Baseboard heaters add warmth to a room, but their long, narrow covers can collect dust and debris. Cleaning them regularly helps improve efficiency and air quality. This guide walks through practical steps to safely clean baseboard heaters using common household tools and the right vacuum attachments.
With the right approach, you can remove built-up dust without disassembling the unit. The focus is on gentle brushing, precise suction, and minimizing disruption to nearby walls and furniture.
Quick Answer
Best starter approach: power off the heater, vacuum loose dust with a crevice tool, then use an extendable microfiber duster for hard-to-reach areas. Finish with a damp microfiber cloth if allowed by manufacturer guidelines. Regular maintenance prevents stubborn buildup and keeps rooms feeling fresh.
What You’ll Need
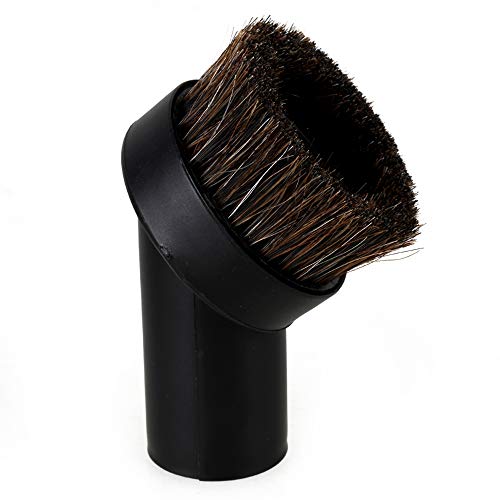
- Baseboard heater dusting brush vacuum attachment
- Extendable microfiber duster for baseboard heaters
- Crevice tool vacuum for baseboards and radiators
- Baseboard heater vent cleaning brush kit
- Baseboard heater cleaning tool set


Before You Start
Turn the heating system off and let the heater cool fully before cleaning. Some models may have sealed components; consult the user manual for any cautions about water or cleaning agents. Protect nearby floors with a drop cloth or old towels to catch dust and debris. Avoid using water directly on electrical components unless the manual permits. Expect 15–30 minutes for a typical cleaning session, longer for larger rooms or heavily dusted bases.
Step-By-Step: How To Clean Baseboard Heaters
- Put on safety gear if needed and ensure the area is well-ventilated. Gather the cleaning tools listed in the What You’ll Need section.
- Remove loose dust by running the crevice tool vacuum for baseboards and radiators along the top edge of the baseboard heater. Move slowly to maximize suction.
- Use the baseboard heater dusting brush vacuum attachment to lift settled dust from the vent slits and grooves. Work from one end to the other in even strokes.
- Extend the extendable microfiber duster for baseboard heaters to reach behind the heater cover and along its bottom edge. Gently sweep dust away from the wall surface.
- Inspect the cleanable vent area. If you notice stubborn dust, use the baseboard heater vent cleaning brush kit to agitate and dislodge particles without bending or breaking the cover.
- For deeper cleaning, remove the heater cover if your model allows it. Clean the inside with light brushing and reattach securely, ensuring no loose parts remain.
- Wipe the exterior with a dry microfiber cloth. If allowed by the manufacturer, lightly dampen the cloth and wipe; avoid excess moisture near electrical components.
- Vacuum again to capture any loosened dust during reassembly. Check for gaps between panels and the wall; reseat any misaligned components.
- Replace the cover and restore power. Observe how the area looks and listen for any odd noises that may indicate a loose part.
- Establish a cleaning routine: light dusting every 1–2 weeks and a deeper clean every 3–6 months, depending on usage and dust levels.
- Document your process so you can reproduce it with similar tools in the future. This helps maintain consistent results.
Troubleshooting
| Symptom | Likely Cause | Fix | Prevention |
|---|---|---|---|
| Dust is not lifting from grooves | Dust has become compacted | Agitate with a vent cleaning brush kit and follow with vacuum | Clean regularly to prevent buildup |
| Needle-like creaks when sweeping | Cover or wall attachment is loose | Power off, reseat components, tighten screws | Inspect during cleaning to catch loose parts early |
| Moisture marks on walls after cleaning | Excess moisture near electrical parts | Use dry microfiber cloth or minimal dampening | Follow manufacturer guidelines on cleaning products |
| Dust persists after vacuuming | Hidden dust behind the end caps | Use extendable duster and vent brush to reach seams | Repeat cleanings on a regular schedule |
Common Mistakes
- Using excessive water near electrical components or inside the heater housing
- Forcing the cover off if it is not designed to be removed
- Rubbing hard against delicate wall surfaces, which can cause scuffs
- Neglecting to unplug the system or turning it back on before all dust is cleared
Tips For Best Results
Choose the right attachments: a baseboard heater dusting brush vacuum attachment and a crevice tool vacuum for baseboards and radiators are especially effective. Maintain a steady cleaning cadence to prevent heavy buildup. When using an extendable tool, keep the wand aligned with the baseboard to avoid bending or denting the wall. If the heater has a stubborn vent, a dedicated baseboard heater vent cleaning brush kit can help dislodge debris without disassembling the unit.
Call A Professional
Call a professional if any of these occur: the heater emits unusual noises after cleaning, there is visible damage to the cover or wiring, you suspect mold growth behind the panel, or if the cover cannot be safely removed without tools you do not have. For energy systems with intricate wiring or sealed components, professional service ensures safety and preserves warranty.
FAQ
How often should I clean baseboard heaters?
Dust lightly every 1–2 weeks and perform a deeper clean every 3–6 months, depending on dust levels and usage.
Can I use water to clean the inside of baseboard heaters?
Only if the manufacturer explicitly allows it. In most cases, use dry methods or a lightly damp cloth recommended by the manual.
What tools help reach tight spaces around baseboard heaters?
A crevice tool vacuum and an extendable microfiber duster are particularly helpful for tight seams and under the cover.
Is disassembly required for cleaning baseboard heaters?
Not always. Many models are cleanable with the cover in place, but some may permit safe removal of the cover for a more thorough clean.
What should I do if dust returns quickly after cleaning?
Check for air leakage, consider upgrading to higher-quality vent brushes, and schedule more frequent cleanings in dusty environments.
Are there safety concerns when cleaning near electrical components?
Yes. Always power down, avoid water near electrical parts, and follow manufacturer guidelines.
Buying Guide
When selecting tools for cleaning baseboard heaters, consider size, compatibility with your heater model, and the cleaning efficiency of attachments. Key buying factors include:
- Size and reach: An extendable duster or wand helps cover long baseboards without moving heavy furniture.
- Attachment variety: A combination of a dusting brush, crevice tool, and vent brush kit increases effectiveness on different surfaces.
- Material quality: Soft bristles prevent wall scuffs, while durable plastics resist cracking with repeated use.
- Noise level: Quieter vacuum attachments are preferable for living spaces and night-time cleaning.
- Energy efficiency: Use handheld or energy-efficient vacuums to minimize power use during routine maintenance.
- Placement and storage: Choose tools with compact storage and quick-access configurations near the cleaning zone.
- Compatibility: Ensure tools fit your vacuum brand and model, and that they can access tight spaces behind end caps.
Thinking through these factors helps match tools to your home’s layout and baseboard heater design. If you have multiple heater types or tricky layouts, a cleaning tool set designed specifically for baseboard heaters can streamline maintenance.