Renovation and construction projects create fine dust, debris, and stubborn residues that cling to surfaces. A structured cleaning approach helps restore a home’s comfort and safety without spreading dust to other rooms. This how-to guide outlines practical steps, tools, and best practices tailored for American households facing post-construction mess.
Quick Answer
Use a staged cleaning plan: seal off dusty areas, remove large debris, and then tackle dust with a HEPA vacuum, microfiber mop, and disposable tack cloths. Finish with plastic drop cloths and a dust barrier kit to keep work zones contained and ready for final cleanup.
What You’ll Need
- HEPA vacuum for post-construction dust cleanup
- Microfiber mop 18 inch for renovation cleanup
- Disposable tack cloths for construction dust
- 6 mil plastic sheeting drop cloths for construction cleanup
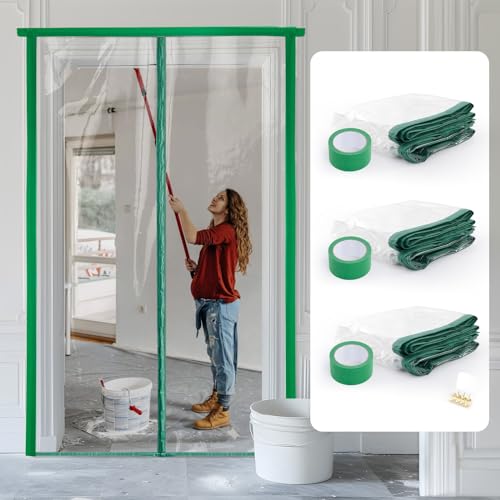
- Dust barrier kit tape and plastic sheeting for post-construction


Before You Start
Plan a clear sequence: protect finished areas, remove loose debris, then focus on dust. Wear a mask and eye protection during cleaning, especially when activities loosen fine particles. Ventilate safely by opening windows but seal off the work zone to prevent dust migration. Estimate roughly 2–6 hours for a typical room, depending on mess level and room size. Prepare a dedicated waste bag for debris and designate a surface-cleaning path to minimize cross-contamination.
Step-By-Step: How To Clean After Construction
- Isolate the work area with dust barrier tape and plastic sheeting to prevent dust from spreading.
- Remove large debris first by hand into a sturdy trash bag or container.
- Vacuum floors and low surfaces with the HEPA vacuum for post-construction dust cleanup, starting from far corners and moving toward the exit.
- Wipe high surfaces with the disposable tack cloths for construction dust to trap fine particles you may have missed with the vacuum.
- Dust horizontal surfaces, then switch to vertical areas such as window sills and door frames, using the tack cloths for stubborn residues.
- Mop floors with the microfiber mop 18 inch for renovation cleanup, using a light mist of water or approved cleaner as needed. Rinse and wring frequently to prevent re-depositing dust.
- Replace drop cloths and seal off cleaned sections with fresh plastic sheeting if more cleaning or renovation work is pending.
- Inspect corners, vents, and ceiling joists for lingering dust; repeat vacuuming and mopping as necessary.
- Dispose of used tack cloths, plastic coverings, and other waste in accordance with local regulations for construction debris.
- Perform a final wipe-down with a fresh tack cloth on all touched surfaces to ensure a dust-free finish before moving furniture back.
- Conduct a final pass with the HEPA vacuum to capture any remaining particles released during cleaning.
- Document any spots that require touch-up painting or sealing to complete the project and prevent future dust migration.
Troubleshooting
| Symptom | Likely Cause | Fix | Prevention |
|---|---|---|---|
| Dust returns after cleaning | New dust from ongoing work or HVAC recirculation | Pause cleaning until activity stops; seal HVAC registers; reseal work zones | Use barriers and frequent HEPA vacuuming during projects |
| Vacuum clogs frequently | Nose heavy debris or inappropriate filter | Clean or replace filter; empty canister; clear nozzle | Pre-clean larger particles with a dust brush |
| Streaky or dull floors after mopping | Excess water or dirty mop head | Rinse mop thoroughly; use minimal water on wood or laminate floors | Change mop water often and follow manufacturer recommendations |
| Visible dust on windows after cleaning | Fine particles airborne during work | Use tack cloths on frames; finish with a final HEPA wipe | Seal off windows during renovation |
Common Mistakes
- Cleaning in the wrong order—starting with the floor before sealing off the area can spread dust.
- Over-wetting wood floors or porous surfaces during mopping.
- Not changing disposable materials frequently, leading to cross-contamination.
- Ignoring air returns and vents that recirculate dust through living spaces.
Tips For Best Results
- Use a fresh disposable tack cloth for each surface to maximize dust capture.
- Work from the farthest corner toward the exit to avoid stepping on cleansed areas.
- Inspect the work area under different lighting to spot hidden dust and debris.
- Label and store protective barriers so they’re ready for future maintenance projects.
- Schedule a quick post-clean scent check or light air-out after sealing barriers for a more comfortable space.
Call A Professional
Consider a professional if the project generates extensive fine dust and you lack quick access to a high-quality HEPA vacuum or barrier materials. Stop and call a pro if you notice persistent respiratory irritation, signs of mold, or water damage that requires remediation beyond cleaning.
FAQ
What is the best order for post-construction cleaning?
First seal and contain the work area, remove large debris, vacuum with a HEPA unit, wipe surfaces with tack cloths, mop floors, and perform a final dust check.
How often should I change tack cloths during cleanup?
Change as soon as they become clogged or visibly dirty to prevent redistribution of dust.
Can I use household cleaning products for post-construction cleanup?
Use mild cleaners recommended for the surface type; avoid over-wetting and strong detergents that may leave residues on finishes.
Is a Dust Barrier Kit essential for every renovation?
It is highly recommended to minimize cross-contamination and protect adjacent living spaces during renovation work.
What maintenance is needed after cleanup?
Inspect vents and filters; vacuum HVAC intake areas to prevent returning dust; reseal barriers if moisture has weakened plastic.
How long does post-construction cleaning typically take?
Most rooms take 2–6 hours depending on size and dust level, with larger spaces needing more time.
Should I hire a professional for cleanup after major construction?
Yes, for extensive dust or complex spaces, or when specialized equipment is preferred for best results.
Buying Guide
Choosing the right cleaning setup after construction means balancing effectiveness, ease of use, and safety. Key buying factors include equipment capability, material compatibility, and how well the tools fit your space. For most American homes, a dedicated post-construction cleaning kit containing a HEPA vacuum, microfiber mop, disposable tack cloths, and plastic barrier materials provides the best results. Consider your room layout and whether you need portable, easy-to-maneuver gear or heavier-duty options for larger projects.
Size and coverage matter: select a vacuum with an adjustable suction setting and a reach that can handle ceilings, corners, and stair landings. Noise level also matters for homes with sensitive occupants; look for units marketed as quiet or designed for residential use. Energy efficiency helps reduce running costs over multiple cleaning sessions. Check compatibility with recommended cleaning fluids or damp-mop methods to protect wood, tile, and laminate finishes.
Controls and maintenance should be straightforward: look for clear filter indicators, easy bag or canister emptying, and accessible replacement parts. Placement considerations include storing gear in a central, accessible closet and using portable barriers to quickly segment work zones. If multiple rooms are involved, a modular approach with separate barrier sets may save time and effort. Finally, assess the availability of compatible accessories like extra HEPA filters, mop heads, and barrier tape for future renovations.