Plastic surfaces can accumulate fine scratches over time, affecting clarity and aesthetics. With the right approach, many shallow scratches can be significantly reduced or eliminated using consumer-friendly tools and materials. This guide provides a practical, step-by-step method tailored for American households and DIY enthusiasts.
Whether you’re repairing a plastic dashboard, smartphone case, or decorative acrylic panel, the goal is to restore gloss without creating new swirl marks. The process relies on controlled abrasion and careful polishing to blend scratches with surrounding material.
Quick Answer
Use a plastic scratch remover kit with polishing compound and a dual action polisher for best results on larger surfaces. For smaller areas, a plastic polish kit with microfiber cloths can work well. Always test in a hidden spot first and work gradually to avoid further damage.
What You’ll Need
- Plastic scratch remover kit with polishing compound
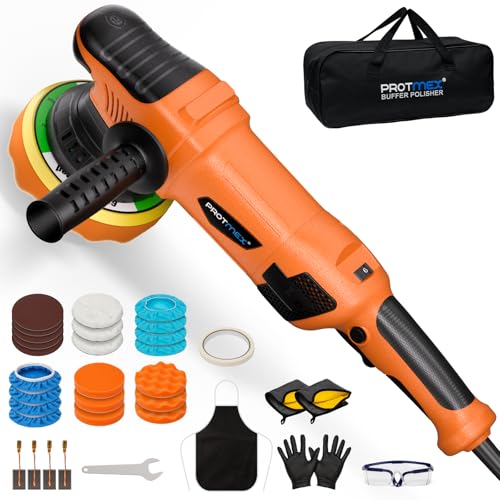
- Dual action polisher for plastic surfaces
- Plastic polish kit with microfiber cloths
- Microfiber polishing cloths for plastic restoration
- Foam buffing pads for plastic scratch repair


Before You Start
Assess the scratch depth before proceeding. Surface contamination should be minimized by cleaning the area with a gentle soap and water solution, then drying thoroughly. Work in a shaded, dust-free area to prevent debris from embedding in the polish. Time estimates vary by area and scratch severity, generally ranging from 15 to 60 minutes per section. Avoid aggressive rubbing or high heat, which can melt or warp plastics.
Safety notes: wear eye protection and, if working on automotive interiors, ensure the vehicle is cool. For electronics enclosures, avoid moisture near electronic components. If the surface is a critical component (airbags, instrument panels), consider professional repair.
Step-By-Step: How To Remove Scratches From Plastic Surfaces
- Prepare the surface by cleaning with a mild soap solution and drying completely; remove any wax or residues that could interfere with polishing.
- Inspect the scratch with a light angle to determine whether it is a surface defect or a through-scratch; document the most affected area for consistent results.
- Apply a small amount of plastic scratch remover kit with polishing compound to a foam buffing pad and mount the pad on the dual action polisher set to a low speed.
- Gently work the damaged area in a circular motion, maintaining light pressure and overlapping passes to avoid creating new scratches.
- Periodically wipe away residue with a clean microfiber cloth to check progress and avoid buildup that could obscure results.
- Switch to a finer polishing compound or plastic polish kit with microfiber cloths for progressively smoother finishes; continue until the scratches become less visible.
- Buff with a clean microfiber cloth to remove any polishing dust and reveal the restored gloss; inspect from multiple angles for uniformity.
- If deeper scratches persist, repeat the process with lower aggressiveness and shorter dwell times on the polishing pad to prevent haze.
- Finish with a dedicated microfiber polishing cloths for plastic restoration and, if desired, a UV-protective spray to guard against future damage.
- Document the results and store all tools cleanly; return pads and cloths to their protective sleeves after cooling.
- For large flat panels, consider a foam buffing pads for plastic scratch repair kit to ensure even coverage and steady results across the surface.
Troubleshooting
| Symptom | Likely Cause | Fix | Prevention |
|---|---|---|---|
| Hazy or milky finish | Over-polishing or abrasive haze | Switch to a finer polish; wipe clean and re-buff | Use correct pad speed and product for the plastic type |
| New swirl marks | Too much pressure or dirty cloth | Lighten touch; use fresh microfiber | Inspect cloth condition; clean surface frequently |
| Scratch not improving | Deep through-scratch or wrong product | Reassess depth; consider professional repair | Test on inconspicuous area first |
| Surface feels rough after polish | Residual compound left on surface | Wipe with microfiber dampened with water | Clean thoroughly after each step |
| Discoloration after polishing | Wrong product for plastic type | Switch to a plastic-safe polish | Check product compatibility with plastic makeup |
Common Mistakes
- Using brute force or high heat to “polish out” scratches
- Skipping test spots or using the same pressure across a large area
- Failing to clean dust and debris before polishing, causing new scratches
- Using household cleaners that contain ammonia or acetone on certain plastics
These missteps can deepen defects or create hazy surfaces; methodical steps and proper products mitigate risks.
Tips For Best Results
- Always start with the mildest product and lowest pressure; you can increase gradually if needed.
- Use dedicated microfiber cloths for plastic restoration to avoid lint and micro-scratches.
- Keep the surface cool and shaded to prevent heat-softening plastics during polishing.
- Test a small, inconspicuous area before applying to the entire surface.
- Store polish and pads clean and dry between uses to maintain performance.
Call A Professional
If the scratch is deep, if the surface is critical (such as automotive interior panels near airbags or aircraft-grade plastic), or if attempts at home polishing fail to produce a satisfactory result, it is prudent to contact a qualified technician. Signs to seek professional help include visible deep gouges, color mismatch after polishing, or suspected structural damage.
FAQ
Can all plastic scratches be removed with home products?
Most surface-level scratches can be reduced or removed with a dedicated scratch remover kit and proper polishing technique. Deeper gouges may require professional refinishing or replacement.
What is the best method for large plastic surfaces?
Use a dual action polisher with a foam buffing pad and a progression of polishing compounds, starting with a gentler compound and moving to a finer polish.
Are microfiber cloths necessary?
Microfiber cloths minimize new scratches and help achieve a uniform finish, especially when paired with the right polishing compounds.
How can I protect plastic surfaces after restoration?
Apply a UV-protective or anti-scratch sealant and avoid abrasive cleaners to prolong the restored appearance.
Buying Guide
When choosing products to remove scratches from plastic, consider size and scope. For small touch-ups, a compact plastic polish kit with microfiber cloths set may suffice, while larger areas benefit from a dual action polisher for plastic surfaces paired with a complete plastic scratch remover kit with polishing compound. Noise level and motor performance matter for frequent or long sessions in indoor spaces. Energy efficiency is less critical for hand tools, but a well-designed polisher reduces heat buildup and fatigue. Controls should be intuitive, with variable speeds to adapt to different plastic types. Placement considerations include access to the surface, ventilation for polish fumes, and a clean, stable work area. To compare options, assess: surface type (Acrylic, polycarbonate, ABS), scratch depth, and desired finish (glossy vs. satin). For best results, match tools to the material and follow the manufacturer’s instructions to minimize risk and maximize clarity. Are you working on a dashboard, a phone case, or a decorative panel? Choose a kit that covers the applicable surface and includes compatible pads and cloths for consistent results.