Cleaning the ceiling of a car, known as the headliner, can improve the cabin’s appearance and air quality. This guide explains a safe, effective method using commonly available detailing tools and fabrics designed for automotive interiors. It covers preparation, steps, troubleshooting, and practical tips for best results.
Quick Answer
Gently vacuum the headliner, apply a fabric-safe cleaner with a microfiber brush, and blot with a clean microfiber cloth. Avoid saturating the material; work in small sections and allow it to dry completely before use.
What You’ll Need
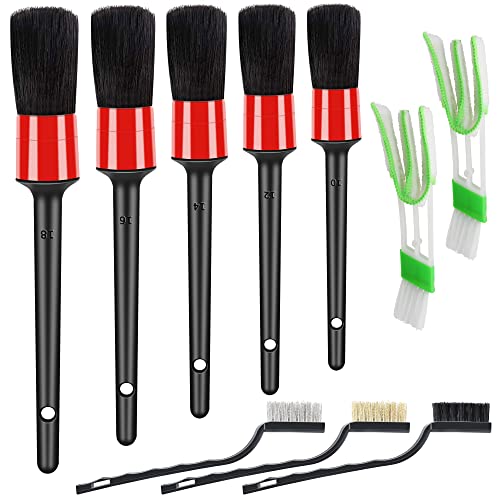
- Car headliner cleaning kit microfiber brush
- Automotive interior detailing brush set fabric headliner
- Microfiber cloth set for car headliner cleaning
- Car interior vacuum with crevice tool and brush for headliner
- Fabric stain remover spray for car headliner


Before You Start
Prepare a clean, well-lit workspace with doors open or in a well-ventilated area. Protect surrounding surfaces with old towels or drop cloths. Perform a small test on an inconspicuous area of the headliner to check for colorfastness. Do not over-wet the fabric, as excessive moisture can cause sagging or mold. Start early in the day to ensure complete drying time.
Step-By-Step: How To Clean The Car Headliner
- Remove loose debris by gently brushing the headliner with a soft automotive brush to lift dust and dirt before damp cleaning.
- Vacuum the headliner with a car interior vacuum along the nap direction to avoid pressing dirt deeper into the fabric.
- Lightly mist a fabric-safe cleaner onto a microfiber brush or cloth; never soak the headliner. Work in small, 6–8 inch sections.
- Gently blot or brush the stained areas with the microfiber brush set designed for headliner cleaning, using a circular or linear motion depending on the fabric texture.
- For stubborn stains, apply a fabric stain remover spray sparingly to a microfiber cloth and dab the area, avoiding oversaturation.
- Continue in sections until the entire headliner is treated, reloading the cloth frequently to prevent transferring dirt back onto the surface.
- Wipe away any cleaner residue with a clean, dry microfiber cloth, ensuring you lift rather than push dirt toward the fibers.
- Allow the headliner to air-dry completely. If needed, use a fan to speed up drying while keeping the car doors open for ventilation.
- Inspect for any remaining stains and repeat the process if necessary, using the least amount of moisture possible.
- Finish by performing a light vacuum over the headliner once it is dry to re-fluff fibers and remove any residual dust.
- Return accessories to their storage, and resume normal driving once everything is fully dry.
Troubleshooting
| Symptom | Likely Cause | Fix | Prevention |
|---|---|---|---|
| Headliner remains damp after cleaning | Over-wetting or inadequate ventilation | Increase airflow, use a fan, and allow more drying time | Use minimal moisture; test cleaner on a small area first |
| Stains reappear after drying | Deep-set stain or fabric bleed | Apply stain remover more directly to stain and blot carefully | Choose a fabric-safe stain remover suited for headliners |
| Discoloration or fading | Harsh cleaner or excessive brushing | Switch to milder cleaner and gentler brush | Always spot-test and minimize agitation |
| Lint or fibers shed after cleaning | New cleaning cycle | Vacuum again with a gentle setting | Use high-quality microfiber products |
Common Mistakes
- Using harsh or overly strong cleaners on the headliner fabric
- Saturating the fabric with water or cleaner
- Brushing too aggressively, causing fiber distortion
- Neglecting to dry completely, leading to mold or odor
Sticking to fabric-safe products and gradual, low-moisture techniques helps avoid these issues and preserves the headliner’s appearance.
Tips For Best Results
- Test cleaners on hidden areas to ensure the color remains uniform.
- Use a dedicated car headliner cleaning kit or fabric-specific products for reliability.
- Work in a cool, shaded area to prevent faster drying in direct sun, which could set stains.
- Lightly brush in one direction to maintain the headliner’s texture and avoid fiber damage.
- Keep cleaners in a reusable spray bottle for controlled application.
Call A Professional
Consider professional help if the headliner is sagging, heavily stained, or if cleaning could risk fabric damage. Stop-and-go odors, persistent mold, or structural issues warrant trained attention. If you notice foul smells after cleaning or the fabric shows signs of separation, contact an automotive interior specialist.
FAQ
Is it safe to use household cleaners on a car headliner?
Household cleaners can be too harsh for headliners. Use fabric-safe automotive cleaners and follow spot-test guidelines.
How long does a headliner take to dry after cleaning?
Drying times vary by humidity and airflow but typically range from 2 to 8 hours. Faster drying with ventilation helps.
Can I use a steam cleaner on the headliner?
Steam can risk fabric damage or adhesive failure. Use only products designed for automotive fabrics and low-moisture methods.
What if the headliner sags after cleaning?
Cleaning should not cause sagging. If sag occurs, consult a professional for reattachment or replacement options.
Are microfiber products necessary?
Microfiber supplies are highly effective for gentle cleaning and lint-free finishing, making them a preferred choice.
Will cleaning remove all stains?
Many stains lift with proper technique, but deep-set or dyed stains may require professional remediation.
Should I vacuum before or after cleaning?
Vacuum before cleaning to remove loose dust, then vacuum again after drying to lift fibers.
How can I prevent future staining?
Use protective fabric-safe sprays and address spills promptly to minimize set-in stains.
Buying Guide
When selecting tools for cleaning a car headliner, consider size, noise, and compatibility with automotive fabrics. Look for a dedicated car headliner cleaning kit with a microfiber brush, a fabric headliner brush set, and a microfiber cloth set. A vacuum with a crevice tool and brush attachment tailored for headliners helps reach tight areas. Opt for a fabric stain remover spray formulated for automotive interiors. Consider the following factors to compare options effectively:
- Headliner compatibility: Ensure cleaners and brushes are labeled safe for fabric headliners and adhesives
- Tool quality: Durable brushes and lint-free microfiber cloths prevent fiber damage
- Moisture control: Low-moisture methods reduce risk of sagging and mold
- Ease of use: Ergonomic handles and clear instructions improve results
- Drying aids: Airflow accessories or fans can accelerate drying
Access to a complete kit that combines these components often yields consistent results. If choosing partially, prioritize a quality microfiber cloth set, a gentle fabric cleaner, and a dedicated headliner brush. For garages with frequent interior detailing, a compact vacuum with a crevice tool enhances versatility. Consider the typical vehicle size and headliner fabric type to guide selection, and ensure replacement parts are readily available if needed.