Stained caulk in a shower not only looks unappealing but can harbor mold and mildew. This guide walks American homeowners through safe, practical steps to restore caulk color and cleanliness using common tools and cleaners. By following a structured process, you can improve shower hygiene and extend caulk life without a full remodel.
Effective caulk cleaning combines stain removal, gentle scraping, and timely maintenance. The goal is to remove discoloration, prevent regrowth, and keep the silicone caulk flexible. The methods below emphasize accessibility, using tools many households already own and a targeted set of cleaners designed for bathroom surfaces.
Quick Answer
To address stained caulk in a shower, start with an equal mix of baking soda and water or a dedicated mildew remover spray for shower caulk stains. Apply, let sit, scrub with a grout and caulk cleaning brush, then rinse. For stubborn stains, use a razor blade silicone caulk removal shower or a caulk remover tool bathroom silicone shower, followed by reapplication of new caulk if needed.
What You’ll Need
The following tools and consumables cover common staining situations and provide options for different levels of buildup.
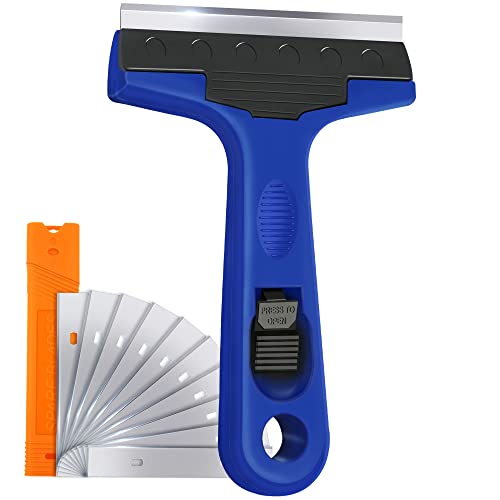
- Caulk remover tool bathroom silicone shower
- Razor blade silicone caulk removal shower
- Caulk scraper tool replacement blades for shower
- Grout and caulk cleaning brush shower scrubber
- Mold and mildew remover spray for shower caulk stains
- All-purpose bathroom cleaner or white vinegar
- Rubbing alcohol or hydrogen peroxide (optional)
- Silicone sealant and caulk for replacement (if re-caulking is needed)


Before You Start
Checklist and cautions help ensure safe, effective cleaning. Clear the shower, ventilate the bathroom, and protect skin and eyes. Test cleaners on a small area to avoid damage to paint or tiles. For porous or older caulk, plan for possible replacement rather than deep staining removal to maintain water sealing. Time estimates vary from 30 minutes for light staining to 2 hours for heavy buildup, plus cure time if re-caulking is required. Critical cautions: avoid metal tools that can scratch grout or tile; never mix bleach with ammonia; use gloves and eye protection when handling powerful cleaners.
Step-By-Step: How To Clean Stained Caulk In Shower
- Ventilate the bathroom and remove shower items. Sweep or wipe the area to prepare a dry working surface.
- Apply a mold and mildew remover spray for shower caulk stains to the discolored caulk line. Let it sit per label directions to penetrate the stain.
- Scrub the caulk with a grout and caulk cleaning brush shower scrubber, focusing on the most stained sections. Use light, circular motions to avoid damaging silicone.
- Rinse with warm water and inspect progress. Repeat the cleaner application if staining remains visible.
- If stains persist, gently score the caulk line with a razor blade silicone caulk removal shower or a caulk remover tool bathroom silicone shower. Work slowly to avoid gouging the surface.
- Wipe away residue and dry the area. If staining remains, apply white vinegar or rubbing alcohol to a cloth and rub along the caulk joint to lift remaining color.
- For stubborn, deeply-set stains, consider replacing caulk. Remove old silicone with a caulk scraper tool replacement blades for shower, then clean the joint thoroughly before applying new bead of silicone caulk.
- Re-caulk if needed. Clean the joint, apply the new bead evenly, smooth with a caulk smoothing tool or finger dipped in soapy water, and allow proper cure time as directed by the product.
- Return items to the shower and monitor the joint for new mold growth. Regular cleaning every few weeks helps prevent recurrence.
- Establish a maintenance routine using a quick spray cleaner after each shower to slow future staining.
- Dispose of disposable materials and store tools in a dry area to prevent corrosion or mildew growth.
- Document steps and results for future reference, especially before attempting major replacements.
Troubleshooting
| Symptom | Likely Cause | Fix | Prevention |
|---|---|---|---|
| Stains return within a week | Moisture buildup and mold growth | Use mold and mildew remover spray, re-clean monthly | Improve ventilation, dry shower after use |
| Caulk feels tacky after cleaning | Soap or cleaner residue | Rinse thoroughly, wipe dry, consider alcohol wipe | Rinse completely after cleaning |
| Caulk peels after re-caulking | Improper surface prep | Remove old caulk fully, clean, and dry before applying new bead | Follow manufacturer curing times and pressure constraints |
| Scratching on tiles | Aggressive tools | Switch to softer scrubbing tools; avoid metal blades | Use gentle methods on delicate surfaces |
Common Mistakes
- Using abrasive scrubs on silicone caulk—causes micro-scratches and gaps.
- Neglecting ventilation—leads to rapid mold regrowth.
- Rushing the cure time when re-caulking—results in weak seals.
- Mixing incompatible cleaners—produces harmful fumes or reactions.
Tips For Best Results
- Test any cleaner on a small area first to confirm no discoloration.
- Choose a silicone-based caulk for better water resistance in showers.
- Apply a thin, even bead of caulk when replacing; avoid gaps that trap moisture.
- Consider routine spray cleaners designed for bathrooms to reduce staining frequency.
Call A Professional
Seek professional help if caulk shows visible cracking, large gaps, or persistent mold despite multiple cleaning efforts. Signs warranting a pro include extensive water damage behind tiles, compromised mold coverage beyond surface joints, or repeated failure after re-caulking.
FAQ
What is the best cleaner for stained shower caulk?
Dedicated mildew removers or a baking soda paste provide effective stain lifting without harsh abrasives.
How often should caulk be replaced in a shower?
Typically every 5–10 years depending on wear, moisture exposure, and cleaning frequency.
Can I reuse old caulk removal tools?
Yes, but replace blades or heads as needed to ensure clean removal without damage.
Is repainting the area an option for stained caulk?
Repaint is not suitable for silicone caulk joints; replacement with new caulk is usually required for a proper seal.
Buying Guide
When choosing products to tackle stained caulk in a shower, consider size, noise level, energy efficiency, controls, and placement. For tools, lightweight caulk remover tools and replacement blades reduce fatigue during a project. Look for non-abrasive brushes designed for grout and caulk cleaning to protect silicone. For cleaners, opt for mildew-targeted formulas with proven bathroom performance and minimal fumes. Consider placement: tools and cleaners that fit easily around a standard bathtub edge or shower niche help keep cleanup practical and accessible. Compare options by durability, ease of use, and the ability to restore seal integrity without exhaustive effort.