Mold growth in the detergent dispenser of a washer is a common issue, especially in homes with high humidity or frequent use of liquid detergents. Regular cleaning helps prevent odors and residue that can transfer to laundry. This guide provides practical steps and safe products to tackle mold effectively in American households.
Quick Answer
Immediately remove the dispenser, rinse with warm water, spray with a mold-killing cleaner, scrub with the right brush, and dry completely before reassembly. Repeat periodically to maintain a clean dispenser and prevent future mold buildup.
What You’ll Need
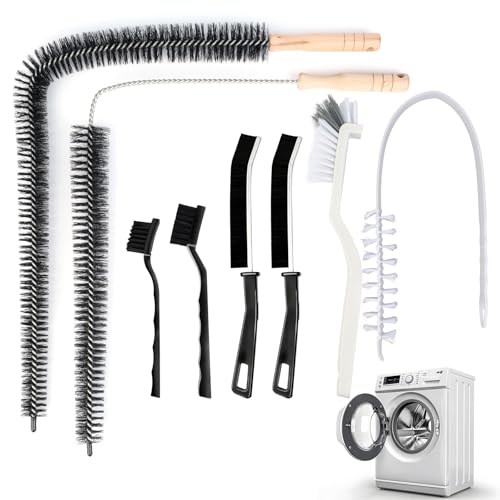
- washing machine detergent dispenser cleaning brush
- front load washer gasket cleaning brush
- appliance cleaning brush set
- scrub brush with long handle for washing machine
- narrow nozzle spray bottle for appliance cleaning


Before You Start
Before beginning, check your washer’s manual for disassembly instructions and avoid using aggressive or abrasive cleaners that could damage plastic parts. Plan for a 20–40 minute cleaning session, depending on the dispenser design. Unplug the machine if accessible and wear gloves to protect hands from cleaning solutions. Ensure the area around the washer is dry to prevent slips during the process.
Critical cautions: do not use chlorine bleach on finished metal components, and avoid aggressive scrubbing on delicate seals. If the dispenser is sealed or integrated in a way that seems difficult to remove, consult a professional before forcing any parts apart.
Step-By-Step: Clean Mold From Detergent Dispenser
- Turn off and unplug the washer; remove the lint filter if applicable, and access the dispenser tray.
- Detach the detergent dispenser according to the manual, keeping track of any small screws or clips.
- Rinse the dispenser under warm water to loosen loose residue, then apply a mild cleaning solution suitable for plastics.
- Use the washing machine detergent dispenser cleaning brush to scrub all crevices, taking care around small channels where mold hides.
- For tight spots, use the front load washer gasket cleaning brush to clean around seals and edges that may harbor mold spores.
- Rinse thoroughly with warm water; spray with a narrow nozzle spray bottle for appliance cleaning to target stubborn mold in hard-to-reach areas.
- Soak the dispenser in a diluted disinfectant recommended for kitchen/bath plastics for 5–10 minutes, then scrub again and rinse completely.
- Let the dispenser air-dry completely on a clean towel before reinstalling it into the washer.
- Wipe the surrounding detergent drawer and drawer slot with the same cleaning solution to prevent reintroduction of mold.
- Run a maintenance wash or empty cycle with hot water and a mild cleaner to flush out any remaining mold spores from the internal passages.
- Reassemble the dispenser and run a test cycle with soiled laundry to confirm that no odors or residues remain.
Troubleshooting
| Symptom | Likely Cause | Fix | Prevention |
|---|---|---|---|
| Mild odor after cleaning | Residual mold or soap scum | Re-clean with a stronger cleaner and rinse thoroughly | Clean monthly; use less soap by following detergent guidance |
| Mold reappears in dispenser | Moist environment and missed spots | Re-disassemble and thoroughly scrub all corners | Leave drawer slightly open after use to promote drying |
| Dispenser remains blocked | Clogged channels | Use a flexible brush to clear channels | Regularly inspect and clean |
| Water leaks when dispenser is removed | Loose connections or damaged seals | Inspect seals and reinstall firmly | Handle with care; replace worn seals |
Common Mistakes
- Skipping the descaling step and reusing moldy components
- Using harsh bleach on plastics or metal parts
- Rushing the drying step, leaving moisture behind
- Forcing parts apart without consulting the manual
Tips For Best Results
- Establish a monthly cleaning routine for the detergent dispenser area to prevent mold buildup.
- Opt for a narrow nozzle spray bottle for appliance cleaning to reach tiny crevices without over-wetting surrounding components.
- Use warm water rather than hot water on plastic components to reduce the risk of warping.
- Keep the area around the dispenser dry by wiping up spills immediately after laundry cycles.
- Label screws or small parts to simplify reassembly if you disassemble multiple sections.
Call A Professional
Seek professional help if the dispenser cannot be removed safely, if mold covers large portions of the internal plumbing, or if repeated cleaning does not eliminate odors. Also contact a pro if you notice persistent leaks, unusual noises, or visible corrosion on metal components.
FAQ
How often should I clean the washer detergent dispenser?
Clean every 1–3 months, or more frequently if you use liquid detergents or have high humidity.
Can I use bleach to clean the dispenser?
Bleach is generally not recommended for plastic dispenser parts; use a mild cleaner suitable for plastics and follow the manufacturer’s guidelines.
What cleaners are safe for the gasket around the dispenser?
Use non-abrasive cleaners designed for appliance gaskets and plastics, avoiding solvents that can degrade rubber seals.
Is it necessary to run a maintenance cycle after cleaning?
Yes, running an empty hot-water cycle with a mild cleaner helps flush remaining residues and improve sanitation.
What if mold returns between cleanings?
Increase cleaning frequency, ensure the area dries properly after each cycle, and inspect for hidden mold in the internal plumbing or seals.
Can I reuse the same cleaning brushes for different parts?
Yes, if properly cleaned and dried, but designate brushes by area to prevent cross-contamination.
Buying Guide
When shopping for tools to clean a washer detergent dispenser, consider these factors to maximize effectiveness and ease of use.
- <bSize and compatibility: Choose brushes that fit the dispenser design and drawer slots; compact brushes work well for tight channels.
- <bNoise level and durability: Durable, ergonomic brushes with firm bristles help remove tough buildup without bending.
- <bEnergy efficiency of your cleaning routine: Regular, short cleanings reduce heavy, energy-intensive scrubs and prevent residue buildup.
- <bControls and ease of use: Simple brushes with long handles for reach and narrow nozzles for targeted spray improve efficiency.
- <bPlacement: Store cleaning tools in a dry area near the laundry room to encourage routine maintenance.
Thinking about options like an appliance cleaning brush set or a scrub brush with long handle for washing machine can streamline the process. Compare bundles that include a narrow nozzle spray bottle for appliance cleaning to concentrate cleaning solutions where needed. If you prefer a compact, one-spot kit, look for bundles that cover both dispenser cleaning and gasket areas.