Keeping a bathroom vent clean improves airflow, reduces humidity, and helps prevent mold growth. This guide walks through a practical, step-by-step process that uses common tools and purpose-built cleaning gear to restore your bathroom exhaust system’s performance.
Regular maintenance can extend the life of the fan and ductwork while keeping the bathroom smelling fresh. The steps below are designed for standard residential bathroom vents and assume the fan is accessible from above the ceiling or behind a wall vent cover.
Quick Answer
Best quick method: Turn off power, remove the vent cover, wipe loose dust, use a dedicated bathroom exhaust fan cleaning kit and exhaust fan cleaning brush to scrub blades, finish with a bathroom vent cover cleaning tool to clean the cover, then reassemble. If buildup is stubborn, add a duct cleaning brush for bathroom vent to clear ducts from the access point.
What You’ll Need
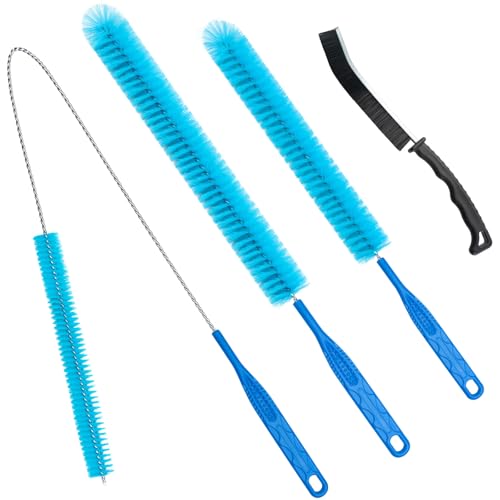
- Bathroom exhaust fan cleaning kit
- Exhaust fan cleaning brush
- Duct cleaning brush for bathroom vent
- Bathroom vent cover cleaning tool
- Bathroom exhaust fan dust remover
- Personal protective gloves and eye protection
- Old towels or a drop cloth
- Flashlight or headlamp


Before You Start
Preparation helps prevent damage and ensures a thorough clean. Turn off the circuit breaker feeding the bathroom fan to avoid accidental startup. If your fan is hardwired or located in a ceiling cavity, consider temporarily shutting off the area’s power at the main panel.
Inspect the vent cover and surrounding area for moisture or mold. If mold is present, address it with appropriate cleaning practices or consult a professional. Ensure the bathroom is well ventilated during cleaning to avoid inhaling dust.
Estimated time: 30–90 minutes depending on access and duct length. Plan for a dry environment and have towels ready to catch debris.
Step-By-Step: How To Clean A Bathroom Vent
- Remove the vent cover carefully. Use a screwdriver if needed and set screws aside in a safe place.
- Check the interior for loose dust and debris. Wipe accessible surfaces with a damp cloth to prevent dust from dispersing during deeper cleaning.
- Use a bathroom exhaust fan dust remover or a damp microfiber cloth to remove loose dust from the fan blades and housing.
- Attach the exhaust fan cleaning brush to a handle or extendable pole and gently scrub the fan blades, motor housing, and any accessible surfaces. Avoid applying excessive pressure near electrical components.
- If buildup persists, insert the duct cleaning brush for bathroom vent through the duct opening and gently rotate to dislodge caked dust. Work from the access point to the duct direction, stopping if resistance is felt.
- Wipe down the vent cover again after brushing. For a thorough job, use the bathroom vent cover cleaning tool to reach into slats, louvers, or grille pockets.
- Clean the vent cover completely, then let it dry. Reattach the cover securely, ensuring a snug fit to prevent rattling or air leaks.
- Restore power and briefly run the fan to confirm airflow is smooth and quiet. Listen for unusual noises that might indicate loose components.
- Replace any worn seals or gaskets if visible. Consider scheduling regular cleanings every 3–6 months depending on usage and humidity.
- Keep a routine by wiping down the vent area after showers and maintaining a dust-free bathroom to reduce buildup over time.
Troubleshooting
| Symptom | Likely Cause | Fix | Prevention |
|---|---|---|---|
| Weak airflow | Ducts clogged with dust | Use the duct cleaning brush for bathroom vent and clean ducts from access point | Regular cleaning schedule, replace or seal leaks |
| Unusual noises | Loose cover or mounting hardware | Tighten screws, reseat vent cover | Check fasteners during routine maintenance |
| Moisture on ceiling around fan | Leaky duct seal or condensation | Inspect seals, reseal with appropriate duct sealant | Improve bathroom humidity control |
| Persistent mold or mildew | Moist environment and organic buildup | Deep clean with approved cleaners and ensure adequate ventilation | Ventilate during and after showers, replace filters if present |
Common Mistakes
- Using water directly on electrical components or the motor—risk of shock.
- Forcing brushes into tight spaces, which can damage the fan or ductwork.
- Forgetting to turn off power before starting the cleaning process.
- Neglecting the vent cover—dust on grilles reduces airflow efficiency.
- Overlooking mold or moisture—address promptly to avoid spread.
Tips For Best Results
- Schedule cleanings seasonally or when humidity is high to prevent buildup.
- Use a well-fitting vent cover that’s easy to remove and clean.
- Keep spare cleaning brushes on hand for quick maintenance between deeper cleans.
- Wear protective gloves to avoid skin irritation from dust and cleaners.
- Label screws and parts to simplify reassembly after cleaning.
Call A Professional
Consider a professional if the fan is difficult to access, if you notice persistent mold growth, or if cleaning does not restore airflow after multiple attempts. Stop work and consult a licensed HVAC technician if you detect buzzing, burning odors, smoke, or if you suspect electrical issues.
FAQ
How often should I clean a bathroom vent?
Most homes benefit from cleaning every 3–6 months, with more frequent cleaning in high-humidity bathrooms or households with long, airing down periods.
Can I use household cleaners on the fan?
Yes, use mild cleaners and a damp cloth on non-electrical components. Avoid getting cleaners on the motor or electrical parts.
Is it safe to clean the duct myself?
It is safe if you access ducts from a reachable point and follow safety steps. If ducts run through walls or ceilings, professional cleaning may be necessary.
What if the vent cover is painted shut?
Gently pry it loose with a tool or contact a professional to avoid damaging the cover or grille.
Should I replace the exhaust fan or vent cover after cleaning?
Replacement is only necessary if parts are damaged or the fan is old and inefficient. Cleaning can extend the life of current components.
Buying Guide
When choosing tools for bathroom vent cleaning, consider size, compatibility, and ease of use. Typical households benefit from a bathroom exhaust fan cleaning kit that includes brushes and cleaning solutions sized for standard fan housings. Look for long-handled or extendable brushes to reach into ducts without dismantling too much.
Key factors to compare:
- Size and reach: Ensure brushes and tools can fit into your fan housing and through access points.
- Brush density and stiffness: Softer bristles for delicate components; stiffer for baked-on grime on blades.
- Noise level and control: Some fans include built-in speed controls; cleaning should not affect these features.
- Energy efficiency: A clean, unobstructed vent improves efficiency and reduces energy use.
- Controls and compatibility: Tools should work with your fan model and cover design.
- Placement and coverage: Consider whether you can access the vent from above the ceiling or behind the wall, and if you need a flexible rod or corded tool.
For best results, choose a kit and accessories designed for bathroom vents specifically, and ensure you follow product instructions for safe use. If in doubt about your vent’s construction or if access is challenging, a professional cleaning service may be the best option.