Bottom loading water coolers offer convenient access to cold and hot water, but they still require regular cleaning to prevent mineral buildup, mold, and unpleasant odors. This guide provides a practical, step-by-step approach using common tools and a dedicated cleaning kit to keep your unit safe and hygienic.
The process covers sanitizing the reservoir, cleaning the bottle neck and inlet, and addressing the drip tray and nozzles. Following these steps helps extend the life of the unit and maintain water quality for household or office use.
Quick Answer
What you’ll do: Disconnect the cooler, empty reservoirs, mix a sanitizing solution, scrub components with specialty brushes, rinse thoroughly, and dry before reassembling. Use a water cooler cleaning kit and long reach brushes for hard-to-reach areas, then complete a final rinse with clean water.
What You’ll Need
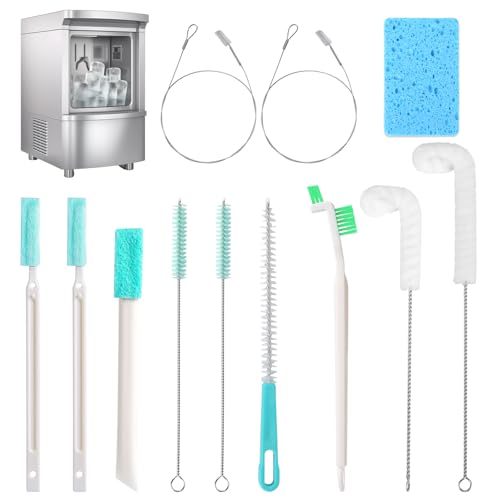
- Water cooler cleaning kit
- Long reach bottle cleaning brush for water cooler
- Spigot cleaning brush for water cooler
- Water cooler reservoir cleaning brush
- Drip tray and nozzle cleaning kit for water cooler


Before You Start
Before beginning, unplug the unit and move it away from walls to access all sides. Remove the bottle and any resevoir caps as per manufacturer instructions. Prepare a sanitizing solution approved for drinking water equipment, or use a vinegar-based mix if recommended by your kit. Allow time for drying after cleaning, typically 1–2 hours. Safety note: Never mix bleach with acidic cleaners, and avoid abrasive scrubbers on delicate surfaces.
Step-By-Step: How To Clean A Bottom Loading Water Cooler
- Detach the water bottle and disconnect power. Place a towel under the unit to catch any spills.
- Prepare the cleaning solution according to the product kit instructions. A mild sanitizing solution is typically recommended for the reservoir and taps.
- Use the reservoir cleaning brush to scrub the interior walls of the reservoir. Refill with clean water and rinse until the water runs clear.
- Insert the long reach bottle cleaning brush through the bottle inlet and neck to scrub the interior surface where residue can accumulate.
- Clean the spigot, handles, and outlet using the spigot cleaning brush to remove any buildup around seals and channels.
- Clean the drip tray and nozzle areas with the dedicated kit tools, paying special attention to corners and drainage paths.
- Rinse all components with clean water. Reassemble the cooler and run several cycles of clean water through the system to purge any remaining cleaning solution.
- Reinstall the bottle, plug in, and verify there are no leaks. Allow the unit to reach operating temperature and confirm steady flow from both hot and cold taps.
Troubleshooting
| Symptom | Likely Cause | Fix | Prevention |
|---|---|---|---|
| Unusual odor after cleaning | Residual cleaning solution or mold in hard-to-reach areas | Rinse thoroughly and repeat cleaning steps on reservoir and nozzles | Regular maintenance schedule; ensure complete drying between uses |
| Water flow is weak from taps | Mineral buildup or clogged spigot | Scrub spigot with cleaning brush; inspect filters if present | Periodic cleaning before buildup occurs |
| Leaks after reassembly | Loose connections or damaged seals | Tighten fittings; replace seals or consult a professional if leaking persists | Inspect seals during every cleaning |
| Discolored water | Stagnant water or mineral deposits | Deep clean reservoir and run multiple rinse cycles | Regular cleaning and immediate attention to any changes in water quality |
Common Mistakes
- Using harsh cleaners that leave residue or react with plastics
- Skipping the rinse step, which can leave taste or odors
- Forgetting to dry all components before reassembly
- Neglecting the drip tray and nozzle areas where mold commonly grows
Tips For Best Results
- Schedule routine cleanings every 1–3 months, depending on usage and water source.
- Label the cleaning cycle to avoid overlapping with water dispensing times.
- Use the exact brush sizes provided by the cleaning kit for optimal reach and sanitation.
- Warm water rinses can help loosen mineral deposits without harming materials.
- Inspect seals and gaskets during each cleaning to catch wear early.
Call A Professional
Consider a professional service if the unit shows persistent leaks, persistent bad taste despite cleaning, or if the reservoir or bottle neck surfaces appear cracked or warped. Stop using the cooler and seek service when there are electrical concerns, unusual noises, or persistent mold growth that resists standard cleaning.
FAQ
How often should I clean a bottom loading water cooler?
Most households and small offices benefit from a cleaning every 1–3 months, with more frequent cleanings in areas with hard water or high usage.
Can I use vinegar to clean my water cooler?
Vinegar is commonly used for descaling, but always check the cleaning kit instructions. Some kits specify milder sanitizers to protect plastic components and seals.
Is it necessary to disinfect after cleaning?
Yes, a sanitizing step helps kill remaining microorganisms. Follow the kit’s guidance for contact time and thorough rinsing.
What if the cleaning kit brushes don’t reach all areas?
Use the long reach bottle cleaning brush and reservoir brush to access tight spaces; if needed, disassemble components per manufacturer instructions.
Can I clean the drip tray without removing the unit?
Yes, most drip trays are removable for easier cleaning. If not, use the nozzle cleaning kit to access and clean the tray area safely.
What signs indicate I should replace seals or gaskets?
Cracked, warped, or permanently stained seals suggest replacement to prevent leaks and contamination.
Buying Guide
When choosing cleaning supplies and accessories for a bottom loading water cooler, consider several factors to ensure compatibility and effectiveness. The right kit and brushes make a big difference in reaching critical areas and preserving the unit’s longevity.
- <bSize and fit: Ensure the cleaning brushes and nozzles are sized for typical water cooler components, including bottle necks and spigots.
- <bNoise level: Cleaning usually generates little noise, but choose a quiet kit if you plan to clean during work or study times.
- <bEnergy and materials: Many cleaning components are plastic-safe and do not affect electrical performance; verify materials are BPA-free where applicable.
- <bControls and compatibility: Some kits are designed for universal use; confirm compatibility with your specific model’s reservoir and nozzle design.
- <bPlacement and storage: Keep cleaning tools organized near the cooler; consider wall hooks or a dedicated tote for easy access.
For a straightforward cleaning routine, stick with a purpose-built water cooler cleaning kit and corresponding brushes. If your unit has unique features or an unusual design, consult the manufacturer’s guidelines or customer support for component-specific guidance. Regular maintenance not only keeps water tasting fresh but also helps prevent costly repairs down the line.