Sun exposure can fade paint, dull clear coats, and degrade interior surfaces over time. This practical guide outlines a step-by-step approach using consumer-friendly tools to restore both the exterior and interior, with emphasis on safe, repeatable techniques suitable for DIY enthusiasts in the United States.
By following the steps below, car owners can address oxidation, yellowing headlights, and UV-damaged dashboards, while keeping the process affordable and straightforward.
Quick Answer
Assess damage, then use a dedicated car paint oxidation remover kit with polishing compound on oxidized exterior panels, restore headlights with a clear coat repair kit, and refresh interior UV-damaged surfaces with a protective spray. A dual action car polisher kit helps apply even pressure, and finishing with a detailing polishing compound kit with microfiber pads ensures a smooth, glossy finish.
What You’ll Need
- Car paint oxidation remover kit with polishing compound
- Headlight restoration kit clear coat repair
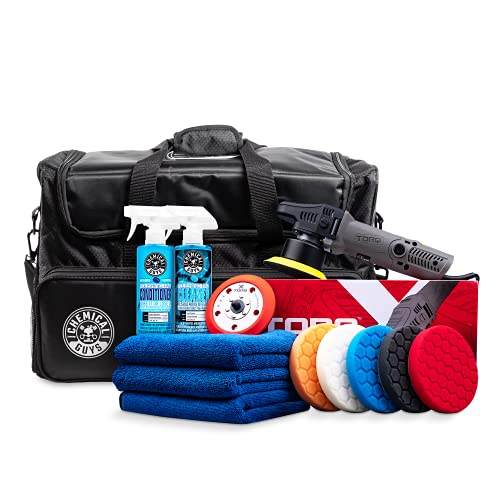
- Dual action car polisher kit with pads
- Car detailing polishing compound kit with microfiber pads
- Car interior UV protectant spray dashboard vinyl protection


Before You Start
Proper preparation reduces damage and yields dependable results. Work in a shaded, well-ventilated area with the car cool to the touch. Wash and dry the vehicle thoroughly, then inspect for deeply pitted paint or cracks that may require professional attention. Safety is essential: wear eye protection and gloves, and follow all product instructions. Time estimates vary by project scope but plan for several hours if working across multiple surfaces.
Critical cautions: avoid aggressive scrubbing on clear coats, test products on a small inconspicuous area first, and never use high-speed compounds on plastic headlights without a dedicated kit.
Step-By-Step: How To Repair Sun-Damaged Car Surfaces
- Prepare the exterior: Rinse the car, then wash with a dedicated car wash soap to remove grime that can abrade the surface during polishing.
- Assess the damage: Check for oxidation on clear-coated panels and dullness on headlights or tainted plastics. Mark areas to prioritize.
- Apply oxidation remover: On oxidized panels, apply the car paint oxidation remover kit with polishing compound as directed. Use a microfiber applicator for even coverage.
- Use a dual action polisher: If available, attach polishing pads to the dual action car polisher kit and work in small circles, maintaining light to medium pressure. Work in 2–3 panels at a time.
- Wipe and assess progress: Wipe clean with a microfiber towel and inspect the gloss. Repeat steps as needed until oxidation appears diminished and color returns.
- Address headlights: For cloudy headlights, follow the headlight restoration kit clear coat repair directions. Polish, sand if required, then seal with the supplied clear coat to restore clarity.
- Polish remaining exterior: After oxidation removal, apply a dedicated car detailing polishing compound kit with microfiber pads to refine and maximize gloss. Buff to a uniform finish.
- Seal and protect: Apply a protective wax or sealant to the exterior to prolong results and add hydrophobic properties that resist future UV damage.
- Refresh interior surfaces: Treat dashboard and vinyl with the car interior UV protectant spray. Apply evenly and wipe off any excess to prevent stickiness.
- Final inspection: Wash lightly to remove residues, dry completely, and look for uniform shine. Correct any streaks or uneven patches with a final pass using clean pads.
- Maintenance plan: Schedule periodic reapplication of UV protection and repeat polishing every 6–12 months depending on exposure and climate.
- Document results: Photograph panels before and after to track improvements and guide future touch-ups.
Troubleshooting
| Symptom | Likely Cause | Fix | Prevention |
|---|---|---|---|
| Dull finish after polishing | Insufficient product buildup or uneven pad pressure | Reapply with even, lighter pressure and a fresh pad | Keep pads clean; don’t overheat the surface |
| Cloudy headlights after restoration | Insufficient curing or contaminated clear coat | Reapply clear coat as per kit instructions | Clean lenses thoroughly before application |
| Streaks on paint | Leftover residue or improper wipe | Wipe with a clean microfiber and rebuffer | Work in a shaded area and use fresh cloths |
| Sticky interior surface after UV protectant | Too much product or hot environment | Wipe excess and ventilate area until dry | Apply thin coats and let cure between applications |
Common Mistakes To Avoid
- Rushing the polishing process; patience yields better gloss and less heat-related damage
- Using household cleaners on the paint or interior surfaces; always use products designed for automotive finishes
- Skipping test patches on inconspicuous areas to gauge reaction
- Ignoring climate conditions; humidity and heat can affect curing and adhesion
Tips For Best Results
- Work in small sections to ensure consistent compound application
- Keep a clean supply of microfiber pads and cloths to avoid reintroducing contaminants
- Maintain a steady, moderate speed on the dual action polisher to prevent swirl marks
- Follow up external work with a high-quality sealant for lasting protection
- Maintain interior protection by reapplying UV protectant every few months, depending on exposure
Call A Professional
Consider professional help if there is extensive paint cracking, deep color fading, or severe headlight damage extending beyond typical restoration kits. Stop and seek pro advice if a surface shows signs of rust, penetrative corrosion, or structural issues that require specialized coatings or safety considerations.
FAQ
Can sun-damaged paint be fully restored to showroom condition?
Restoration can improve gloss and color, but severe fading or clear coat failure may require recoating by a professional.
How often should I reapply UV protection on the interior?
Typically every 3–6 months, depending on sun exposure and climate.
Are headlight restoration results permanent?
Results last longer with a proper sealant, but headlights may need periodic maintenance due to UV exposure.
Do these methods affect warranty coverage?
Most DIY products do not affect factory warranties, but consult vehicle documentation and product guidelines for specifics.
Buying Guide
When selecting products to tackle sun damage, consider a balanced set of factors that covers exterior and interior needs. Important buying factors include:
- Size and coverage: Choose kits that match your vehicle’s size and the number of surfaces to restore—compact cars need fewer units than SUVs.
- Noise level: A dual action polisher with adjustable speeds minimizes noise and heat while delivering even polish.
- Energy efficiency: Battery-powered tools with efficient motors reduce heat generation and battery drain during long sessions.
- Controls: Simple, intuitive controls help beginners maintain consistent speed and pressure.
- Placement and storage: Look for compact, stackable products and organized storage bags to keep tools accessible.
Compare kits by the combination of exterior restoration, headlight repair, and interior protection they offer. Some sets bundle a polishing compound kit with microfiber pads for a complete workflow, which can simplify the process and reduce the need to source pieces separately. Consider climate and typical sun exposure in your region to estimate maintenance frequency and product durability. And always verify compatibility with your car’s paint type and interior materials to avoid unintended reactions.