Holograms and swirling in car paint can dull a finish and complicate future detailing. This guide provides practical, step-by-step methods using common detailing tools to restore a smooth, reflective surface. The approach focuses on safe polishing techniques that minimize new marring while removing holographic patterns.
Quick Answer
Identify the hologram—swirls that create rainbow-like patterns across the paint surface. Use a dual-action polisher with a dedicated polishing agent to gradually remove the holograms. Finish with a finish polish and proper protection to maintain gloss and resist future etching.
What You’ll Need
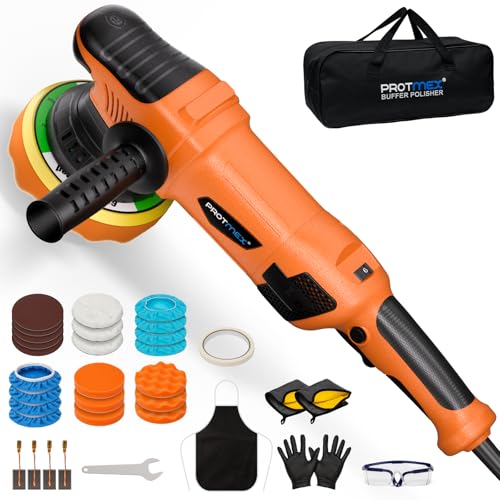
- Car hologram removal polishing kit
- Dual-action polisher for car paint holograms
- Auto detailing cut and polish kit hologram removal
- Holographic swirl remover compound automotive
- Car paint polishing pad set for holograms


Before You Start
Prepare the workspace and assess the painted surface. Park in a shaded area, away from direct sun, heat, and dust. Wash the vehicle thoroughly to remove surface contaminants. Decontaminate with a clay bar if needed, then dry completely. Inspect the finish under proper lighting to confirm holograms versus deeper scratches. Avoid heavy pressure and high heat that can burn through clear coat. Estimate the time: a typical session may range from 1 to 4 hours depending on the severity. Always wear eye protection and use a clean, lint-free microfiber pad to prevent introducing new scratches.
Step-By-Step: How To Remove Holograms From Car Paint
- Set up the dual-action polisher with a safe, low-speed setting and attach the appropriate polishing pad from the car paint polishing pad set for holograms.
- Apply a small amount of hologram removal compound automotive to the pad or directly to a small section of the panel, following the product’s recommended dab amount.
- Work in a 2×2 foot area, moving the polisher in overlapping passes. Maintain a consistent distance from the surface to prevent heat buildup.
- Wipe the area with a clean microfiber to check progress. Look for a reduction in rainbow patterns and a clearer reflection.
- If holograms persist, switch to a slightly more aggressive polish or a fresh pad, repeating the same technique on the affected area.
- After the holograms are removed to your satisfaction, switch to a finish polish to refine the gloss and remove any micro-marring left by the process.
- Wipe again and assess the overall uniformity of gloss across the panel under bright light. Repeat the process on other sections as needed.
- Lightly seal or wax the surface to protect the finish and improve water beading. Ensure complete cure before washing again.
- Inspect for any hazing or residues. If hazing occurs, use a dedicated detail spray and microfiber to re-clean the surface.
- Document the steps and avoid applying excessive pressure or heat in future polishing sessions to prevent reintroduction of holograms.
- For deeper holograms that resist standard polishing, consider professional evaluation to determine if color sanding or multi-stage correction is necessary.
Troubleshooting
| Symptom | Likely Cause | Fix | Prevention |
|---|---|---|---|
| Holograms persist after polishing | Insufficient cut in a single pass | Switch to a more aggressive regimen or use a different compound on a clean pad | Use proper technique and pad selection from the start |
| Hazing or dull film after polish | Over-application or residue | Wipe with a clean microfiber, re-polish with finish product | Apply thin, even coats; remove promptly |
| New scratches appear | Streaky or dirty pads | Use a fresh pad and clean microfiber between sections | Keep pads clean and use two separate sets for cut and finish |
| Uneven gloss across panels | Inconsistent pressure or speed | Maintain steady speed and pressure; re-check light angles | Practice on a test spot first |
| Swirl patterns return after washing | Protection not applied or poor application | Reapply sealant or wax with proper curing time | Use compatible products and follow cure times |
Common Mistakes
- Using overly aggressive compounds on delicate clear coats
- Rushing the process without inspecting your progress under good lighting
- Applying excessive pressure with the polisher
- Using dirty pads or dirty rags that reintroduce scratches
- Neglecting to protect the surface after correction
Awareness of these mistakes helps maintain a high-gloss finish and reduces the chance of reintroducing holographic patterns.
Tips For Best Results
- Work in small sections and frequently wipe to monitor improvement.
- Keep a light hand; let the polisher do the work with a properly selected pad.
- Use a dedicated polishing kit designed for hologram removal to ensure compatible abrasives.
- Dust and debris can introduce new scratches—keep the work area clean and lint-free.
- Finish with a paint sealant or waxing system to enhance depth and protection.
Call A Professional
Consider a pro if: the holograms are extensive or located in difficult-to-reach areas; the paint shows deep scratches or you notice clear coat damage after trying at-home methods; you lack a suitable space to control dust and humidity. Signs to stop and consult a pro include persistent hazing, color mismatch, or suspected clear coat breach.
FAQ
What causes holograms in car paint?
Holograms are typically caused by improper polishing technique, using the wrong abrasive level, or applying products that leave micromarring on the clear coat.
Can I fix holograms with a DIY kit at home?
Yes, a car hologram removal polishing kit and a dual-action polisher can be effective when used with the correct pads and compounds.
How long does the hologram removal process take?
It depends on the severity, but most sessions range from 1 to 4 hours, including prep and final protection.
Is a professional polishing service worth it for holograms?
For severe cases or multi-coat finishes, professional correction ensures even results and minimizes risk to the clear coat.
What maintenance helps prevent holograms?
Regular washing, prompt decontamination, and periodic protective coatings help minimize future hologram formation.
Buying Guide
When selecting tools and products to remove holograms, consider several buying factors to ensure good results and long-term paint health.
- <bPad quality and compatibility: Choose car paint polishing pads designed for hologram removal, with appropriate foam density for your vehicle’s clear coat.
- <bAbrasive system and compounds: Use a dedicated hologram removal compound automotive that matches your pad and polish sequence. Avoid mixing incompatible products.
- <bPolisher type and power: A dual-action polisher provides safer, more controlled correction compared with a rotary polisher, especially for DIY users.
- <bFinish products: After correction, select a paint sealant or wax that suits your climate and washing routine, ensuring long-lasting gloss and protection.
- <bSurface evaluation tools: Bright, glare-rich lighting or a mobile loupe helps objectively assess holograms and progress.
- <bEase of use and safety: Look for ergonomic design, variable speed, and low heat output to protect the clear coat during correction.
Consider your vehicle’s finish and climate, and create a plan that fits your garage setup and time availability. If in doubt, start with the mildest approach and escalate only as needed. A staged approach often yields the most consistent results while preserving the factory clear coat.