Car dents can mar a vehicle’s appearance and resale value. This guide explains practical, do-it-yourself methods using common dent repair tools, focusing on paintless dent repair where feasible. The steps emphasize safety, cost-conscious options, and when to seek professional help.
Quick Answer
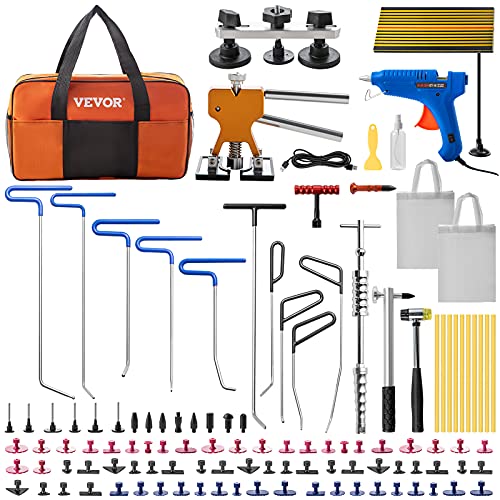
For small to moderate dents on flat panels, start with a paintless dent repair kit for car and a car dent puller suction cup kit. If the dent is sharp or edge-damaged, use a PDR tool kit for auto dent removal and auto body dent repair rods puller kit. For stubborn dings, glue puller tabs with the car dent repair kit glue puller tabs can yield good results. Always test on a hidden area first.
What You’ll Need
- Paintless dent repair kit for car
- Car dent puller suction cup kit
- PDR tool kit for auto dent removal
- Auto body dent repair rods puller kit
- Car dent repair kit glue puller tabs


Before You Start
Inspect the dent: small, non-sparking dents on flat surfaces are best candidates for DIY repair. Check for paint damage, creases, or sharp edges that could require refinishing. Clear the area around the dent and wash the panel to remove dirt that could hinder suction or glue adhesion. Time estimates vary: simple fixes may take 15–40 minutes; complex dents or multiple panels may require longer.
Cautions: Do not attempt repairs on structural areas, airbags, or panels with visible corrosion. If the paint is cracked, bubbling, or the dent is near a seam or edge, professional assessment is advised. Work in a clean, shaded area to prevent rapid drying of glue and to avoid heat damage to the paint.
Step-By-Step: How To Fix Dents On A Car
- Assess the dent and choose the appropriate method: suction-based repair for shallow, smooth dents; glue puller tabs for irregular or deeper dents.
- Prepare the surface: wash and dry the panel, then wipe with a mild solvent to remove waxes or oils. Dampen the area if using suction cups to improve grip.
- For suction approach, apply the car dent puller suction cup kit over the center of the dent and create a strong seal. Gently pull in measured, steady strokes to raise the metal toward its original contour.
- If the suction method stalls, switch to the paintless dent repair kit for car or PDR tool kit for auto dent removal. Use the tools to tap or push from behind the dent or along the edges with controlled force.
- When using the glue puller tabs, apply an appropriate amount of glue to the tab, press it onto the center of the dent, and wait for adhesion. Use the puller handle to draw the tab away from the panel, lifting the dent methodically.
- Progressively work around the dent: switch to a clean tab or cup and reapply as needed. Avoid over-pulling; stop when you see the panel begin to align with surrounding contours.
- Inspect the repaired area from multiple angles under good lighting. If needed, repeat steps with alternate tools to fine-tune the final shape.
- Finish by wiping the area clean and, if required, performing a light polish to restore the panel’s uniform appearance.
- Document results: take a post-repair photo to compare with the pre-repair state and inform future touch-ups if needed.
Troubleshooting
| Symptom | Likely Cause | Fix | Prevention |
|---|---|---|---|
| Dent remains after pulling | Insufficient pull strength or grip | Reapply suction or glue puller tabs and pull gradually | Work in cool, dry conditions; use multiple passes |
| Paint cracks after repair | Excessive force or existing paint damage | Stop and consult a pro; avoid forcing | Inspect paint for issues before starting |
| Gloss mismatch around repaired area | Indented metal but paint preserved; uneven surface | Lightly sand and polish; consider professional refinishing | Test on hidden spot first; use gentle pressure |
| Adhesive residue on panel | Glue puller tabs used too long or with low-quality glue | Use appropriate solvent to clean residue; re-clean surface | Use manufacturer-recommended glue and removal solvent |
Common Mistakes
- Using excessive force or tackling edges first, which can stretch metal or crack paint.
- Skipping surface prep, causing poor adhesion for glue pullers or suction cups.
- Assuming all dents are suitable for DIY repair; some require professional equipment and experience.
- Neglecting safety; never work on hot panels or near airbags or structural components.
Tips For Best Results
- Work in a cool, shaded area to prevent paint from softening or glazing, which reduces adhesion.
- Use a suction cup with a large diameter for shallow dents to maximize pull force without stressing the paint.
- Alternate methods: start with suction, then switch to glue puller tabs if the center lift doesn’t fully level the surface.
- Keep tools clean and dry to maintain grip and prevent scratching the paintwork.
- Test any method on a small inconspicuous area before applying to the main dent.
Call A Professional
If the dent is large, near or on a seam, involves sharp creases, or shows signs of paint damage, consider professional evaluation. Watch for warning signs such as clear paint cracking, metal creasing, or the dent returning after an initial pull. If uncertainty remains about panel integrity or warranty implications, seek a certified auto body technician.
FAQ
Can I fix dents on a car without professional tools?
Yes, small to moderate dents on flat panels can often be improved with a paintless dent repair kit for car, a car dent puller suction cup kit, or glue puller tabs.
Will DIY dent repair damage the paint?
It can if excessive force is used or if the paint is already compromised. Always assess paint condition and proceed cautiously.
How long does a typical DIY dent repair take?
15–60 minutes for a simple dent; longer for larger or tricky dents.
Should I use glue puller tabs on all dents?
Glue puller tabs are useful for irregular or recessed dents but require care to avoid painting issues. For smooth, shallow dents, suction or internal push methods may work better.
Can I fix dents on aluminum panels the same way as steel?
Aluminum panels behave differently and may require specialized tools or professional guidance to avoid further damage.
Buying Guide
Choosing the right dent repair tools involves considering panel type, dent characteristics, and your comfort with DIY tasks. Ask yourself these questions:
- Size and depth of the dent: Small, shallow dents respond well to suction cups, while deeper or complex dents may need glue tabs or PDR tools.
- Panel material: Aluminum and high-strength steel can react differently to prying and pulling; ensure tools are suitable for the panel.
- Noise and effort level: Some kits operate quietly; others require more manual tapping or pulling. Consider your tolerance for physical effort.
- Control and precision: Look for tools that allow controlled, incremental adjustments rather than brute force.
- Adhesive quality and compatibility: Use TABs and glue recommended by the kit to prevent residue or paint damage.
- Ease of cleanup and storage: Choose compact, durable kits with clear instructions for maintenance.
- Placement and access: Flat panels versus curved surfaces require different tool configurations; ensure you can reach the dent safely.
For most DIY enthusiasts, a bundle that includes a paintless dent repair kit for car, a car dent puller suction cup kit, and a car dent repair kit glue puller tabs provides flexible options for a variety of dents. If in doubt, begin with suction-based methods on accessible areas and reserve glue-based techniques for tougher cases. A well-chosen kit supports better outcomes and minimizes the risk of paint damage.