Cleaning the area behind and under the rim of the toilet can be challenging, especially in tight spaces. This guide offers practical, step-by-step methods using common bathroom tools to reach hard-to-reach areas safely and effectively.
Quick Answer
Use a specialized toilet brush with an angled head or a narrow, extendable wand to reach behind the toilet and under the rim. Clean with a toilet-safe cleaner, rinse with water, and dry with a cloth or paper towel. For stubborn spots, a flexible neck brush can help you access crevices without heavy scrubbing.
What You’ll Need
- Toilet cleaning brush with angled head long handle
- Extendable toilet brush for behind toilet
- Angled flexible neck toilet brush for hard-to-reach areas
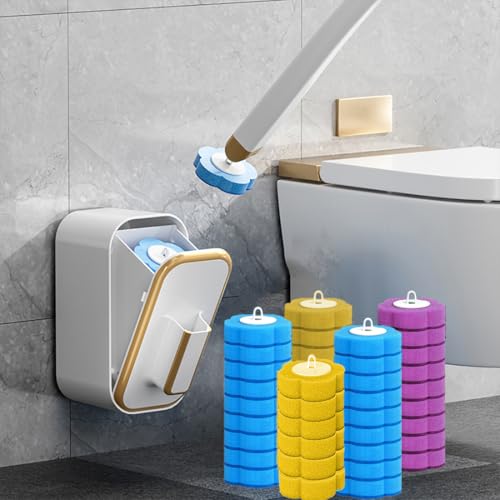
- Toilet wand with disposable cleaning heads for behind toilet
- Narrow bathroom scrub brush for behind toilet and under rim


Before You Start
Prepare the area and protect surfaces nearby. Ventilate the bathroom if possible and use gloves to protect hands from cleaning solutions. Avoid mixing harsh cleaners (for example, bleach with ammonia) as this can release dangerous fumes. Clear the floor of rugs or objects that could snag brushes, and ensure the toilet lid is closed when storing cleaning tools. Expect a 15–30 minute cleaning session for a thorough behind-the-toilet wipe-down.
Step-By-Step: How To Clean The Back Of The Toilet
- Put on gloves and gather your tools: a brush with angled head or extendable wand, a toilet-safe cleaner, and a microfiber cloth.
- Apply cleaner to the area behind the toilet and under the rim, allowing it to sit for 5–10 minutes to break down grime.
- Use the angled head toilet brush or extendable toilet brush to reach behind the toilet base. Work in small circular motions to lift buildup.
- For tight spots, switch to the angled flexible neck toilet brush to access corners and crevices without excessive scrubbing.
- Wipe the exposed surfaces with a microfiber cloth to remove loosened grime and residue.
- Rinse the brush tip or wand head under running water and wipe clean to prevent spread of bacteria.
- Inspect for any missed areas. Reapply cleaner if necessary and repeat brushing, then wipe again.
- Rinse the surrounding floor area to remove any drips. Dry with a clean cloth to prevent moisture buildup.
- Dispose of disposable cleaning heads if you used a toilet wand, following the product’s disposal guidance.
- Store brushes and wands in a dry, ventilated area away from direct contact with food or children.
- Record a quick maintenance check: is the area consistently clean, or does it require more frequent attention?
Troubleshooting
| Symptom | Likely Cause | Fix | Prevention |
|---|---|---|---|
| Stubborn grime behind the toilet | Build-up not fully loosened | Apply cleaner and re-brush with a flexible neck brush | Clean more frequently to prevent heavy buildup |
| Brush head won’t reach tight spaces | Head design not compatible with space | Switch to a narrow or angled head model | Choose a tool with extendable reach |
| Discolored rings on underside | Soap scum or mineral deposits | Use a stronger toilet-safe cleaner and a dedicated scrub brush | Regular wipe-down after use |
| Foul odor after cleaning | Residual grime or mold | Deep clean with disinfectant; ensure thorough drying | Improve ventilation during cleaning |
Common Mistakes
- Using abrasive scrubbers that scratch ceramic surfaces
- Rushing the cleaner’s dwell time, leaving grime behind
- Neglecting under the rim and behind the toilet base
- Overlooking proper drying, which invites mold growth
Tips For Best Results
- Choose tools that fit your bathroom layout; a narrow bathroom scrub brush can be quicker for tight gaps than a standard brush.
- Alternate between brushing and wiping to maintain efficiency and hygiene.
- Schedule routine cleans to prevent heavy buildup and reduce scraping effort.
- Store brushes in a clean, dry location to extend their life and performance.
Call A Professional
Consider a professional if the area behind the toilet shows persistent mold growth, persistent odors after cleaning, or water damage concerns. Stop signs include ongoing staining after multiple cleanings, unusual discoloration spreading, or any signs of plumbing leaks. A pro can assess seal integrity and suggest a long-term solution.
FAQ
What’s the best tool to reach behind the toilet?
A brush with an angled head, or an extendable toilet brush, is typically most effective for reaching behind the toilet and under the rim.
Are disposable wand heads hygienic for cleaning behind the toilet?
Yes, disposable cleaning heads reduce cross-contamination. Be sure to follow disposal instructions and replace as recommended by the product.
How often should I clean behind the toilet?
For typical households, a biweekly clean or after heavy use is usually sufficient. Increase frequency if you notice grime buildup sooner.
Can I use bleach around the toilet behind areas?
Bleach can be used with proper ventilation and when compatible with the other cleaners. Do not mix chlorine bleach with ammonia or acids.
What if water spots appear after cleaning?
Dry thoroughly with a microfiber cloth and consider a light wipe with a gentle cleaner to prevent mineral deposits.
Buying Guide
Choosing the right tools depends on your bathroom layout and cleaning habits. Consider the following factors to optimize performance and ease of maintenance.
- Size and reach: Select tools with extendable handles or angled heads to access behind the toilet and under the rim without contorting.
- Head design: Flexible necks or angled heads help reach tight spots; ensure compatibility with your preferred cleaners.
- Material quality: Durable plastics and rust-resistant metal improve longevity in humid bathrooms.
- Disposability: Disposable heads can simplify cleanup but require ongoing purchase; reusable brushes require cleaning and drying after use.
- Noise and ease of use: Lightweight designs reduce fatigue; look for brushes with comfortable grips.
- Size constraints: For compact bathrooms, choose slim, compact brushes that fit the space without obstruction.
- Storage: A small caddy or wall mount helps keep brushes dry and organized away from surfaces used for food.
Multi-pack sets or coordinated tool kits often provide the best value for households that want consistency across cleaning tasks. If unsure, start with a compact extendable wand and a compatible angled head, then add specialized brushes as needed for hard-to-reach areas.