Plastic headlight lenses can become cloudy and dull over time due to oxidation, UV exposure, and road grime. Proper cleaning restores clarity and improves nighttime visibility. This guide covers a practical, step-by-step method using common tools and a headlight restoration approach suitable for most vehicles.
Quick Answer
Clean cloudy headlights with a dedicated headlight restoration kit for plastic lenses or a polishing compound, then seal with a protective coating. For deeper oxidation, start with sanding and finish with polishing for the best result.
What You’ll Need
- Headlight restoration kit for plastic lenses
- Plastic headlight polishing compound with applicator pad
- 1800-3000 grit sanding sponge for headlights
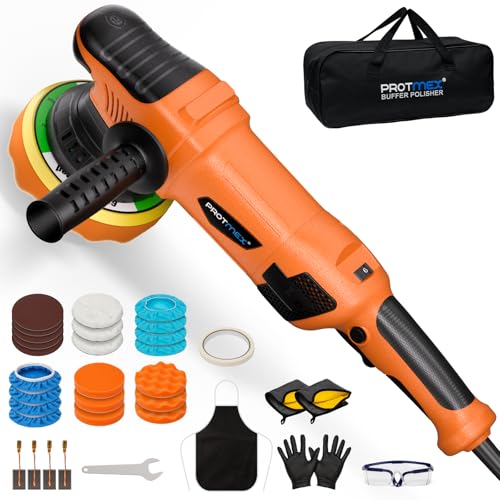
- Dual-action polisher for headlight restoration
- Microfiber cloths and polishing pad set for headlights


Before You Start
Prepare a shaded work area and gather all supplies before beginning. Wash the vehicle’s surface around the headlights to remove dirt that could scratch the lenses. Protect surrounding trim with painter’s tape to prevent accidental abrasion. Time estimate: 45–90 minutes depending on lens condition. Safety note: wear eye protection and avoid breathing fine sanding dust. If you have deep cracks or structural damage, seek professional help.
Step-By-Step: How To Clean Plastic Headlights
- Begin with a thorough wash of the headlight area to remove surface dirt.
- Mask surrounding areas with tape to protect paint and trim from abrasive compounds.
- If using a sanding method, start with the lowest grit (1800) and wet-sand the lens in a consistent, circular motion until the surface looks uniform. Rinse frequently.
- Progress to higher grits (2400, then 3000) for a smoother finish, keeping the sponge and lens wet during sanding.
- Apply the plastic headlight polishing compound with applicator pad to the lens and use the dual-action polisher for headlight restoration or a handheld pad to buff in small, circular motions until the haze reduces.
- Wipe clean with a microfiber cloth and inspect clarity. Repeat polishing steps as needed for deeper oxidation.
- Apply the restoration kit’s recommended sealant or protective coating to shield the lens from UV exposure and future yellowing.
- Cure time may vary—avoid washing the car for the first 24 hours to maximize coating adhesion.
- Re-check after a day and perform a quick buff with a microfiber pad to remove any residue.
- Reapply protective sealant every 6–12 months to maintain clarity and protection.
- If using a headlight restoration kit for plastic lenses, follow the kit’s specific steps for best results and compatibility with the provided applicators and pads.
- Complete the process with a final wipe-down and optional protective film or UV sealant for extended life.
Troubleshooting
| Symptom | Likely Cause | Fix | Prevention |
|---|---|---|---|
| Haze returns quickly after polishing | Insufficient sealant or improper cure | Reapply the protector and ensure proper cure time | Apply a dedicated sealant and avoid washing for 24 hours post-application |
| Scratches remain after sanding | Uneven sanding pressure or insufficient grit progression | Repeat with even pressure, progress through grits sequentially | Use a sanding block or dual-action polisher for even abrasion |
| Cloudy patches appear after polishing | Compound residue or improper wipe-down | Thoroughly wipe with a clean microfiber and re-polish lightly | Use lint-free cloths and work in a shaded area |
| Headlights look cloudy in sunlight | Yellowing from UV exposure not fully removed | Repeat polishing with finer grits and seal with UV-protective coating | Maintain UV protection with annual sealant |
Common Mistakes
- Rushing through sanding and skipping grits, leaving scratches visible when finished.
- Overheating the lens with the polisher, causing warping or glare.
- Using inappropriate clamps or forcing the polisher, leading to uneven results.
- Neglecting to protect surrounding paint and trim with tape.
- Applying heavy coats of compound, which can leave residue and haze.
Tips For Best Results
- Work in a shaded area to avoid direct sun affecting the curing process.
- Keep lenses wet during sanding to prevent dry scratches.
- Use a dual-action polisher to minimize swirl marks and generate consistent results.
- After polishing, always seal with a UV-resistant coating to slow future oxidation.
- Test a small area first to determine which grit progression yields the best clarity.
Call A Professional
If there are deep pits, severe yellowing, or crazing that persists after home restoration, stop and consult a professional. Signs to seek help include persistent fogging that doesn’t respond to polishing, structural damage, or if vehicle warranty or safety concerns apply. A pro can assess whether resurfacing, full lens replacement, or an integrated headlight assembly service is needed.
FAQ
Can I use any polishing compound on plastic headlights?
Use compounds designed for plastic headlight lenses and follow the manufacturer’s instructions. Some products are formulated specifically for polycarbonate lenses to avoid damage.
How long does a typical headlight restoration last?
Results vary with climate and care, but a properly sealed restoration can last several months to a year with regular maintenance.
Is sanding necessary for cloudy headlights?
Not always. Start with cleaning and polishing; sanding is typically reserved for heavy oxidation or scratch repairs.
Will this damage my vehicle’s paint?
Protect surrounding areas with tape and work carefully. When done correctly, the risk to paint is minimal.
Should I replace headlights instead of restoring?
Replacement is considered if the lens is severely cracked, pitted beyond repair, or the internal lens is damaged.
What maintenance should follow a restoration?
Apply a UV-blocking sealant and clean lenses regularly to prevent future oxidation and keep clarity longer.
Buying Guide
When choosing products for plastic headlight care, consider size and compatibility with your vehicle, the expected noise level and ease of use, energy efficiency if powered polishing tools are involved, and control options on any electric tools. Placement of the headlight restoration kit items in the work area should allow easy access to the headlight restoration kit for plastic lenses and the companion plastic headlight polishing compound with applicator pad. Look for complete sets that include 1800-3000 grit sanding sponge for headlights, a dual-action polisher for headlight restoration, and a microfiber cloths and polishing pad set for headlights. Compare kits based on included pads, abrasion range, sealants, and user reviews. If you have a busy schedule, a kit with a built-in applicator and clear instructions can save time and reduce errors. For best results, choose a system designed for plastic lenses with UV protection and durable coatings. Consider the vehicle’s headlight type (single vs. dual) and ensure the kit’s size is compatible with your workspace. Finally, verify warranty terms and availability of replacement pads or accessories.