Oxidized headlights can diminish visibility and road safety. This step-by-step guide walks American drivers through a practical, home-friendly process to restore clarity using commonly available headlight restoration products. The method combines sanding, polishing, and sealing to extend headlight life and improve nighttime visibility.
Quick Answer
Restore clarity in a few simple steps: protect surrounding surfaces, sand to remove oxidation, polish to bring back shine, and seal to protect against future yellowing. Start with a small test area, work steadily, and follow product directions for best results.
What You’ll Need
- Headlight restoration kit with sanding pads polish compound
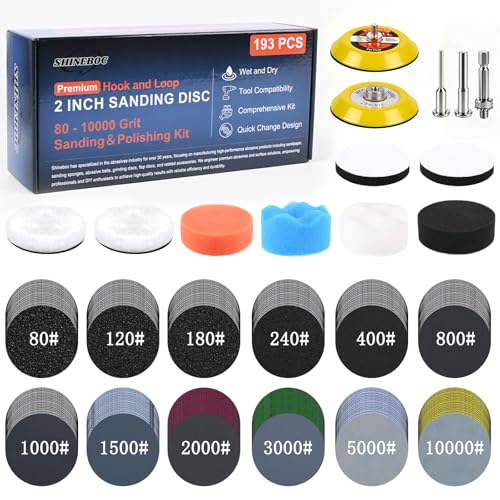
- Drill-powered headlight restoration kit with sanding discs
- Automotive headlight polish kit 1000-3000 grit
- Headlight oxidation remover kit with UV sealant
- Headlight restoration kit microfiber cloths and sealant


Before You Start
Preparation is critical for consistent results. Park in a shaded area, away from direct sun, and wash the vehicle surface to remove dirt. Use painter’s tape to protect the paint and trim around the headlight. Have a clean workspace and a light source that reveals scratches and haze. Time estimate: about 60–90 minutes per headlight for an at-home attempt. Safety note: wear eye protection and a mask if sanding, and keep solvents away from skin. If the headlight housing is cracked or moisture starts to seep inside, stop and consider replacement instead of restoration.
Step-By-Step: How To Clean Oxidized Headlights
- Inspect the headlight for deep gouges or moisture. If oxidation is extensive, start with the lowest grit sandpaper to avoid creating more haze and gradually work up to higher grits.
- Attach the appropriate sanding disc or pad to the drill-powered headlight restoration tool. Begin with a coarse grit (e.g., 1000) and keep the pad moving in small, overlapping circles. Maintain light pressure to avoid damaging the outer plastic skin.
- Rinse the headlight after each sanding stage to remove residue and inspect clarity. If oxidation remains, switch to the next finer grit (1500, then 2000, and finally 3000) and repeat the sanding process.
- Wipe away dust with a microfiber cloth and apply a small amount of polishing compound. Use circular motions with medium pressure to glaze the surface. This step helps restore clarity by removing micro-scratches left by sanding.
- Apply a headlight oxidation remover kit with UV sealant. Apply evenly across the headlight surface and allow the sealant to cure as directed by the product. The UV sealant provides a protective layer against sun exposure and future oxidation.
- Buff the sealed surface with a clean microfiber cloth to remove any excess sealant. Ensure the headlight is dry before testing visibility at night. For best results, reapply a second coat of sealant if recommended by the kit.
- Recheck alignment and re-torque any fasteners if you notice changes in the lamp orientation after restoration. Clean up your workspace and remove painter’s tape.
- Re-inspect the headlights in different lighting. If there is residual yellowing or cloudiness, consider repeating steps or applying a higher-grade sealant designed for reflective coatings.
- Apply a dedicated protective layer such as a sealant included in the headlight restoration kit microfiber cloths and sealant or a separate UV-protective coating. This helps extend the results and keeps the lenses clear longer.
- Document the condition for future reference. A quick photo log can help determine when maintenance should be performed again and can guide future product choices.
Troubleshooting
| Symptom | Likely Cause | Fix | Prevention |
|---|---|---|---|
| Headlight still hazy after polishing | Deep scratches or uneven sanding | Repeat sanding with finer grits and reapply polish | Follow grit progression precisely and keep the surface wet during sanding |
| Sealant fails to cure | Contamination on the surface or improper application | Clean surface thoroughly, reapply sealant per instructions | Work in a dust-free, shaded area with the headlight fully dry |
| White haze appears after sealant | Over-application or solvent residue | Wipe with a clean microfiber cloth, remove excess resin | Apply thin, even coats; cure undisturbed as directed |
| Headlight fogs up in rain | Moisture trapped inside housing | Replace sealant or check for cracks in housing | Ensure housing is dry before sealing; replace damaged seals |
Common Mistakes
- Using too much pressure while sanding, which creates new scratches
- Avoiding proper masking, leading to paint or trim damage
- Skipping the finish sealant, resulting in rapid re-oxidation
- Rushing layers, especially sealants, which can trap dust or air bubbles
Tips For Best Results
- Test a small corner first to gauge the time and effect of sanding.
- Keep the surface consistently moist during sanding to reduce heat buildup and scratching.
- Use a clean, lint-free microfiber cloth for polishing and buffing to avoid swirl marks.
- Choose a kit that includes UV sealant for long-term protection against sun damage.
- Store sanding discs and pads in a clean, dry place to maintain effectiveness for future uses.
Call A Professional
If the headlights show signs of cracking inside the lens, significant moisture accumulation, or if restoration does not improve visibility to a safe level, consult a pro. Roof- and bumper-mounted lamps may require professional disassembly and resealing, while severely yellowed units could indicate aging plastic beyond practical restoration. Seek a technician if you notice persistent fogging after multiple restoration attempts or if the housing appears compromised.
FAQ
Can I use any sanding pad for headlight restoration?
Use pads designed for plastics and the specific grit sequence recommended by the kit to avoid gouging the lens.
How long does a typical headlight restoration last?
Results vary with climate and care, but a properly sealed headlight can stay clear for several months to a couple of years.
Is it safe to use a drill-powered kit on my headlights?
Yes, when used with light pressure and appropriate speed settings, drill-powered kits are safe for most plastic headlights.
Will this work on all headlight types?
Most projects target polycarbonate lenses; opaque or very worn lenses may require professional replacement.
Buying Guide
Choosing the right headlight restoration approach involves balancing ease, cost, and desired durability. Consider the following factors to guide buying decisions.
- Size and accessibility: Larger or curved headlights may benefit from a drill-powered kit with sanding discs for consistent coverage.
- Noise level and user comfort: Some kits operate quietly with orbital motion, reducing fatigue during longer sessions.
- Energy efficiency and materials: Look for water-based or low-odor compounds and a durable UV sealant to maximize longevity without strong fumes.
- Controls and ease of use: Kits with clear instructions and included accessories (microfiber cloths, sanding discs, and sealants) simplify the process.
- Placement and climate: In sunny climates, UV protection is especially important; ensure the kit includes a UV sealant and consider indoor storage for curing steps.
In practice, most DIY enthusiasts pair a comprehensive headlight restoration kit with a dedicated UV sealant for best long-term results. If you value speed and straightforward results, a kit with all-in-one components and clear guidance is a solid choice. For those who anticipate frequent maintenance, a drill-powered option with versatile sanding discs can offer flexibility for different headlight shapes and levels of oxidation. Ready to restore your headlights with confidence? Start by inspecting your lenses, masking surrounding areas, and selecting a kit that matches your needs and comfort level.