Foundation brushes deliver smooth, even coverage when they’re clean. Over time, makeup oils, pigments, and bacteria build up on bristles, reducing performance and potentially causing skin irritation. This guide walks through practical, proven steps and gear options suitable for American households to keep foundation brushes pristine and ready for use.
Whether you’re a daily user or a weekend warrior, selecting the right tools and following a routine can dramatically improve results. The methods below cover traditional hand-wash techniques and modern gear to speed up cleaning while protecting brush bristles.
Quick Answer
Fast method: Rinse brush head under lukewarm water, apply gentle cleanser, work into a lather, rinse until water runs clear, gently squeeze out excess moisture, and lay flat to dry. For heavy use, supplement with cleaning gear such as a silicone mat or automatic cleaner to speed up the process.
What You’ll Need
- Silicone makeup brush cleaning mat for foundation brushes
- Automatic makeup brush cleaner machine for foundation brushes
- Makeup brush cleaning glove silicone pad for foundation brushes
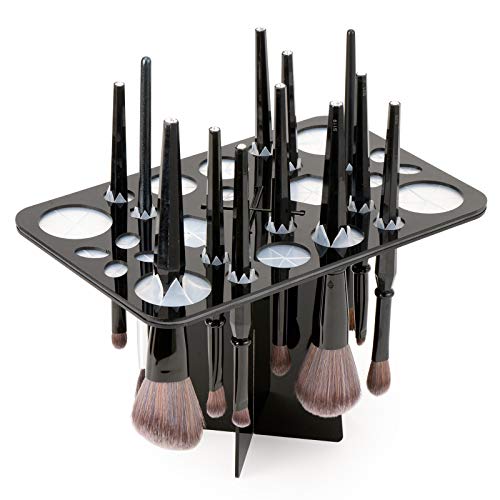
- Makeup brush drying rack with adjustable arms
- Dual-sided brush cleaning mat and scrubber for foundation brushes


Before You Start
Prepare a clean workspace, ideally near a sink. Use lukewarm water to preserve bristle integrity, avoiding hot water which can loosen adhesives. Choose a mild, streak-free cleanser suitable for brushes. Allow ample drying time to prevent mildew and brush deformation. Safety note: Never soak wooden-handled brushes for long periods; moisture can warp handles and loosen ferrules. Time estimate: 10–20 minutes per session, plus drying time.
Step-By-Step: How To Clean Foundation Brushes
- Rinse the brush under lukewarm water, holding the brush with bristles pointing downward to avoid water seeping into the ferrule.
- Apply a small amount of mild cleanser to the bristles or to a silicone mat, then gently lather using circular motions.
- Focus on the most soiled areas, especially near the base of the bristles, to remove oil and pigment buildup.
- Rinse the bristles thoroughly until the water runs clear; avoid leaving soapy residue that can irritate skin.
- Gently squeeze out excess water with a clean towel; reshape the brush head to its original form.
- Place the brush on a drying rack or lay flat with bristles hanging off the edge to maintain shape and airflow.
- For faster cleaning, use a silicone cleaning pad or dual-sided mat to scrub and lift pigment more efficiently.
- Allow brushes to air-dry completely before reuse, preferably overnight, to ensure bristles are fully dry and maintain shape.
Troubleshooting
| Symptom | Likely Cause | Fix | Prevention |
|---|---|---|---|
| Bristles still feel sticky after washing | Residue from cleanser or makeup | Wash again with a small amount of cleanser and rinse thoroughly | Rinse until water runs clear |
| Brush handle feels loose | Excess moisture near ferrule | Pat dry and avoid soaking the handle; ensure ferrule stays dry | Dry brushes upright or on a rack |
| Bristles fray or shed | Harsh cleansing or aggressive scrubbing | Use gentler motions and a mild cleanser | Treat brushes with care; replace damaged brushes |
| Bristles take too long to dry | Dense bristles and poor airflow | Split drying across multiple brushes and use a rack | Improve ventilation and avoid stacked storage |
Common Mistakes
- Using hot water or harsh cleaners that degrade bristles
- Soaking brushes too long, especially wooden handles
- Rubbing bristles aggressively, causing shedding
- Skipping thorough rinsing, which leaves residue on skin and brushes
Keeping to a gentle routine and using the right tools helps extend brush life and performance.
Tips For Best Results
- Rotate brushes to avoid over-washing a single tool; wash makeup brushes on a fixed schedule.
- Use a dedicated cleanser or mild baby shampoo if a specialty brush cleaner is unavailable.
- After washing, fan brushes with bristles pointing downward to reduce water seepage into handles.
- When using a drying rack, space brushes to maximize airflow and reduce moisture pockets.
- For quick cleans between heavy days, consider a silicone pad or mat to lift pigment with minimal effort.
Call A Professional
Seek professional help if brushes become permanently misshapen, if handles crack, or if bristles shed excessively despite proper cleaning. If you notice persistent mold growth on the bristles or handles, stop using the brushes and replace them. A pro can advise on restoration options or recommend replacement for safety and performance.
FAQ
How often should foundation brushes be cleaned?
Brushes used daily should be cleaned at least once a week; brushes used less frequently can be washed every two weeks.
Can I wash synthetic brushes with regular shampoo?
Yes, mild shampoos or dedicated brush cleansers work well for synthetic bristles. Rinse thoroughly.
Is it okay to use a dishwasher for brush cleaning?
No. Dishwashers can damage bristles and ferrules; hand cleaning with proper tools is recommended.
How should I store clean brushes?
Store brushes upright on a drying rack or in a brush holder to maintain shape and airflow.
What if my brushes smell after cleaning?
Ensure complete rinsing and drying. A rinse with a tiny amount of white vinegar mixed with water can help neutralize odors, followed by a final rinse.
Do cleaning mats damage brush bristles?
Use mats as directed and avoid harsh scrubbing; gentle motion helps preserve bristles over time.
Buying Guide
When selecting cleaning gear for foundation brushes, consider key factors that influence performance and practicality. Size matters for storage in small spaces, and noise levels can affect nighttime routines. Energy efficiency matters for electric cleaners used frequently, while controls determine ease of use. Placement in the bathroom or vanity should optimize airflow and safety.
Size and capacity: For households with multiple brushes, larger cleaning mats or machines may speed up the process. Consider a drying rack with adjustable arms to accommodate various brush sizes. Noise level: Electric cleaners produce some sound; look for models with quieter operation if used in shared spaces. Energy efficiency: Some compact cleaners consume minimal electricity; choose energy-conscious options if used daily. Controls: Simple power, speed, and timing controls aid consistent results. Placement: A dedicated, ventilated spot reduces moisture buildup and protects countertops.
In practice, pairing a silicone mat with a drying rack offers a flexible, low-cost workflow, while an automatic cleaner can save time for heavier use. Assess daily routines, brush count, and space constraints to balance convenience with investment. With the right setup, foundation brushes stay effective, last longer, and deliver flawless makeup application. Do you prioritize speed, gentleness, or a blend of both in your routine?