Flexible air ducts are common in many homes and can accumulate dust, debris, and allergens over time. Regular cleaning helps maintain indoor air quality and HVAC efficiency. This guide provides practical, step-by-step instructions tailored to flexible duct systems, along with the right tools to use and how to avoid common pitfalls.
Quick Answer
Goal: Remove loose dust and buildup from flexible ducts without damaging the lining. Use a combination of gentle brushing and suction with the appropriate attachments. Avoid harsh tools that could puncture or deform the duct.
What You’ll Need
The following tools are commonly used for cleaning flexible ducts. Assemble these items before you start to keep the project smooth and efficient.
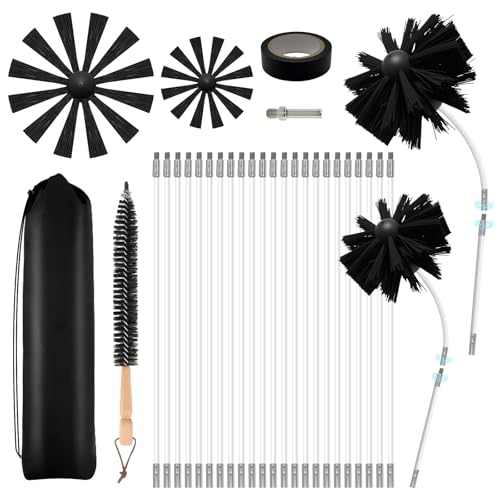
- flexible air duct cleaning brush kit
- HVAC duct cleaning brush and wand set
- vacuum attachment hose for air duct cleaning
- air duct cleaning vacuum with brush attachment
- spiral duct cleaning brush for flexible ducts
- Lint-free cloths and a flashlight for inspection


Before You Start
Before cleaning, turn off the HVAC system at the thermostat and power at the furnace or air handler. Seal off supply and return registers in the work area to limit dust spread. Wear a dust mask and eye protection. Expect the process to take several hours for a full system, and plan for interruptions if you encounter stubborn debris. Do not force brushes through damaged or extremely tight bends; this can damage the duct lining or create leaks. Clear a working space in the basement, attic, or crawl space where you can access the main trunk and branch lines.
Step-By-Step: How To Clean Flexible Ducts
- Inspect the system: Look for visible dust buildup, mold, or tears. Photograph problem areas to revisit if needed.
- Attach the vacuum: Connect a high-powered vacuum with a brush attachment to the nearest accessible duct end. Ensure a snug seal to maximize suction.
- Insert the brush wand: Gently guide the spiral duct cleaning brush for flexible ducts into the duct. Avoid forcing through tight corners.
- Brush section by section: Work from the main trunk toward each branch, pulling the brush back slowly to dislodge dust into the vacuum stream.
- Clean second pass: If debris clings, alternate brushing with backward and forward motions to loosen buildup.
- Vacuum the debris: After brushing a section, seal the vent and vacuum that area, then move to the next section.
- Check flexible joints: Inspect joints and fittings for dust leakage and reseal if necessary.
- Repeat as needed: For heavy buildup, repeat brushing passes, then run the vacuum through the lines again.
- Clean supply plenum and return plenum: Wipe down accessible plenums to remove residual dust.
- Reopen and test: Remove seals, restore power, and run the system to verify improved airflow and noise levels.
- Final inspection: Look for any remaining dust near vents and double-check that there are no loose tools inside the ductwork.
- Maintenance plan: Schedule periodic cleanings in line with household activity, pets, and weather patterns to maintain efficiency.
Troubleshooting
| Symptom | Likely Cause | Fix | Prevention |
|---|---|---|---|
| Low suction at the vent | Leaks or loose seals | Check and reseal joints; replace damaged sections | Inspect seals during each cleaning; use clamps where needed |
| Rattling or banging | Loose ductwork or brackets | Tighten straps and brackets; secure with additional fasteners | Schedule regular checks after renovations |
| Unusual odor | Mold growth or trapped debris | Clean thoroughly and address moisture sources | Control humidity and address leaks promptly |
| Debris still visible after cleaning | Severe buildup or hidden ducts | Consider professional cleaning for inaccessible paths | Plan preventive cleaning every 1–3 years |
Common Mistakes
- Using overly aggressive brushes on flexible duct linings, which can tear material.
- Forgetting to seal off areas, causing dust to spread during cleaning.
- Neglecting to inspect and reseal joints after brushing; leaks reduce efficiency.
- Relying solely on one tool; combining brush and vacuum attachments yields better results.
Tips For Best Results
Plan a system-wide approach: Clean from the main trunk outward to minimize recontamination. Schedule work during a time when interior doors are closed and air exhaust is controlled.
Use the right attachments: The air duct cleaning vacuum with brush attachment and a spiral duct cleaning brush for flexible ducts work in tandem for deeper cleaning, especially in long runs.
Inspect after each section: Wipe surfaces, check for gaps, and re-seal as you progress to avoid repeated cleanings.
Call A Professional
Consider a professional if any of the following apply: signs of mold, persistent odor after cleaning, extensive damage or tearing of the duct lining, or if the system is connected to unusual or inaccessible pathways. Fractures or ductwork in hard-to-reach areas may require specialized equipment and safety training. If unsure about electrical safety or furnace access, seek expert help promptly.
FAQ
Can I clean flexible ducts without turning off the system?
It is best to power down the HVAC system before cleaning to protect components and avoid spreading dust.
How often should I clean flexible air ducts?
Typical guidance is every 3–5 years for residential systems, but households with pets, smokers, or allergies may benefit from more frequent cleanings.
Will cleaning improve airflow immediately?
Yes, removing dust buildup can improve airflow and efficiency, though results vary by system and duct condition.
What if dust returns quickly after cleaning?
This may indicate ongoing dust sources or moisture problems; recheck for leaks, filter quality, and humidity control.
Are chemical cleaners safe for flexible ducts?
Most professionals avoid chemical cleaners inside ducts due to potential residue and safety concerns; rely on mechanical cleaning and proper sealing instead.
Buying Guide
When selecting tools for cleaning flexible air ducts, consider size, compatibility with your ductwork, and ease of use. Look for a comprehensive flexible air duct cleaning brush kit that includes multiple wand diameters and flexible reaches to navigate bends. A robust HVAC duct cleaning brush and wand set should offer corrosion-resistant materials and secure attachments to your vacuum. If you primarily clean in tight or irregular spaces, a spiral duct cleaning brush for flexible ducts can help dislodge stubborn buildup. For ongoing maintenance, a quality vacuum attachment hose for air duct cleaning paired with a capable air duct cleaning vacuum with brush attachment is essential. Consider noise levels, power source, and length of hoses to fit your space. Placement matters: keep the vacuum outside living areas when possible, and route hoses to minimize dust dispersion. Evaluate energy efficiency by choosing tools with ergonomic designs that reduce user fatigue. Compare kits by included diameters, length, and compatibility with standard HVAC fittings to ensure a seamless cleaning experience.