Keeping faucets and shower heads clean helps maintain water flow, prevent buildup, and extend their life. This guide provides a practical, step-by-step approach using common tools and dedicated descaling products. Readers will learn how to remove mineral deposits, polish surfaces, and prevent future buildup in American bathrooms.
The following instructions emphasize safe handling and efficient techniques so homeowners can achieve professional-quality results without costly services.
Quick Answer
Detaching aerators and shower heads, soaking in a descaling solution, and scrubbing with a nylon brush or sponge typically restores flow and appearance. Use a faucet aerator cleaning tool or adjustable aerator wrench for stubborn parts, then rinse, reassemble, and wipe dry to prevent new mineral deposits.
What You’ll Need
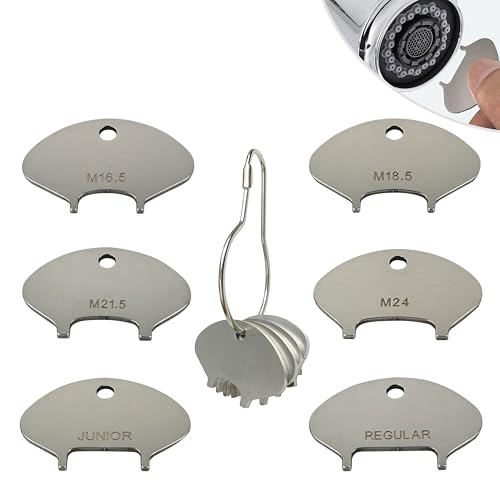
- Faucet aerator cleaning tool
- Shower head descaling kit calcium lime remover
- Nylon bristle faucet cleaning brush
- Bathroom faucet cleaning sponge scrubber set
- Adjustable faucet aerator wrench


Before You Start
Turn off the water supply to the affected faucet or shower if possible to minimize leaks. Protect surrounding surfaces with a towel or cloth to catch drips. If you have chrome, brushed nickel, or brass finishes, test a small inconspicuous area first to ensure the cleaner won’t dull the finish. Plan for 30–60 minutes depending on the number of fixtures and the level of buildup. Never mix harsh chemicals—follow product instructions and wear gloves.
Step-By-Step: How To Clean Faucets And Shower Heads
- Remove the aerator from the faucet and the shower head from the wall mount or arm if possible.
- Inspect the parts for debris and mineral buildup. Note any parts that require replacement or a tight fit.
- Soak aerators and shower heads in the shower head descaling kit calcium lime remover or an appropriate descaling solution according to the product instructions.
- For stubborn deposits, use the faucet aerator cleaning tool or adjustable faucet aerator wrench to carefully loosen and remove mineral plugs. Do not force fittings.
- Gently scrub the exterior and interior screens with the nylon bristle faucet cleaning brush and a mild cleaner or warm soapy water.
- Rinse all parts thoroughly under running water to remove cleaner residue and loosened minerals.
- Reassemble the aerator and shower head, ensuring a snug, even fit without cross-threading.
- Turn the water back on and run for a minute to flush out any remaining debris. Check for leaks and adjust as needed.
- If mineral buildup reappears quickly, repeat the soaking step or consider a longer soak with the descaling solution.
- Wipe exterior surfaces with the bathroom faucet cleaning sponge scrubber set to restore shine and remove any residual fingerprints.
- Schedule regular maintenance, such as quarterly soaks, to prevent heavy buildup and maintain optimal flow.
- Store tools in a dry place after drying to prevent rust and corrosion on metal fittings.
Troubleshooting
| Symptom | Likely Cause | Fix | Prevention |
|---|---|---|---|
| Low water flow after cleaning | Partial mineral buildup remains in aerator | Disassemble and re-soak; scrub screens more thoroughly | Regularly clean every 3–6 months |
| Water leaks at the aerator | Gasket or washer damaged or over-tightened | Check washers; replace if worn; tighten to snug fit | Inspect washers during reassembly |
| Stubborn scale on shower head | Deep mineral buildup | Extended soak with descaling solution; use a small brush | Prevent by wiping down after use |
| Corroded tools or fittings | Exposure to cleaner or moisture | Dry thoroughly; use rust-resistant tools | Store tools dry and clean after each use |
Common Mistakes
- Over-tightening fittings during reassembly, which can cause leaks.
- Using metal tools on finished surfaces, risking scratches.
- Skipping a test run after reassembly, missing leaks or misalignment.
- Using abrasive cleaners on chrome or nickel finishes that dull shine.
Tips For Best Results
- Choose a descaling solution labeled safe for your fixture finish to avoid tarnish or dulling.
- Mark the aerator orientation before removal to ensure correct reattachment.
- Soak times vary by mineral severity; for heavy buildup, a longer soak can improve results.
- Consider a preventative wipe-down routine: after each shower, quickly wipe the head to reduce mineral deposits.
- For multiple fixtures, perform tasks in a single session to reduce downtime and simplify cleanup.
Call A Professional
Stop signs to contact a pro include:
- persistent leaks after reassembly
- significant corrosion or damaged threads
- unclear warranty terms after cleaning attempts
- feeling uncomfortable with disassembly or tools
When in doubt, a licensed plumber or fixture specialist can assess water pressure, mineral hardness, and hardware compatibility, ensuring repairs won’t cause further damage.
FAQ
Can I clean a shower head without removing it?
Yes, many mineral deposits can be loosened by soaking the head while attached, using a suitable descaling solution when possible.
Is it safe to use vinegar for descaling?
Vinegar is effective for mineral deposits but may damage certain finishes. Check finish recommendations before using.
How often should I clean faucet aerators?
Approximately every 3–6 months, or when water flow declines noticeably.
Should I replace aerator screens regularly?
Yes, inspect screens for wear and replace as needed to maintain optimal flow and filtration.
What if mineral buildup returns quickly after cleaning?
This may indicate high mineral content or water pressure issues; consider longer soaks or testing water hardness with a sampler kit.
Can I reuse the same tools for different fixtures?
Yes, most tools are universal, but designate clean tools for each fixture to avoid cross-contamination.
Is it necessary to dry fixtures after cleaning?
Drying helps prevent future mineral deposits and rust; wipe with a clean cloth after drying.
Buying Guide
When selecting products and tools for faucet and shower head cleaning, consider size, compatibility, and ease of use.
Size and compatibility matter: ensure the faucet aerator cleaning tool and adjustable faucet aerator wrench fit your faucet models. Look for universal designs that work with common aerator sizes in American homes.
Descaling power and chemistry: choose a shower head descaling kit calcium lime remover with proven efficacy against mineral buildup and safe labels for bathroom fixtures. Check safety data for prolonged use and compatibility with different finishes.
Cleaning accessories: a nylon bristle faucet cleaning brush and bathroom faucet cleaning sponge scrubber set provide versatile scrubbing without scratching finishes. Aim for soft bristles and non-abrasive pads for delicate surfaces.
Storage and durability: select rust-resistant tools and keep them dry after cleaning to prolong their life. A compact cleaning kit is helpful for households with multiple fixtures.
Usage simplicity: products with clear instructions and ready-to-use soak solutions save time and reduce mistakes. Look for kits that include step-by-step guidelines and replacement parts if needed.
Environmental considerations: choose cleaners and tools designed for reuse where possible. Avoid harsh chemicals near automatic shutoffs and water-sensitive areas.