Preparing a wall surface before applying paint is essential for a smooth, durable finish. Drywall dust can cling to surfaces, settle into pores, and cause adhesion issues if not properly removed. This guide outlines practical, safe steps that homeowners and bystanders can follow to achieve a clean, paint-ready surface.
Quick Answer
Seal the area, remove loose dust with a vacuum and microfiber tools, wipe remaining residue with tack cloths, and finish with a final dry wipe before painting. Use a wet wash only if the wall is to be painted soon after. Follow with dust containment to avoid recontamination.
What You’ll Need
- HEPA shop vacuum for drywall dust
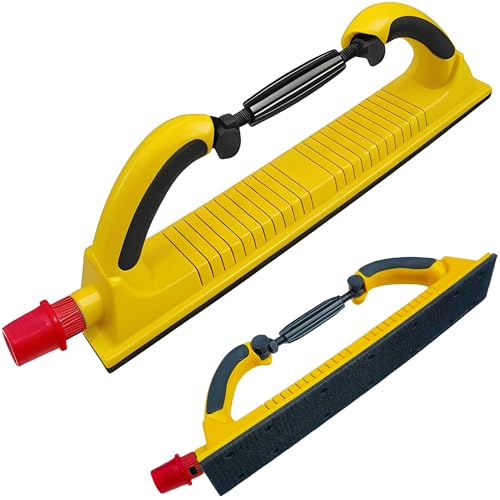
- Drywall sanding block with dust collection
- Dust containment shield drywall sanding
- Tack cloth for drywall dust removal
- Microfiber dust mop for walls and ceilings


Before You Start
Clear the work area and cover floors with plastic or drop cloths. Seal adjacent rooms if possible to prevent dust migration. Protect yourself with a dust mask and safety goggles. Allow extra time for thorough dust removal, especially in high-traffic areas. Important: dry sanding generates airborne dust; keep doors closed and minimize airflow toward living spaces.
Step-By-Step: How To Clean Drywall Dust Before Painting
- Lockdown the workspace by laying down protective coverings and closing doors to the area. This reduces cross-contamination during cleaning.
- Use the HEPA shop vacuum for drywall dust to remove loose dust from walls and ceilings, starting from the ceiling and working downward.
- Attach the drywall sanding block with dust collection to any remaining dusty areas and gently sand flat surfaces to knock loose fine particles loose without gouging the drywall.
- Employ a dust containment shield drywall sanding setup if sanding in a fixed space to trap debris and prevent spread to adjacent rooms.
- Wipe the surface with a fresh tack cloth for drywall dust removal to pick up fine particles that vacuuming left behind.
- Follow with a microfiber dust mop for walls and ceilings to collect residual dust across flat areas and corners.
- Inspect the surface under bright light for remaining haze and repeat vacuuming and wiping as needed, focusing on corners and joints.
- Do a final dry wipe with a clean tack cloth to assure a dust-free surface prior to painting.
- Lightly sand any patched areas and re-clean to ensure an even texture across repaired spots.
- Switch to a clean room or ventilate briefly after cleaning, then proceed to priming to seal the surface.
- Dispose of used cloths and debris in sealed bags to prevent dust from resettling in the room.
- Confirm the area is completely dry before applying primer or paint.
Troubleshooting
| Symptom | Likely Cause | Fix | Prevention |
|---|---|---|---|
| Dust reappears after cleaning | Ventilation re-aided dust circulation | Re-seal area and re-clean with HEPA vacuum | Limit airflow during cleaning |
| Streaks or haze on walls | Residue from sanding or clinging fibers | Wipe with tack cloth and re-vacuum | Use fresh tack cloths and clean tools |
| Dust cleared only partially from corners | Dust accumulates in crevices | Careful hand wipe with tack cloth in corners | Use small brushes to reach tight spots |
| Vacuum filter clogs quickly | Excess dust loading | Clean filter or replace, run the vacuum less aggressively | Pre-filter or bag the dust efficiently |
Common Mistakes
- Using a damp cloth on unprimed drywall, which can raise dust or warp the surface
- Skipping the HEPA filtration step, causing dust to linger in the air
- Neglecting corners and ceiling edges where dust tends to accumulate
- Rushing the process and painting over still-dusty surfaces
Tips For Best Results
- Work from top to bottom to prevent settled dust from falling onto freshly cleaned areas.
- Keep tools organized and use separate cloths for different zones to avoid cross-contamination.
- Test a small area with a tack cloth first to gauge how much residue is picked up.
- Choose tools with dust-collection capabilities to minimize airborne particles.
- Plan for multiple passes if the area is large or heavily dusted.
Call A Professional
If dust containment challenges persist, or if the space includes significant lead-based paint concerns, seek professional help. Stop work and contact a certified contractor if there is visible peeling paint, moisture damage, or mold along with heavy dust deposition. For large-scale renovations, a pro can ensure proper containment and ventilation while maintaining safety standards.
FAQ
What is the best order for cleaning drywall dust before painting?
Vacuum with a HEPA-equipped machine, sand with a dust-collection block if needed, wipe with tack cloth, then mop or wipe surfaces to pick up remaining fine particles.
Can I use water to clean drywall before painting?
Only if the wall is promptly primed and dried after; otherwise water can raise or warp drywall and create adhesion issues.
Why is dust control important before painting?
Dust inhibits primer and paint adhesion, causing flaking, texture variance, and reduced durability over time.
Do I need a special vacuum for drywall dust?
A HEPA-filtered shop vacuum is recommended to capture extremely fine particles and prevent them from recirculating into the air.
How long should I wait after cleaning before painting?
Wait until the surface is completely dry and any moisture is evaporated, typically a few hours depending on humidity and ventilation.
Is sanding necessary before painting?
Sanding helps smooth patched areas and remove high spots, but it should be done with a dust-collection tool to minimize exposure.
What about lead paint concerns?
If the home was built before 1978, test for lead paint and follow hazardous materials handling guidelines.
Buying Guide
When selecting tools to clean drywall dust before painting, consider size, noise, and efficiency. A high-quality HEPA shop vacuum for drywall dust provides strong pickup and safer air quality, while drywall sanding block with dust collection reduces airborne particles during sanding. A dust containment shield drywall sanding setup helps keep dust contained in a workspace. For finishing touches, tack cloth for drywall dust removal and a microfiber dust mop for walls and ceilings ensure a thorough, residue-free surface. Look for compatible attachments and simple maintenance to fit your project scope. Consider room size, HVAC layout, and the likelihood of recontamination to choose the right combination of tools and containment strategies.
What size is practical for a typical home project? A mid-sized HEPA shop vac with a broad cleaning head can handle most living spaces, while smaller setups suit tight areas. How loud is acceptable? Tools should balance performance with comfortable noise levels, especially in occupied homes. How energy-efficient should the setup be? Favor tools with efficient filtration and low power draw, which also reduces dust recirculation. How should you place tools during cleanup? Keep vacuums on a stable surface, with hoses managed to avoid tripping hazards and to maximize reach. Are there any safety concerns? Always wear a mask and eye protection, seal off the workspace, and ensure proper ventilation during cleaning and painting.