Construction dust can settle on furniture surfaces, leaving a fine, gritty film that is difficult to remove with regular cleaning. This guide provides practical steps to safely and effectively clean dust from furniture using common tools and specialized equipment. It covers preparation, methods, troubleshooting, and when to seek professional help.
Quick Answer
Use a layered approach: start with a microfiber or tack cloth to lift settled dust, follow with a vacuum attachment dusting brush on surfaces, and use a HEPA vacuum cleaner for construction dust furniture for deeper cleaning. For air quality, a portable HEPA air scrubber helps reduce airborne particles during the cleaning process.
What You’ll Need
Collect these tools and materials to efficiently remove construction dust from furniture:
- HEPA vacuum cleaner for construction dust furniture
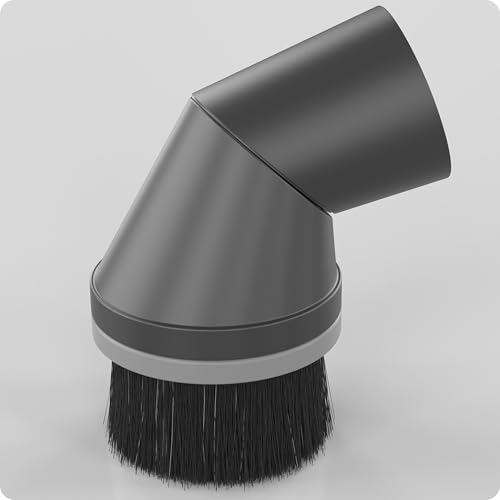
- vacuum attachment dusting brush for furniture
- tack cloth for dust removal on furniture
- microfiber dusting mitt for construction dust on furniture
- portable HEPA air scrubber for dust removal in rooms


Before You Start
Prepare the workspace by moving lightweight items away from the cleaning zone. Wear a dust mask and safety goggles if dust levels are high. Close adjacent doors to limit dust spread and cover floors with drop cloths. Estimate cleaning time: small rooms 30–60 minutes; larger rooms 60–180 minutes. Important cautions: avoid wet cleaning on unfinished wood or delicate finishes unless the product is labeled safe for that surface, and never use high-pressure air directly on soft furnishings, which can drive dust deeper into fibers.
Step-By-Step: How To Clean Construction Dust From Furniture
- Inspect surfaces to identify delicate finishes and coated wood. Plan to use a tack cloth for dust removal on furniture on smooth, sealed surfaces and reserve damp methods for appropriate finishes.
- Remove loose dust with a microfiber dusting mitt for construction dust on furniture. Glide in long, even strokes along grain directions to avoid scratching.
- Follow with a vacuum attachment dusting brush for furniture to lift dust from ornate edges, seams, and upholstery seams that mitts may miss.
- Use a HEPA vacuum cleaner for construction dust furniture to vacuum shelves, tabletops, and seating surfaces. Use low suction on delicate fabrics.
- Wipe down hard surfaces with a lightly damp microfiber cloth if necessary, then immediately dry with a dry microfiber cloth to reduce moisture damage risk.
- If deeper dust has settled into fabric or porous surfaces, consider a portable HEPA air scrubber for dust removal in rooms running in a filtered mode to reduce airborne particles during cleaning.
- Pay attention to corners, chair legs, and underside of furniture where dust can accumulate. Repeat brushing and vacuuming as needed.
- Replace or clean filters on equipment after use, especially the HEPA components, to maintain effectiveness for future cleanups.
- Reassess the area for remaining dust, especially on reflective or glossy finishes where dust may be more visible. Repeat steps as necessary.
- Store tools properly after cleaning, ensuring no residual dust is left in crevices of tools or fabric pockets.
- Dispose of captured dust following local waste guidelines, and wash textiles used during cleanup to prevent cross-contamination in future projects.
- Inspect the room after a short period to confirm the air feels cleaner and surfaces are free of flakes or smears.
Troubleshooting
| Symptom | Likely Cause | Fix | Prevention |
|---|---|---|---|
| Dust resettles soon after cleaning | Insufficient air filtration | Run a portable HEPA air scrubber for dust removal in rooms continuously during cleanup | Close doors and seal off area; use continuous filtration |
| Dust remains on crevices | Flat tools missing small gaps | Use a tack cloth for dust removal on furniture along seams and joints | Touch-up with vacuum brush in tight spaces |
| Finishes appear dull after cleaning | Over-wetting or harsh cleaners | Switch to microfiber and non-wetting methods; avoid excess moisture | Test on a small area first |
| Dust appears on upholstery | Dust penetrated fabric fibers | Use a vacuum with upholstery attachment and consider fabric-safe wipe downs | Clean from top to bottom to prevent re-depositing dust |
Common Mistakes
- Using damp cloths on unfinished wood or porous surfaces unless approved by the finish manufacturer.
- Relying on a single cleaning method; dust often requires multiple tools for best results.
- Neglecting to vacuum or replace filters on their equipment after heavy dust exposure.
- Moving dust from one surface to another by wiping with dry hands; always brush or vacuum first.
Tips For Best Results
- Work from top to bottom, and from clean to dirty areas to minimize re-deposited dust.
- Keep a dedicated toolkit for dust cleanup to avoid cross-contamination from other tasks.
- Pre-clean high-dust zones (ceiling edges, light fixtures) before tackling larger furniture surfaces.
- Use the right tool for the right surface: microfiber for finishes, tack cloth for wood joints, and HEPA vacuum for overall extraction.
- If possible, run the air scrubber in a filtered mode while cleaning to improve air quality in real time.
Call A Professional
Consider professional help if furniture surfaces are heavily coated, if finishes show staining from dust exposure, or if allergic reactions occur during cleanup. Stop cleaning and consult an expert if you notice damaged finishes, persistent odors, or high dust concentrations in living spaces.
FAQ
What is the best tool for dust on furniture after construction?
The combination of a HEPA vacuum cleaner for construction dust furniture and a tack cloth for dust removal on furniture yields strong results on most surfaces.
Can I use water to clean dust off furniture?
Light damp wiping is acceptable on sealed surfaces, but avoid excess moisture on unfinished or delicate finishes.
How often should I clean after a renovation?
Clean thoroughly after major dust events and perform routine touch-ups to prevent buildup.
Is a HEPA air scrubber necessary?
It is highly effective for reducing airborne dust during cleaning, especially in rooms with limited ventilation.
What should I do with leftover dust?
Dispose of dust according to local regulations and avoid storing in living spaces where it could re-enter air pathways.
Can I clean upholstery with a microfiber mitt?
Yes, using a microfiber dusting mitt with gentle strokes helps remove surface dust without harming fabrics.
Should I use professional services for large-scale dust cleanup?
For extensive renovations or high-dust environments, professional cleaning can ensure thorough removal and protect finishes.
Buying Guide
Choosing the right equipment helps maintain furniture during and after construction dust events. Consider factors like size, noise, energy efficiency, controls, and placement to suit a typical American home or apartment.
- <bSize and capacity: Look for compact, portable units that fit stairwells and closets for quick access, or larger models for open rooms where dust lingers.
- <bNoise level: Low-noise models are preferable for living spaces and bedrooms; check decibel ratings if possible.
- <bEnergy efficiency: HEPA-equipped devices with efficient motors reduce operating costs during extended cleanups.
- <bControls and usability: Simple controls, clear indicators, and washable prefilters simplify repeated use during renovations.
- <bPlacement and airflow: Position air scrubbers to optimize room flow and minimize dead zones; place behind furniture for better filtration without obstructing movement.
- <bMaintenance: Prioritize models with easy filter access and durable components to withstand frequent dust exposure.
- <bMulti-tool versatility: A vacuum with a dusting brush attachment and compatibility with tack cloths and microfiber supplies enhances flexibility.
When evaluating options, compare how each tool integrates with existing cleaning routines. Do you need a dedicated dust removal kit for furniture, or a larger system that covers rooms as well? The right combination of HEPA vacuum cleaner for construction dust furniture, tack cloth for dust removal on furniture, and portable HEPA air scrubber for dust removal in rooms can offer a balanced, effective solution.