Maintaining clean caulk around shower stalls and tubs helps prevent mold growth and keeps your bathroom looking fresh. This guide walks through practical, surface-safe methods to clean and refresh silicone sealant and caulk, with clear steps, tools, and troubleshooting to fit American homes.
Whether you’re dealing with mild soap scum or mildew staining, understanding the right tools and techniques can save time and preserve the integrity of your bathroom sealant.
Quick Answer
Best approach: start with gentler cleaners to prevent damage, then use a silicone blade scraper or replacement blade tool for stubborn buildup. For tough mildew, a dedicated remover gel or mildew stain remover can help without harming the sealant.
What You’ll Need
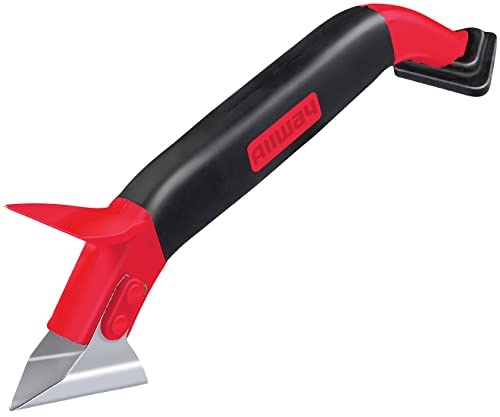
- Silicone caulk remover tool shower silicone blade scraper
- Caulk removal tool with replaceable blades bathroom shower
- Bathroom caulk remover gel scraper silicone shower
- Mildew stain remover for shower caulk silicone sealant
- Shower caulk scraper tool plastic blade bathroom


Before You Start
Prepare the area by removing any loose items from the shower and laying down a towel or protective sheet. Ventilate the space if using chemical cleaners. Test a small, inconspicuous area of the caulk first to ensure no discoloration or damage occurs. Time estimate: 20–40 minutes for initial cleaning; adding replacement caulk can extend the project.
Safety cautions: wear gloves to protect skin, keep cleaners away from eyes, and avoid mixing bleach with ammonia-based products. If you notice cracking or crumbling caulk, plan for resealing rather than attempting a deep clean that could worsen gaps.
Step-By-Step: How To Clean Caulk In The Shower
- Inspect the caulk line to identify areas of mildew, mold, or soap scum that require attention.
- Choose a cleaning method: start with a silicone blade scraper or plastic blade scraper to lift surface buildup gently.
- Apply a mild cleaner compatible with silicone caulk to the problem area and let it sit for a few minutes to loosen residues.
- Slide the silicone caulk remover tool or bathroom shower scraper along the seam to dislodge softened grime, using steady, even pressure.
- For stubborn mildew, apply a mildew stain remover for shower caulk silicone sealant to the affected zone and allow the product to work as directed.
- Wipe away loosened debris with a damp cloth and inspect the seam again. Repeat cleaning steps as needed on small sections.
- If the caulk is still discolored or shows signs of mold infiltration, consider removing and resealing the area with new silicone caulk for a long-lasting finish.
- After cleaning, rinse thoroughly with clean water and dry the area completely to prevent rapid re-growth.
- Apply fresh silicone caulk around the shower edges if resealing becomes necessary, using a steady bead and a caulk smoothing tool or finger dampened with water for a neat line.
- Allow the caulk to cure as recommended by the product instructions before exposing it to water.
- Clean the tools after use and store them in a dry place to prevent blade dulling or tool corrosion.
Troubleshooting
| Symptom | Likely Cause | Fix | Prevention |
|---|---|---|---|
| Mildew returns quickly after cleaning | Residual spores or inadequate drying | Dry thoroughly; reapply mildew stain remover and reseal if needed | Keep shower dry after use; improve ventilation |
| Discolored caulk after cleaning | Penetrating stains in porous caulk | Replace caulk with fresh silicone sealant | Seal in zones with frequent water exposure |
| Caulk tears or cracks during scraping | Caulk age or excessive force | Pause and replace rather than forcefully scrape | Use proper blades and light pressure |
| Hard-to-remove soap scum persists | Stubborn residue or mineral buildup | Repeat gentle cleaning; consider gel scraper product | Regular cleaning prevent buildup |
Common Mistakes
- Using aggressive metal tools that can scratch or gouge silicone caulk
- Over-relying on bleach-based products that may degrade silicone over time
- Waiting too long to address mildew, which makes removal harder
- Rushing the curing period after resealing, leading to premature water exposure
Tips For Best Results
- Test any cleaner on a small area before full application to avoid damage.
- Work in small sections to prevent spreading soap scum or mildew further along the seam.
- Keep blades sharp and replace dull blades to avoid tearing caulk during removal.
- Use a silicone-based remover tool designed for bathroom use to minimize surface damage.
- Consider resealing with a high-quality silicone caulk for areas with repeated moisture exposure.
Call A Professional
Stop signs to call a pro include extensive mold growth behind caulk, persistent mold after multiple cleanings, or widespread cracking and gaps in the grout or sealant. If you’re unsure about resealing or suspect water damage behind tiles, a bathroom contractor can assess and execute a proper remediation plan.
FAQ
Can I use bleach to clean caulk in the shower?
Bleach can whiten mold but may degrade silicone over time. Use sparingly and rinse thoroughly, or opt for milder mildew removers designed for silicone.
What type of caulk should I use for a bathroom shower?
Choose silicone-based caulk designed for bathrooms to resist water, mold, and cleaning chemicals.
How long does new caulk need to cure before shower use?
Most silicone caulks cure in 24 hours, but full cure may take up to 48 hours; check product instructions.
Is replacement necessary if caulk is just stained?
If staining persists after cleaning and moisture checks, resealing with new silicone caulk is often the most durable solution.
How can I prevent mildew re-growth after cleaning?
Improve ventilation, dry the area after showers, and perform routine cleanings with a mildew-focused product.
Are plastic blade scrapers safe for shower caulk?
Yes, plastic blade scrapers are gentle on caulk and effective for lifting buildup without scratching.
What maintenance schedule keeps caulk clean longer?
Weekly quick wipe-downs and a monthly deep clean help prevent mold and soap scum buildup.
Buying Guide
When selecting tools and products to clean or replace shower caulk, consider size, materials, and how they fit your bathroom layout. A versatile silicone caulk remover tool with replaceable blades offers long-term value, while a dedicated mildew remover can simplify maintenance. Review the following factors to make a smart choice.
Key Buying Factors
- <bSize and reach: Choose tools with comfortable grips and blades long enough to cover seams without overreaching.
- <bBlade type: Replaceable blades extend tool life and reduce scraping damage to caulk.
- <bMaterial compatibility: Ensure removers are safe for silicone caulk and hardware finishes in bathrooms.
- <bMildew cleaning capability: Look for products labeled for mildew stain removal compatible with silicone.
- <bEase of use: Plastic blade scrapers reduce risk of scratching and are beginner-friendly.
- <bStorage and maintenance: Tool sets with organized storage and clear cleaning instructions save time.
Product Perspectives
For routine maintenance, a bathroom caulk remover tool with a silicone blade scraper is efficient and gentle. If mold has penetrated the caulk, a gel remover followed by resealing often yields the best results. Consider a combination kit that includes a mildew stain remover and a durable scraper to cover cleaning and resealing tasks in one package.