Blender bottles and shaker cups are popular tools for blending protein shakes, smoothies, and meal replacements. Proper cleaning helps prevent odors, stains, and bacterial buildup. This guide offers practical, step-by-step methods tailored to American kitchens and common blender bottle designs.
Quick Answer
Rinse immediately after use, wash with warm water and mild dish soap, then air-dry. For stubborn residue, use specialized cleaning tools and consider dishwasher-safe options when applicable. Regular maintenance prevents lingering smells and extends bottle life.
What You’ll Need
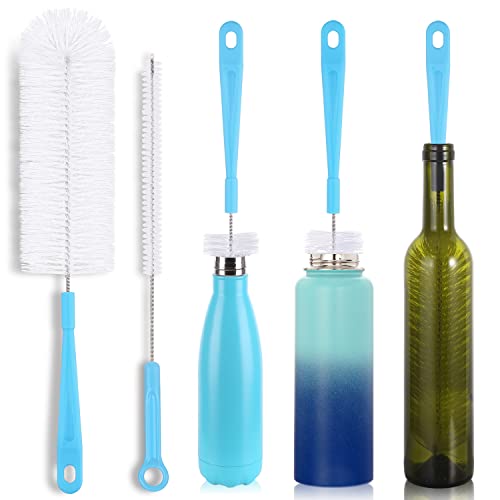
- BlenderBottle shaker bottle cleaning brush
- Dishwasher-safe shaker bottle cleaning kit
- Long-handled bottle brush for shaker bottles
- Blender bottle cleaning tablets
- Narrow-neck bottle cleaning brush for shaker bottles


Before You Start
Prepare a clean workspace and gather tools. Rinse the bottle under warm running water to loosen residues. Avoid soaking metallic or battery-powered components unless the manufacturer specifies compatibility. Time estimate: 5–10 minutes for routine cleaning; 15–20 minutes for thorough scrubs and bottle inspection.
Step-By-Step: How To Clean A Blender Bottle
- Rinse the bottle with warm water immediately after each use to prevent dried residue.
- Fill with warm water and a few drops of mild dish soap, then close and shake vigorously for 15–20 seconds.
- Disassemble all removable parts—lid, gasket, whisk ball, and any seals—to expose all surfaces.
- Scrub the interior with a long-handled bottle brush for shaker bottles to reach the bottom and corners.
- Clean the threads, lid mouth, and gasket area with a narrow-neck bottle cleaning brush to remove hidden grime.
- Rinse thoroughly with clean water until no soap residue remains.
- Use blender bottle cleaning tablets according to package directions for a deeper cleanse when odors persist.
- Inspect for lingering smells; if present, rinse again and air-dry upside down on a rack.
- Ensure the cap and seal are completely dry before reassembling to prevent mold.
- Store with the lid off or ajar to improve airflow and reduce moisture buildup.
- For dishwasher-safe parts, place them on the top rack and use a gentle cycle if the manufacturer approves.
- Repeat daily or weekly as needed, depending on usage and ingredients used.
Troubleshooting
| Symptom | Likely Cause | Fix | Prevention |
|---|---|---|---|
| Persistent sour smell | Residual oils or spoiled dairy | Soak with cleaning tablets; scrub with brush | Rinse promptly after use; air-dry completely |
| Stubborn staining | Color-rich powders or fruit | Use baking soda paste on stains; rinse | Pre-rinse and quick wash after use |
| Gasket residue around lid | Soap buildup or moisture trap | Clean gasket area with narrow-neck brush; dry thoroughly | Dry after washing; remove gasket weekly for inspection |
| Moldy interior | Moisture left during storage | Deep clean with tablets; ensure complete drying | Store open; rotate bottles to air |
Common Mistakes
- Waiting too long to clean after blending, allowing dried residue to form.
- Forgetting to disassemble the lid and seal components for thorough cleaning.
- Using abrasive brushes or scrubbing pads that scratch the interior.
- Washing only the exterior and neglecting the narrow neck and gasket areas.
- Storing while still damp, which encourages mold growth.
Tips For Best Results
- Keep a dedicated blender bottle cleaning brush handy near the sink for quick scrubs.
- Choose dishwasher-safe parts when possible to simplify cleaning cycles.
- Periodic deep cleans with blender bottle cleaning tablets help neutralize odors.
- Label bottles to track cleaning frequency and prevent odor transfer from other foods.
- Replace worn gaskets or seals to maintain a tight seal and prevent leaks during washing.
Call A Professional
In most cases, routine cleaning is straightforward. Seek professional help if the bottle shows persistent mold growth, persistent strong odors after thorough cleaning, or if discoloration affects taste despite repeated cleaning. If the lid or seals are damaged and cannot be replaced, consult the manufacturer’s support for replacement parts or guidance.
FAQ
Can I put a blender bottle in the dishwasher?
Many bottles are dishwasher-safe on the top rack, but always follow the manufacturer’s instructions to avoid warping or damage.
What should I do if the bottle still smells after cleaning?
Try cleaning with blender bottle cleaning tablets and ensure complete drying before storage.
How often should I replace the gasket?
Inspect monthly; replace when you notice cracks, stiffness, or odor retention.
Are metal bottles harder to clean than plastic?
Metal bottles can require more attention to remove mineral buildup; use brushes designed for narrow necks and confirm compatibility with cleaners.
Buying Guide
When selecting a blender bottle and cleaning kit, consider these factors to optimize cleaning efficiency and ongoing hygiene.
- Size and capacity: Choose a bottle that matches typical serving sizes and is easy to reach with your cleaning tools.
- Noise level: Some cleaning tools generate minimal noise; quiet brushes can improve convenience in shared spaces.
- Energy efficiency: If using dishwasher cycles, select bottles that tolerate the heat and cycles without warping.
- Controls and features: Look for sealed lids, removable gaskets, and compatible cleaning kits for thorough scrubbing.
- Placement: Store bottles upright in a dry area; ensure they are easily accessible for daily cleaning.
Choosing the right combination of bottle and cleaning tools can reduce odor buildup and extend the product’s life. Are you ready to pick a kit that includes the essential brushes and cleaning tablets to maintain your blender bottle in peak condition?