Keeping a wave brush clean is essential for healthy hair and scalp. Build-up from oils, sweat, and product residue can transfer back onto hair, dulling wave patterns and causing scalp irritation. This guide outlines safe, effective methods using common tools and a few specialty items designed for cleaning brushes used to shape waves.
Readers will learn a straightforward routine that works for most wave brushes, including maintenance tips to extend brush life and preserve performance. The steps below prioritize safety, efficiency, and clarity to help both beginners and seasoned groomers achieve consistent results.
Quick Answer
Best method at a glance: rinse the brush under warm water, loosen debris with a cleaning tool, scrub with mild soap or shampoo, rinse thoroughly, dry with bristles facing down, and store in a dry area. For stubborn residue, use a silicone mat or specialized scraper before the final rinse.
What You’ll Need
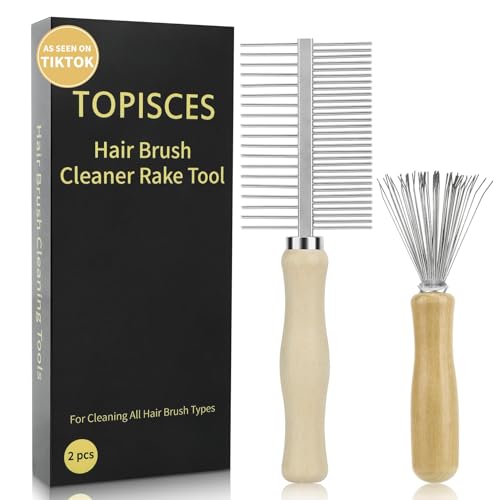
- Wave Brush Cleaning Tool for Hair
- Silicone Hairbrush Cleaning Mat
- Boar Bristle Brush Cleaner Tool
- Hairbrush Cleaning Brush with Scraper
- Dual-Sided Hair Brush Cleaning Kit


Before You Start
Prepare a clean workspace and gather all tools. Place a towel or shallow basin under the brush to catch water and loose debris. Use lukewarm water to avoid damaging synthetic bristles or wood parts. Avoid soaking wooden handles for extended periods, which can cause warping or cracking. Allow the brush to air dry completely before reuse or storage.
Time estimate: 5–15 minutes per cleaning session, depending on residue. If you have sensitive skin or allergies, wear gloves and opt for fragrance-free cleansers.
Step-By-Step: How To Clean A Wave Brush
- Remove hair and large debris by hand or with the dual-sided hair brush cleaning kit to loosen difficult clumps.
- Rinse the brush head under warm running water to loosen oils and product buildup. Keep the handle away from direct exposure if it’s wooden.
- Use the wave brush cleaning tool for hair or boar bristle brush cleaner tool to lift and extract embedded residue from between bristles.
- Apply a small amount of mild shampoo or gentle soap to a soft sponge or the silicone hairbrush cleaning mat, then gently scrub the bristles in circular motions.
- Rinse thoroughly, ensuring all soap is removed. Residue can attract more dirt if not fully rinsed.
- For stubborn buildup, press the brush against the hairbrush cleaning brush with scraper to scrape away residue without damaging bristles.
- Shake off excess water and lay the brush on a towel with bristles facing downward to air dry completely.
- Once dry, inspect the bristles for misalignment or damage. If bristles are bent, set the brush aside for longer drying time before next use.
- Store in a dry, ventilated space to prevent mold or mildew. Regular cleaning after heavy product use maintains effectiveness.
Troubleshooting
| Symptom | Likely Cause | Fix | Prevention |
|---|---|---|---|
| Residual soap or oily film remains after washing | Incomplete rinse | Rinse thoroughly twice, paying attention to between bristles | Rinse immediately after cleaning and run water between washes |
| Bristles appear bent or misaligned | Brushing too hard or drying improperly | Gently reshape bristles while damp; avoid heat; ensure air dry | Use soft brushes and air-dry in a bristle-down position |
| Foul odor persists | Mold/mungal buildup or trapped moisture | Disinfect with a mild solution, then thoroughly dry | Clean routinely; store in a dry area |
| Wood handle shows cracks or swelling | Prolonged exposure to water | Limit soaking; dry promptly after cleaning | Separate wood and water contact; use protective coatings if possible |
Common Mistakes
- Overwashing with harsh chemicals that degrade bristles
- Forcing debris out with sharp objects, risking bristle damage
- Ignoring drying time, leading to mildew or odor
- Using hot water that weakens adhesives or wooden components
To improve results, stick to mild cleansers, gentle scrubbing, and thorough drying. Small, consistent maintenance prevents larger cleanups later.
Tips For Best Results
- Clean after intense product use to prevent buildup.
- Alternate between a cleaning brush and a scraper to reduce wear on bristles.
- Use the silicone mat to stabilize the brush while cleaning for a thorough, even scrub.
- Avoid soaking any wooden parts; dry promptly to preserve finish.
- Regularly inspect for loose or damaged bristles and replace as needed.
Call A Professional
Seek professional care if the brush has significant cracking, loose bristles that won’t stay in place, or if cleaning fails to remove stubborn odors or mold. If the handle is structurally compromised or wood shows deep warping, a professional can advise on repair or replacement options.
FAQ
How often should I clean my wave brush?
Clean after heavy product use or weekly for routine maintenance, depending on hair type and scalp health.
Can I use dish soap to clean my wave brush?
Yes, a mild dish soap or shampoo works well, provided you rinse thoroughly.
Is it okay to soak the brush in water?
Only if the handle is plastic or water-resistant; avoid soaking wooden handles for long periods.
What’s the best way to dry a wave brush after cleaning?
Lay it bristles-down on a towel in a well-ventilated area until completely dry.
Can I use a hair dryer to speed drying?
Use caution with heat; air drying is safer for most brushes to prevent bristle damage.
Buying Guide
Selecting a cleaning setup for a wave brush involves considering several factors. Size and bristle type determine how easily buildup can be removed and how comfortable the process feels. Noise level is typically not a concern with cleaning tools, but consider whether you want a compact setup for travel or a larger mat for home use.
Energy efficiency is usually not a major factor for manual tools, but if you’re choosing an electric or hands-free cleaning option, look for energy-saving features and ergonomic designs. Controls should be simple and intuitive, such as non-slip grips or suction mats that keep gear in place during cleaning.
Placement matters too. A dedicated cleaning station with good lighting and a drain makes maintenance easier and cleaner. If space is limited, a dual-sided cleaning kit can pack multiple functions in a compact form. When comparing options, consider durability, ease of cleaning, compatibility with your brush model, and how well the tool handles tight spaces between bristles. Do you prefer a dedicated silicone mat, or a tool that combines multiple functions in one?