Dry makeup brushes require careful cleaning to remove trapped pigment and oils without damaging the bristles. The following guide explains a practical, user-friendly method and highlights tools that streamline the process for American users.
Quick Answer
Prepare by rinsing the brush under lukewarm water, apply a gentle cleanser, work up a lather, rinse thoroughly, and reshape the bristles. Allow to air-dry completely before reuse.
What You’ll Need
- Silicone makeup brush cleaning mat
- Ultrasonic makeup brush cleaner
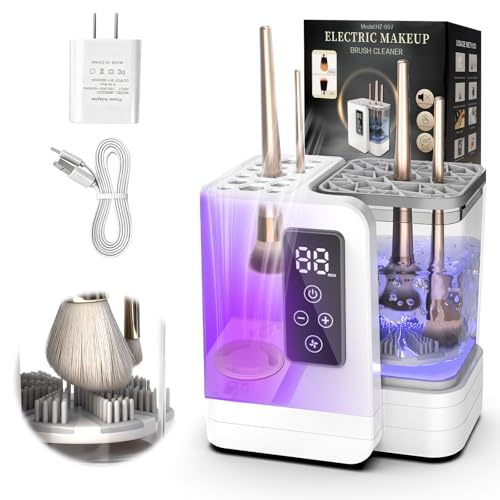
- Electric makeup brush cleaner
- Makeup brush cleaning glove silicone
- Makeup brush cleaning tray mat with grid

Before You Start
Choose a clean workspace and protect surfaces with a towel or mat. Use lukewarm water rather than hot water to avoid bristle damage. Avoid soaking wooden-handled brushes for extended periods, as it can loosen glue and deform the handle. Permit ample drying time—wet brushes stored away can breed bacteria.
Estimated time for a thorough clean: about 15–30 minutes per brush, depending on buildup and tool choice.
Step-By-Step: How To Clean A Dry Makeup Brush
- Lay the brush flat on a clean surface or use a silicone cleaning mat to hold it steady while cleaning.
- Rinse the brush bristles under cool to lukewarm water, avoiding the ferrule where the handle meets the bristles.
- Apply a small amount of gentle cleanser directly to the bristles or onto the cleaning mat, then work in small circular motions to lift pigment.
- For stubborn makeup, use a light back-and-forth motion along the bristle base to dislodge dried product.
- Rinse the bristles thoroughly under running water until the water runs clear and no soap remains.
- Gently squeeze out excess water with a clean towel and reshape the brush head.
- Place the brush in an upright position or lay it flat with the bristles over the edge of a surface to air-dry completely.
- If using an ultrasonic cleaner, follow the manufacturer’s instructions for detergent concentration and cycle time, then rinse and air-dry as above.
- For speed and convenience, a makeup brush cleaning glove silicone or tray mat with grid can help keep bristles clean while you scrub and dry.
- Repeat the process for each brush, allowing full drying between uses to maintain hygiene.
- Inspect bristles for wear. Replace brushes with frayed or shed bristles to avoid skin irritation.
- Store brushes in a clean, dry area away from moisture and dust.
Troubleshooting
| Symptom | Likely Cause | Fix | Prevention |
|---|---|---|---|
| Bristles stay stiff after drying | Excess cleanser or incomplete rinsing | Rinse again thoroughly and gently reshape | Use minimal cleanser; rinse until water runs clear |
| Color staining on bristles | Residual pigment within bristles | Repeat washing, consider a color-safe clarifying rinse | Clean brushes promptly after use with similar pigments |
| Bristles splay or flatten | Heat exposure or improper drying position | Reform bristles while damp and dry upright | Avoid direct heat; dry flat or upright |
| Mold or musty smell | Moisture retention in bristles | Ensure complete drying; use ventilation | Do not store damp brushes |
Common Mistakes
- Using hot water that “shocks” bristles or loosens glue
- Submerging handles or ferrules for long periods
- Over-squeezing brushes, which can damage the shape
- Rushing the drying process; improper drying invites mildew
- Using harsh cleaners that degrade bristles
Tips For Best Results
- Clean brushes regularly; daily use may require weekly cleaning for ideal hygiene.
- Rotate brushes to prevent buildup and extend bristle life.
- When drying, keep bristles elevated and fan them out to maintain shape.
- Consider using an ultrasonic makeup brush cleaner for deep cleaning of dense brushes.
- Store brushes with bristles up or flat to prevent deformation.
Call A Professional
Seek professional help if brushes show persistent shedding, cracking, or if you notice any odor that doesn’t fade after cleaning. Professional brush cleaning services are recommended when dealing with delicate or luxury brushes that require specialized care.
FAQ
How often should I clean my makeup brushes?
Light daily brushes can be cleaned weekly; dense or heavily used brushes may require cleaning every few days.
Can I use regular dish soap to clean brushes?
Gentle, makeup-specific cleansers or mild dish soap are acceptable, but opt for formulas designed for brushes when possible.
Is it OK to use hot water to clean brushes?
No. Hot water can damage bristles and loosen glue, reducing brush lifespan.
How long should brushes air-dry?
Most brushes fully dry within 6–12 hours, but larger or densely packed brushes may take longer.
Buying Guide
Choosing the right brush-cleaning setup depends on budget, usage, and preferred method. Consider the following factors:
- Size and capacity: If you own many brushes, an ultrasonic makeup brush cleaner or electric makeup brush cleaner with multiple slots can save time.
- Effectiveness: Cleaning mats and gloves provide surface areas that lift pigment; an ultrasonic cleaner adds a deep-cleaning action.
- Speed vs. gentleness: Electric and ultrasonic devices speed up cleaning but may be harsher on delicate brushes; always follow manufacturer guidance.
- Noise level: Ultrasonic units can be quieter or louder depending on model; look for consumer reviews focused on noise.
- Energy efficiency: Check power consumption if you plan frequent use; energy-efficient models are preferable for daily routines.
- Controls and presets: Look for simple controls with clear cycle options and timer settings.
- Placement: Ensure a stable surface and easy access to outlets; consider a mat or tray to catch splashes.
Would you benefit from a stackable or compact system for a small vanity? Do you need a professional-grade cleaner or a budget-friendly starter kit? A balanced choice aligns with routine, brush types, and tolerance for maintenance.