Clogged faucet aerators are a common culprit behind reduced water pressure and uneven spray. Cleaning the aerator restores flow, improves efficiency, and extends the life of your faucet. This guide walks American homeowners through a practical, step-by-step process to remove, clean, and reinstall a sink aerator using common tools and accessible supplies.
Quick Answer
Here’s the fast method: remove the aerator with the right tool, soak it in vinegar or a descaling solution, scrub with a soft brush, rinse, and reinstall. Tests show near-instant improvement in flow after cleaning. If flow remains weak, inspect for mineral buildup in the faucet throat or replace damaged screens.
What You’ll Need
- Kitchen faucet aerator cleaning kit
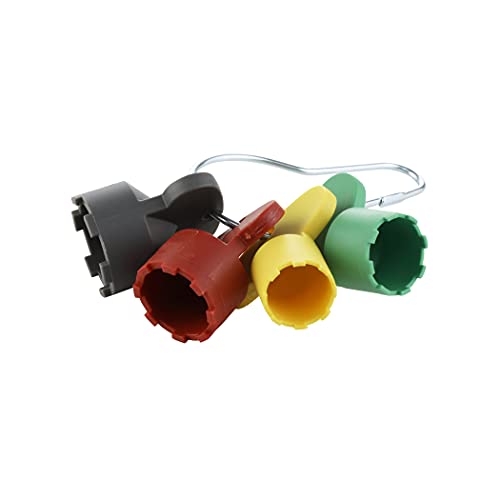
- Universal faucet aerator removal wrench
- Stainless steel faucet aerator cleaning brush
- Faucet aerator replacement screen kit
- Small adjustable faucet aerator wrench for kitchen
- White vinegar or descaling solution
- Small bowl or cup for soaking
- Lint-free cloth


Before You Start
Before attempting a cleaning, turn off the water briefly at the shutoff valve or run a small amount of water to relieve pressure. Protect surfaces around the sink from vinegar splashes and wear gloves if you have sensitive skin. Most aerators are compact and threaded, but some may be reverse-threaded depending on the faucet design. Identify the type of aerator you have to avoid overtightening during removal.
Estimated time: 20–40 minutes for a full cleaning including soaking. If you notice corrosion, damaged screens, or a continuously leaky valve after cleaning, plan for replacement or professional assessment.
Step-By-Step: How To Clean A Sink Aerator
- Close the faucet and place a towel beneath the sink to catch drips. Locate the aerator at the end of the faucet spout.
- Using the universal faucet aerator removal wrench or small adjustable faucet aerator wrench, grip the aerator and turn counterclockwise to remove it. If it’s tight, apply a gentle twist and avoid forcing it to prevent thread damage.
- Inspect the aerator screen for debris, mineral buildup, or discolored spots. If present, proceed to the soaking step.
- Fill a small cup with white vinegar or descaling solution and submerge the aerator pieces. Let them soak for 15–30 minutes to loosen mineral deposits.
- Remove the components and scrub them with the stainless steel faucet aerator cleaning brush, paying attention to tiny crevices and the screen.
- Rinse all parts under running water. If deposits persist, repeat soaking and brushing until the screen is clear.
- Reassemble the aerator parts in the correct order, ensuring the screen is seated properly and threads are clean. Do not overtighten during reinstall.
- Reattach the aerator to the faucet and run cold water for 15–30 seconds to flush the line. Check for improved flow and a consistent spray pattern.
- If the aerator is damaged or the screen kit components are worn, install the faucet aerator replacement screen kit to restore performance.
- Document maintenance by marking the date on a temporary note near the faucet. Regular checks (every 6–12 months) help prevent buildup.
Troubleshooting
| Symptom | Likely Cause | Fix | Prevention |
|---|---|---|---|
| Slow water flow after reinstall | Mineral buildup still inside the aerator or faucet throat | Repeat soak and brush; consider replacing screen components | Regular cleaning schedule |
| Spray pattern is uneven | Aerator screen partially clogged or misassembled | Disassemble, clean, and reassemble correctly | Check screen seating and threads |
| Water leaks around aerator | Improper threading or damaged gasket | Apply thread sealant sparingly or replace gasket | Use correct size and compatible parts |
| No water after cleaning | Shutoff valve or supply line issue | Verify valve is open and supply lines are clear | Inspect under-sink connections periodically |
Common Mistakes
- Using excessive force when removing or reinstalling the aerator, which can strip threads
- Ignoring mineral buildup in the faucet throat, focusing only on the screen
- Using harsh chemicals that could corrode metal components
- Skipping replacement of worn screens when the kit is available
Regular maintenance with the right tools helps prevent these issues from recurring and keeps faucets functioning smoothly.
Tips For Best Results
- Prefer a warm vinegar soak for mineral-heavy deposits, but avoid soaking brass or chrome-plated parts too long if advised by manufacturer guidelines
- Keep a small toolkit near the sink that includes the universal faucet aerator removal wrench and small adjustable faucet aerator wrench for kitchen
- Replace screens proactively using a dedicated faucet aerator replacement screen kit to maintain optimal flow
- Label the aerator type on the faucet with a short note to simplify future maintenance
Call A Professional
Schedule professional help if: the aerator cannot be removed due to corrosion, leaks persist after multiple maintenance attempts, or there are significant faucet component failures. Signs to seek a pro include persistent low pressure despite a clean screen and brittle or damaged threads that compromise the faucet’s sealing capability.
FAQ
Can I use vinegar on all faucet materials?
Most mineral deposits respond well to vinegar, but check manufacturer guidance for brass or nickel finishes to avoid damage.
How often should I clean a faucet aerator?
For homes with hard water, clean every 6–12 months; in softer water areas, yearly maintenance is often sufficient.
What if the aerator is missing or damaged?
Replace with a compatible unit using a faucet aerator replacement screen kit to restore flow and prevent leaks.
Do I need special tools to remove all aerators?
Many aerators require only a small wrench or pliers, but a universal removal wrench ensures compatibility across designs.
Is it safe to soak aerator parts in vinegar overnight?
Short soaks are recommended; overnight soaking can sometimes affect finishes. Follow product guidelines and avoid prolonged exposure.
Can I reuse the same screen after cleaning?
Yes, if the screen shows no damage or wear; otherwise replace it with a new screen from the replacement kit.
Buying Guide
When selecting tools and replacement parts for sink aerator maintenance, consider these factors to optimize performance and longevity.
- Size and compatibility: Ensure the universal faucet aerator removal wrench and replacement screens fit common aerator thread sizes. If unsure, carry a few different sizes or choose tools labeled universal.
- Noise and water conservation: While cleaning is silent, choosing efficient screens and proper aerator components helps minimize splashing and maintain steady pressure, contributing to water conservation.
- Energy and water efficiency: Regular cleaning preserves optimal spray patterns, reducing the need to run faucet longer to achieve preferred flow.
- Controls and ease of use: Ergonomic tools with comfortable grips reduce strain and improve accuracy during removal and reassembly.
- Placement considerations: For dual-sink faucets, verify compatibility for both sides, as some aerators are side-specific or one-sided in design.
- Maintenance kit contents: A kit that includes a stainless steel faucet aerator cleaning brush and a faucet aerator replacement screen kit helps manage routine upkeep without extra purchases.
Consider a bundled kit that covers all essential tasks: removal, cleaning, screen replacement, and reinstallation. This reduces downtime and ensures you have the right parts on hand for future maintenance. Do you want a compact, all-in-one solution for daily upkeep or a more robust set for hard-water households?