Maintaining a clean shower pan is essential for a fresh bathroom and a hygienic living environment. This guide provides practical, step-by-step methods using common tools to remove soap scum, mineral deposits, and mildew from acrylic, fiberglass, and tile environments. Readers will learn efficient approaches that minimize scrubbing time while protecting surfaces.
Quick Answer
For quick results, start with a mild cleaner, scrub with a nylon bristle shower pan brush, and finish with a rinse. For stubborn stains, switch to a silicate-based cleaner or a shower pan cleaning kit with a scraper and spray bottle. Regular maintenance reduces buildup and keeps the pan looking new.
What You’ll Need
- nylon bristle shower pan scrub brush for acrylic fiberglass
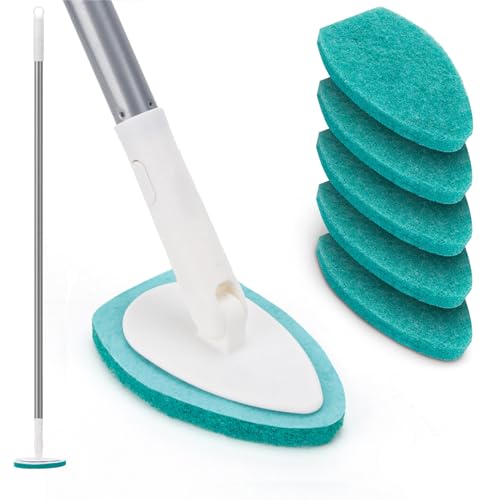
- extension handle bathroom scrub brush for shower pan
- silicone grout cleaning brush for shower pan cleaning
- soft grip tile and grout scrub brush for shower pan
- shower pan cleaning kit with scraper and spray bottle


Before You Start
Prepare the area by removing all bath mats and products from around the shower. Ventilate the space to reduce fumes and contact with cleaning agents. Test cleaners on a small, inconspicuous area of the shower pan first to ensure there is no adverse reaction. Plan for a total cleaning time of 20–60 minutes depending on buildup. Wear gloves and eye protection when using harsher cleaners.
Step-By-Step: How To Clean A Shower Pan
- Dry the surface and inspect the pan for any chips or cracks that may trap grime.
- Apply a mild bathroom cleaner or a mixture of baking soda and water to cover the affected areas.
- Use a nylon bristle shower pan brush for initial scrubbing, focusing on corners and drain perimeter.
- For stubborn mineral deposits, apply a dedicated cleaner and scrub with the extension handle bathroom scrub brush for shower pan to reach high edges.
- Alternate with the silicone grout cleaning brush for shower pan cleaning to break up grout haze near seams if applicable.
- Rinse thoroughly with warm water to remove loosened debris.
- Use the shower pan cleaning kit with scraper and spray bottle to gently lift and remove any tough residues around the drain.
- Repeat as needed, then wipe dry and inspect for remaining stains.
- Finish with a light mist of water and a quick dry to prevent new mineral buildup.
- If you notice persistent mildew, treat with a 1:1 mixture of water and white vinegar, wait 10 minutes, then rinse.
- Return mats and products, ensuring the area is completely dry before use.
- Schedule routine cleanings to maintain a fresh shower pan state and prevent heavy buildup.
Troubleshooting
| Symptom | Likely Cause | Fix | Prevention |
|---|---|---|---|
| Streaks or dark patches persist after cleaning | Soap scum buildup in grout lines or pan recesses | Reapply cleaner and scrub with a grout-friendly brush; rinse well | Regular weekly cleaning |
| Rings around the drain remain | Hard water mineral deposits | Use a mineral-removing cleaner and scrub with nylon bristle brush | Dry after each shower |
| Strong mildew odor | Moist environment and mildew growth | Apply a mildew-targeted cleaner and ensure good ventilation during cleaning | Keep area dry after use |
| Scrubber leaves scratches on acrylic | Aggressive scrubbing with hard-bristle tools | Switch to softer brushes and use gentle circular motions | Use protective coatings or sealants as recommended |
Common Mistakes
- Using highly abrasive pads that scratch acrylic or fiberglass pans
- Neglecting corners and drain area where grime collects
- Over-wetting surfaces before cleaning, which can dilute cleaners and spread grime
- Skipping rinsing steps, leaving cleaner residue that attracts more dirt
Tips For Best Results
- Schedule a weekly wipe-down routine to minimize buildup.
- Pre-wet the pan before applying cleaners to reduce surface tension and improve cleaning action.
- Use the extension handle to reach the far corners and under the drain without bending.
- Rotate brushes to avoid overusing one area, which can wear patterns into surfaces.
- Rinse with warm water to loosen mineral deposits more effectively than cold water.
Call A Professional
Consider a professional if the shower pan shows deep cracks, persistent mold behind tiles, or staining that won’t respond to standard cleaning. Stop and consult a pro if you notice structural damage, persistent leaks, or if cleaning requires aggressive chemicals beyond household cleaners.
FAQ
What is the best brush to clean a shower pan?
The nylon bristle shower pan brush for acrylic fiberglass offers effective cleaning without scratching surfaces.
Can I extend my reach with a handle?
Yes, the extension handle bathroom scrub brush for shower pan improves reach for high edges and tight corners.
Are there tools specifically for grout around the shower pan?
Yes, the silicone grout cleaning brush for shower pan cleaning helps tackle grout lines safely.
What should I use for stubborn stains near the drain?
A shower pan cleaning kit with scraper and spray bottle is designed for stubborn residues and precise application.
How often should I clean the shower pan?
For most households, a light cleaning once a week and a deeper clean every 2–4 weeks keeps buildup minimal.
Is it safe to use vinegar on acrylic or fiberglass?
Vinegar is generally safe in diluted form for many surfaces, but test first and avoid mixing with bleach.
What if the pan has chips or cracks?
Assess for damage and consider professional repair or replacement if structural flaws are present.
Buying Guide
When selecting tools and products to clean a shower pan, consider size, material compatibility, and ease of use. For pans made of acrylic or fiberglass, choose softer brushes to prevent scratching while still delivering effective scrubbing power. Look for a versatile shower pan cleaning kit with a scraper for stubborn residues and a spray bottle for targeted cleaner application. A long-handled brush reduces bending and improves reach, particularly in corner areas. Consider the noise level of any electric scrub tools if you opt for power assistance, and ensure the kit includes a variety of brush textures to handle grout lines and pan surfaces. Finally, verify that cleaners are safe for your shower pan material and for any surrounding tile or grout to avoid discoloration or damage.