Clean vent covers not only improve indoor air quality but also help HVAC systems run more efficiently. This guide walks through practical steps to remove dust, dirt, and buildup from wall and ceiling vent covers using common tools and safe methods. Readers will learn how to assess the type of vent, select appropriate cleaning tools, and avoid damaging delicate louvers or coatings during the process.
Whether dealing with kitchen grease, pet hair, or seasonal dust, a clean vent cover makes a noticeable difference in room air and system performance. The steps below emphasize safety, efficiency, and repeatable results that homeowners can apply to most residential vent configurations.
Quick Answer
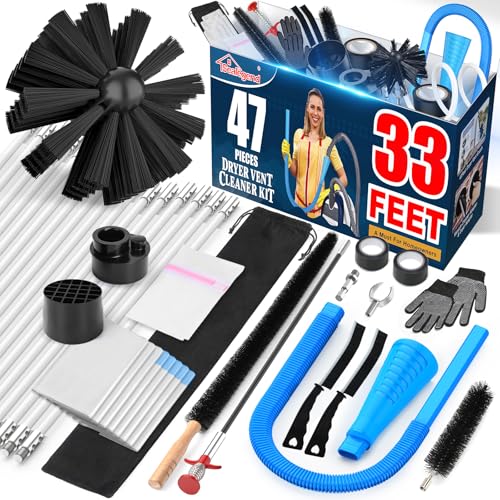
What works best: detach the vent cover, use a soft brush or microfiber cloth, rinse if plastic, and dry completely before reinstallation. For stubborn buildup, try a vent grille cleaning tool kit or a slotted louver vent cleaner brush to reach internal louvers.
What You’ll Need
- Air vent cleaning brush extendable rod
- Vacuum attachment vent cleaning brush for wall vents
- Vent grille cleaning tool kit
- Dryer vent cover cleaning brush
- Slotted louver vent cleaner brush


Before You Start
Safety first: turn off the HVAC system or switch the circuit if needed to prevent fan operation during removal. Have protective gloves and a dust mask handy, especially in dusty or mold-prone spaces. Remove furniture or clear the area to avoid contact with debris. Estimate 15–30 minutes for a standard cover; more time may be required for multiple vents or heavily soiled covers. Do not scrub coatings off plastic or painted surfaces; use gentle pressure and choose tools that minimize scratch risk.
Step-By-Step: How To Clean A Vent Cover
- Disengage the vent cover by removing screws or lifting the cover from its mounting seat.
- Inspect the grille for damage, warping, or rust. If damaged, plan for a replacement before reinstalling.
- Dust the exterior with a dry brush or microfiber cloth to remove loose debris.
- Use an extendable brush or a vacuum attachment to reach between slats or louvers. Begin with the areas closest to the surface.
- For stubborn buildup, lightly dampen a cloth or sponge and wipe in the direction of the louvers. Avoid soaking the material.
- Clean the interior surfaces of the vent with a vacuum or a brush designed for vent cleaning to pull out embedded dust.
- Rinse plastic covers with warm water if permitted by manufacturer guidance; dry completely with a towel or air dry before reattachment.
- Reinstall the vent cover securely, ensuring screws are snug but not overtightened.
- Run the HVAC briefly to confirm the cover is properly seated and airflow is even. Listen for rattles or vibrations that indicate misalignment.
- If residue remains after initial cleaning, repeat the process focusing on the most clogged louvers or slats.
- Schedule regular cleaning intervals (every 3–6 months for typical homes) to prevent heavy buildup.
Troubleshooting
| Symptom | Likely Cause | Fix | Prevention |
|---|---|---|---|
| Visible dust on the surface after cleaning | Residual dust trapped in louvers | Re-sweep with a narrow brush or use an extendable tool to dislodge | Clean more frequently; use fine-gauge brushes |
| Stiff or squeaky louvers | Dried grime; hinge wear | Wipe with a damp cloth; apply a light lubricant to moving parts if allowed | Avoid harsh solvents; lubricate sparingly |
| Uneven airflow after reinstallation | Vent cover not seated properly | Remove and reseat; check for screws touching the grille | Check mounting depth before tightening |
| Water spots or cracking on plastic cover after cleaning | Excess moisture or harsh cleaners | Use a mild soap solution and dry thoroughly | Limit moisture exposure; air dry fully |
Common Mistakes
- Using abrasive sponges or strong solvents on delicate vent finishes
- Leaving covers wet, which can promote mold growth or warp edges
- Overtightening screws, causing cracks or warping
- Not disconnecting power before cleaning, risking fan injury or debris in the system
Tips For Best Results
- Choose the right tool: extendable rods and slender brushes reach tight louvers without dismantling the vent completely.
- Work from top to bottom to prevent re-depositing dust onto cleaned surfaces.
- Combine dry and damp cleaning methods as appropriate for material type and buildup level.
- Inspect vents for structural wear during cleaning; replace damaged covers to maintain system efficiency.
Call A Professional
Consider professional help if the vent shows signs of mold, persistent musty odors, extensive rust, or if access requires ceiling or wall demolition. Seek expert assessment for channels that are difficult to reach or that involve complex ductwork. Stop cleaning and schedule a service if you notice leaks, cracks, or unusual noises that suggest structural issues.
FAQ
How often should I clean vent covers?
In general, clean vent covers every 3–6 months, with higher frequency in homes with pets, allergies, or heavy dust.
Can I put vent covers in the dishwasher?
Most vent covers should not go in a dishwasher; check manufacturer guidance. Use hand washing with mild detergent when possible.
Is it safe to use a vacuum on vent covers?
Yes, using a vacuum attachment designed for vents is safe and effective for removing dust and debris.
What tools work best for stubborn buildup?
Extendable vent cleaning brushes and slotted louver cleaners are effective for hard-to-reach areas and tight louvers.
Should I remove the whole vent from the wall?
For thorough cleaning, detaching the vent is often best, but only if you can safely access and reattach it without damage.
Can cleaning vents improve indoor air quality?
Yes, regular cleaning reduces dust and contaminants that circulate through the HVAC system.
What about dryer vent covers?
Dryer vent covers require specific brushes designed for lint buildup; ensure you use tools suited for high-heat environments.
Buying Guide
Choosing the right vent cleaning tools depends on vent design, material, and your cleaning goals. Consider size, access, and the type of dirt you encounter most often. A good starter kit should include extendable brushes, a vacuum-attached cleaning head, and a compact slotted louver cleaner for tight spaces. Noise level and ease of use also matter for regular maintenance in homes with sleeping areas. When comparing options, look for compatibility with your vent type (slotted louvers, grilles, or flat covers) and whether the tools are safe for plastic, painted metal, or coated surfaces. Finally, assess how the tool fits your storage space and whether it can reach hard-to-access vents without removing nearby furniture or fixtures.
With the right kit and a simple routine, cleaning vent covers becomes a quick, repeatable task rather than a dreaded chore. Is your home ready for a cleaner, more efficient air flow? Start with the basics and progress to specialized tools as needed to keep every vent looking and performing its best.