Regular cleaning of a water cooler helps maintain water quality, prevent mineral buildup, and extend the unit’s life. This guide provides a practical, step-by-step approach using common cleaning tools and NSF-approved sanitizers. Readers will learn how to prepare, clean, and sanitize the reservoir and spouts without disrupting daily access to fresh drinking water.
Whether you own a countertop bottleless cooler or a traditional bottled unit, a consistent cleaning routine is essential. The steps below are written for typical household and small office setups in the United States, with emphasis on safety and proper product use.
Quick Answer
To clean a water cooler efficiently, start with a thorough rinse, use a reservoir cleaning brush for hard-to-reach areas, apply a descaler tablet kit or a sanitizing solution approved by NSF, scrub with long-handled brushes, rinse again, and air-dry before reassembling. Always follow package directions for any cleaning agents and replace filters as recommended.
What You’ll Need
- Water cooler cleaning kit with bottle brush
- Reservoir cleaning brush for water cooler
- Long-handled bottle brush for water cooler
- Water cooler descaler tablet kit
- Sanitizing solution for water cooler NSF approved
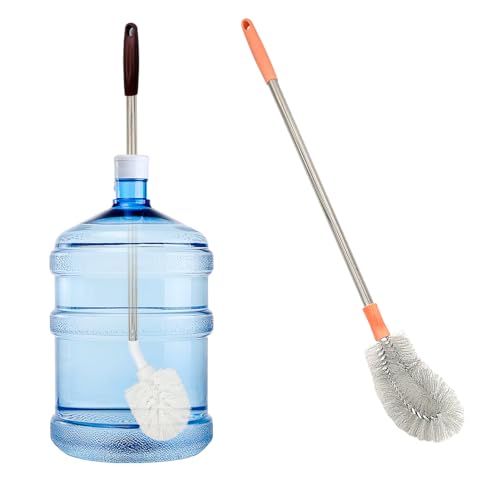 |
2-Pack Bucket Brush, Bottle Brush for Cleaning Extra Long Bottles, Gallon Jug Cleaner, Water Bottle Cleaner. | |
 |
Water Cooler Cleaning Kit | |
 |
AQUA SHOCK H2O Fresh Water Tank SANITIZER/Disinfectant |
Before You Start
Prepare the area to avoid water spills and protect nearby surfaces. Unplug the unit and disconnect any power cords before cleaning. Clear a space to set aside removed components and have a towel handy for drying. Time estimate: 30–60 minutes for initial clean and 15–20 minutes for routine maintenance between deep cleans. Critical cautions: never mix cleaning chemicals unless the product instructions explicitly allow it; always rinse thoroughly to prevent chemical residue in drinking water; ensure the unit is fully dry before reconnecting power.
Step-By-Step: How To Clean A Water Cooler
- Turn off and unplug the cooler; remove bottles and disconnect the beverage lines if applicable.
- Drain residual water from the reservoir into a container. Use the bottle brush to reach into the reservoir opening and rinse with clean water.
- Prepare the cleaning solution as directed by the descaler tablet kit or the NSF-approved sanitizing solution.
- Apply the solution to the reservoir using the reservoir cleaning brush. Scrub all interior surfaces, paying attention to corners and seams where slime can accumulate.
- Let the solution sit for the recommended contact time. Then rinse thoroughly with clean, cold water to remove all cleaning agents.
- Use long-handled bottle brushes to clean the exterior spouts and air gaps, ensuring any residue is removed from drip surfaces.
- Rinse the reservoir again to remove any remaining cleaner. Refill with fresh water and run through the taps to flush the system.
- Wipe dry all accessible parts and allow the reservoir to air-dry completely before reassembling and reconnecting power.
- Reattach bottles or reconnect lines, then run a small amount of water to purge air and confirm clear, clean water flow.
- Document the cleaning date and establish a routine interval based on usage and water quality.
Troubleshooting
| Symptom | Likely Cause | Fix | Prevention |
|---|---|---|---|
| Muddy or cloudy water after cleaning | Incomplete rinse | Rinse more thoroughly and run extra cycles | Rinse twice after any cleaning and sanitize on a regular schedule |
| Strange odor | Residual cleaner or biofilm | Additional rinse and sanitize with NSF-approved solution | Follow recommended contact times and replace sanitizing solution as directed |
| Weak water flow | Blocked spout or filter | Inspect and clean spouts; replace filters if necessary | Keep spouts clear and follow filter replacement schedule |
| Leaks after reassembly | Improper reseating components | Disassemble and reseat parts correctly; check O-rings | Handle parts gently and align connectors as instructed |
Common Mistakes
- Using undiluted cleaners or mixing chemicals not approved for drinking water equipment.
- Skipping a thorough rinse, leading to taste and odor problems.
- Neglecting the reservoir corners where buildup hides.
- Cleaning on a rough surface, causing scratches on plastic components.
Tips For Best Results
Schedule quarterly deep cleans or more often in areas with hard water. Use the long-handled bottle brush to reach into tight areas where mineral deposits collect. Always confirm that the sanitizing solution is NSF approved for drinking water contact. After cleaning, run several cycles of fresh water to ensure no cleaning agent remains. Keep cleaning tools dedicated to the water cooler to avoid cross-contamination.
Call A Professional
Contact a professional if the cooler shows persistent leaks, persistent odor despite cleaning, or if the unit fails to produce cold or hot water properly after multiple cleaning cycles. If you notice significant mineral buildup that cannot be removed with standard descaling, a technician may recommend more intensive service or part replacement.
FAQ
How often should I clean a water cooler?
Most households should perform a deep clean every 3–6 months, with more frequent cleaning in hard water or high-use environments.
Can I use household bleach for cleaning?
Only if specifically approved by the manufacturer and the sanitizer’s label permits it; always rinse thoroughly to remove any residual chemicals.
Is it necessary to sanitize the reservoir?
Sanitizing helps reduce microbial growth and is recommended when deep cleaning, especially if the unit has been unused for a period.
What if the water tastes odd after cleaning?
Rinse again thoroughly and run several cycles of fresh water to remove any residual cleaning agents before using the cooler.
Should I clean the exterior of the cooler?
Yes, wipe the exterior with a mild, non-abrasive cleaner to remove fingerprints, spills, and dust.
Do I need to replace filters during cleaning?
Yes, replace filters as needed according to the manufacturer’s maintenance schedule to ensure clean water flow.
Buying Guide
Key buying factors for a water cooler and its maintenance kit include size and setup type (bottled vs bottleless), noise level during operation, energy efficiency, control options (manual vs digital), and placement considerations (kitchen counter, office break room, or dedicated closet). When selecting cleaning tools, choose a kit that includes a reservoir cleaning brush, a long-handled bottle brush, and a descaler tablet or NSF-approved sanitizing solution. The right combination reduces mineral buildup, simplifies maintenance, and keeps drinking water safe.
Size and capacity should fit the available space and the expected water demand. A compact unit or a slim bottleless cooler may suit a small kitchen or office nook, while larger options serve busy break rooms. Noise level matters in quiet environments; look for models with quiet compressors and solid insulation. For energy-conscious buyers, compare energy usage ratings and standby modes. Controls can range from simple push buttons to programmable temperature settings. Finally, consider placement: avoid direct sunlight, ensure easy access to water lines, and leave room for cleaning access around the reservoir and spouts.
When evaluating cleaning-related accessories, prioritize items that are compatible with the specific cooler model and approved cleaning agents. A comprehensive kit with a bottle brush, reservoir brush, descaler tablets, and a NSF-approved sanitizer provides an all-in-one approach to routine maintenance, helping to keep water tasting fresh and safe across seasons.