Maintaining a clean CPAP reservoir is essential for user comfort and device performance. A well-cleaned water chamber helps reduce bacterial build-up, mineral deposits, and odors that can affect sleep quality. The following guide outlines practical steps, safe cleaners, and best practices to keep the CPAP reservoir sparkling and ready for nightly use.
Regular cleaning routines protect your lungs and prolong the life of the machine. This article uses common cleaning tools and methods tailored for American households, with emphasis on safety and ease of use.
Quick Answer
Simple routine: Rinse the reservoir daily with warm water, use a dedicated cleaning solution weekly, and perform a thorough soak with cleaning tablets or descaler as directed. Rinse thoroughly after every cleaning to remove any residue.
What You’ll Need
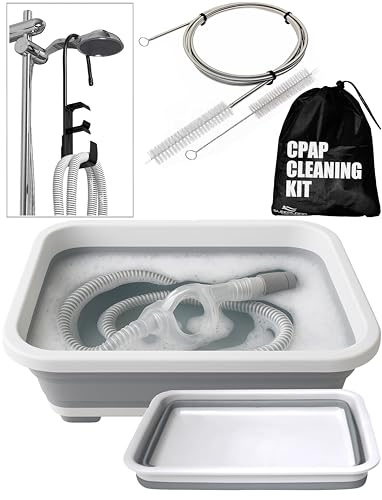
- CPAP humidifier chamber cleaning brush
- CPAP water chamber cleaning tablets for humidifier
- CPAP humidifier reservoir cleaning kit
- CPAP humidifier chamber descaler sanitizer
- CPAP machine water chamber cleaning solution hydrogen peroxide


Before You Start
Read the device manual for specific care instructions and verify compatibility with your model. Clear the workspace and disconnect the CPAP from power before cleaning. Use warm, not hot, water to avoid warping components. Do not soak the CPAP base or hose for extended periods. Allow the reservoir and parts to air-dry completely before reassembly.
Estimated time for a standard cleaning session is about 15–25 minutes, depending on the method chosen. For heavy mineral buildup or persistent odors, plan extra time for a deeper clean. If you notice cracks, leaks, or persistent contamination, stop using the device and consult a professional.
Step-By-Step: How To Clean A CPAP Reservoir
- Disassemble the CPAP humidifier by removing the water chamber from the main unit and detaching the hose if necessary.
- Rinse the reservoir with warm running water to wash away loose dust and debris.
- Fill the reservoir with a cleaning solution or hydrogen peroxide-based cleaner, following product instructions for concentration and soak time.
- Gently scrub the interior with the CPAP humidifier chamber cleaning brush to loosen mineral deposits and biofilm without scratching surfaces.
- Rinse thoroughly with clean water until no cleaner scent remains. Ensure all surfaces, seals, and corners are rinsed.
- Soak the reservoir in a descaler sanitizer or cleaning solution as directed, then rinse again to remove any chemical residue.
- Dry all parts completely with a clean towel or air-dry on a lint-free surface before reassembly.
- Reassemble the CPAP humidifier and fill the reservoir with fresh water for use. Do a quick test run to ensure no leaks and proper humidification.
- Perform a regular schedule: light daily rinsing, weekly cleaning, and monthly deep cleaning depending on usage and water hardness.
- If you travel, dry the parts thoroughly before packing to prevent mold growth during storage.
- Keep a dedicated cleaning kit separate from other household cleaners to avoid cross-contamination.
- Document your cleaning routine to track frequency and any changes in noise, humidity, or odor.
Troubleshooting
| Symptom | Likely Cause | Fix | Prevention |
|---|---|---|---|
| Persistent odor after cleaning | Residual cleaner or biofilm | Repeat cleaning with fresh solution; extend soak time | Regular cleaning schedule; use distilled water if possible |
| Residue on reservoir walls | Rinse insufficiently | Rinse thoroughly and repeat if needed | Rinse until water runs clear |
| Caps or seals leaking | Cracks or wear | Replace affected parts; do not use damaged components | Inspect seals monthly |
| Chamber not humidifying adequately | Mineral buildup or dirty surfaces | Clean and descale according to instructions | Use distilled water; clean regularly |
Common Mistakes
- Using strong household cleaners not intended for CPAP parts, which can leave harmful residues.
- Soaking the CPAP base or non-removable components, risking damage.
- Delaying cleaning after exposure to hard water or mineral-rich water.
- Rinsing with unclean water or reusing dirty containers for soaking.
Tips For Best Results
- Use distilled or sterile water in the reservoir to minimize mineral deposits and odors.
- Label your cleaning schedule and set reminders to maintain consistency.
- Rinse and air-dry components completely to prevent mold growth during storage.
- Keep the cleaning kit dedicated to CPAP parts to avoid cross-contamination with other cleaning products.
Call A Professional
Seek professional help if you notice persistent odors after repeated cleans, visible mold, cracks in the reservoir, or if the unit fails to maintain proper humidity despite cleaning. Do not operate a CPAP device with compromised components, as this may impact safety and sleep quality.
FAQ
How often should I clean the CPAP water chamber?
Most users benefit from a daily quick rinse and a deeper cleaning weekly, with a monthly descaler or tablet-based treatment as recommended by the manufacturer.
Can I use hydrogen peroxide to clean the reservoir?
Yes, hydrogen peroxide-based solutions are common sanitizers, but follow the product instructions and rinse thoroughly to remove all residues.
Is it safe to use a generic cleaning brush on the chamber?
Use the CPAP humidifier chamber cleaning brush designed for the reservoir to avoid scratching seals and hard-to-reach areas.
What if I see mineral buildup around the water line?
Apply a descaler sanitizer or cleaning tablet per directions, then rinse completely and consider using distilled water to reduce future buildup.
Buying Guide
When choosing cleaning supplies and replacements for a CPAP reservoir, consider several factors to optimize safety and performance.
Size and compatibility: Confirm the cleaning kit and tablets fit your CPAP model’s water chamber type and size. Some kits are model-specific, while others fit a range of reservoirs.
Noise level: Cleaning routines shouldn’t affect night-time humidity or machine operation. Ensure any added devices or brushes are gentle on surfaces and quiet during use.
Energy and chemical efficiency: Choose low-toxicity cleaners and descalers that work effectively at room temperature. Avoid mixing cleaners that may neutralize each other.
Controls and indicators: Some cleaning solutions come with timers or color-changing indicators; these can help ensure proper soak durations for sanitation.
Placement: Store cleaning supplies in a cool, dry cabinet away from direct sunlight to preserve efficacy. Keep the reservoir and related parts within reach of the CPAP station for quick access.
Multi-purpose versus dedicated kits: A dedicated CPAP cleaning kit reduces the risk of cross-contamination with household cleaners. However, some regulators accept reputable, manufacturer-approved multi-use sanitizers as alternatives.
Cost and availability: Compare per-use costs and ensure replacement parts, brushes, and descalers are readily available from reputable retailers or the device’s manufacturer.
With the right tools and a consistent routine, CPAP reservoir cleaning becomes a straightforward part of nightly care. A clean reservoir supports reliable humidification, reduces the risk of nasal dryness or infection, and helps preserve overall device performance. If there is ever doubt about the cleanliness or integrity of any component, consult the product manual or contact a sleep health professional for guidance.