Keeping a Dyson vacuum performing at its best involves regular maintenance, especially cleaning the filter, dustbin, and brushes. This practical guide walks American users through a safe, effective routine that extends suction power and prolongs the life of the machine.
Quick Answer
Regularly wash washable filters every 1–3 months, inspect and remove tangled hair from the brush bar, and wipe down surfaces with a damp cloth. Use dedicated tools to reach tight spots and replace worn attachments as needed.
What You’ll Need
- Dyson vacuum washable HEPA filter replacement set
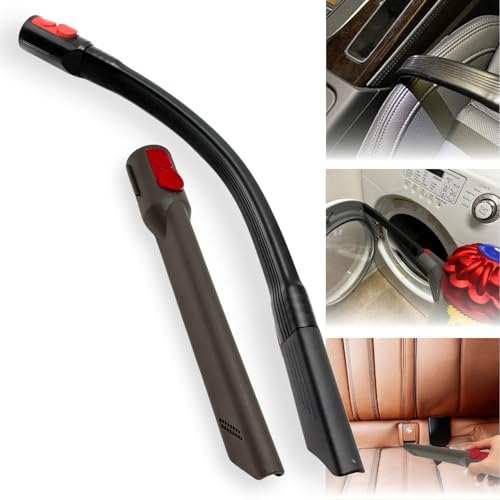
- Dyson crevice tool attachment kit
- Dyson brush bar roller cleaning tool
- Dyson wand hose attachment kit
- Dyson turbine tool attachment set


Before You Start
Unplug the vacuum and allow a cool-down period before handling components. Clear the area of small objects that could be sucked into the machine. Gather a soft cloth, mild soap, and a shallow tray for rinsing parts. Protect your hands and eyes when disassembling parts; some components may pinch or release dust. Time estimates vary: a quick cleaning can take 15–25 minutes, while a full flush of filters and attachments may take up to 45 minutes.
Step-By-Step: How To Clean Your Dyson Vacuum
- Disconnect the vacuum from power and remove the dustbin. Empty the bin into a trash can, then rinse with warm water if the bin is washable. Let it fully dry before reassembling.
- Remove the washable HEPA filters. Rinse under cool running water until the water runs clear. Do not use detergents or hot water. Gently squeeze out excess water and let the filters air dry for at least 24 hours.
- Inspect the filter housing for dust buildup. Wipe with a damp cloth to remove fine particles. Ensure the seals are clean and intact before reinstalling.
- Check the brush bar roller. Use the brush bar roller cleaning tool to lift hair, threads, and debris wrapped around the bar. Trim any fibers and wipe the bar clean.
- Clean the wand and hose connections. Detach the wand hose attachment kit and remove any blockages using a long flexible brush. Reattach securely and test for suction.
- Clean the main body exterior. Wipe the housing, wheels, and cyclone chamber with a damp cloth. Avoid moisture entering electrical components.
- Reinstall the filters once completely dry. Ensure the filter lock is engaged and the housing seals are seated properly.
- Reassemble the dustbin and test. Plug in the vacuum and run a brief test on a low setting to confirm suction is restored and no unusual noises are present.
- Conduct a post-clean diagnostic. Check for any loose attachments and verify that airflow is consistent across different floor types.
- Schedule routine maintenance. Mark calendar reminders to check filters and brush condition every 1–3 months depending on usage and household environment.
- For deep cleaning, use turbine tool attachment set on upholstery and nooks to dislodge dust from fabric surfaces without damaging fibers.
Troubleshooting
| Symptom | Likely Cause | Fix | Prevention |
|---|---|---|---|
| Loss of suction | Clogged filter or debris in hose | Clean or replace filter; clear hose and wand | Schedule regular checks; avoid overfilling bin |
| Brush bar not spinning | Hair tangled in bar | Use brush bar roller cleaning tool to remove hair | Brush hair-free after each heavy use |
| Unusual grinding or rattling | Foreign object caught in turbine | Turn off and inspect turbine tool for debris | Avoid vacuuming large objects |
| Weak suction on floor tools | Blockage in wand or attachments | Inspect and clean wand, attachments; reseat connections | Keep intake paths clear |
| Filter smells | Dirty or damp filter | Wash and fully dry filters; replace if needed | Dry filters completely before reinstall |
Common Mistakes
- Not letting filters dry fully before reassembly, which can mold or reduce suction
- Using chemical cleaners on plastic parts that can degrade seals
- Forgetting to check the brush bar for hair after vacuuming textiles
- Ignoring warning indicators or excessive noise during operation
Keeping a routine that targets filters, brushes, and airflow helps prevent these issues from arising and preserves peak suction.
Tips For Best Results
- Establish a cleaning cadence based on floor type and household pets; higher frequency is beneficial for carpets and households with shedding.
- Use the crevice tool attachment kit to access corners, under furniture, and along baseboards for dust reduction.
- Wipe down exterior surfaces after cleaning to prevent dust from resettling on components.
- Store attachments in a dedicated kit or pouch for quick access during future maintenance.
- Label maintenance dates to track filter replacements and part lifespans.
Call A Professional
Contact a professional if the vacuum still loses suction after cleaning, if unusual noises persist, or if the unit fails to power on despite safe checks. Seek service if you notice cracked housings, damaged cords, or suspected electrical faults. Do not attempt internal repairs beyond the recommended steps.
FAQ
How often should I clean the Dyson filter?
Wash the washable filter every 1–3 months, depending on usage and household environment. Ensure full drying before reinstalling.
Can I clean the brush bar with water?
Yes, you can wipe the brush bar with a damp cloth and remove hair; do not soak the brush bar in water.
What tools help reach tight spaces?
The Dyson crevice tool attachment kit and wand hose attachment kit are ideal for corners and upholstery.
Is it safe to use detergent on Dyson parts?
Avoid detergents on plastic components or filters; use mild soap only if recommended by the manufacturer and rinse thoroughly.
When should I replace parts rather than clean?
Replace worn brushes, seals, or filters when cleaning no longer restores performance or when the part shows visible wear.
How long does it take to dry the filters?
Allow at least 24 hours for complete drying in a breathable area before reusing the vacuum.
Can I use the turbine tool for pet hair?
Yes, the turbine tool is effective for removing pet hair from upholstered surfaces and stairs.
Buying Guide
When choosing replacement parts and attachments for a Dyson vacuum, consider several factors to ensure compatibility and performance. Size and model compatibility matter; verify that filters, wands, and tools are designed for your specific Dyson model. Noise level can influence user comfort, especially in smaller living spaces or multi-story homes. Look for energy efficiency and airflow efficiency to maximize runtime per charge in cordless models. Controls should be intuitive and accessible, with clear indicators for filter status and blockage alerts. Placement and storage of tools should be convenient to encourage regular maintenance. Compare bundles that include a washable HEPA filter set, crevice tools, and brush bars to cover most cleaning scenarios, and ensure spare parts are readily available from reputable retailers. Ask about warranty coverage and the return policy, and verify that replacement components are genuine or certified by Dyson to maintain performance and safety. If choosing multiple attachments, assess how often you will use each tool to balance cost with practical utility.