Lint buildup in dryers and ducts is a common cause of reduced efficiency and potential fire hazards. This guide walks American homeowners through a practical, step-by-step process to remove lint using common cleaning tools and safe techniques. By following the methods below, you can improve dryer performance and safety without extensive downtime.
Quick Answer
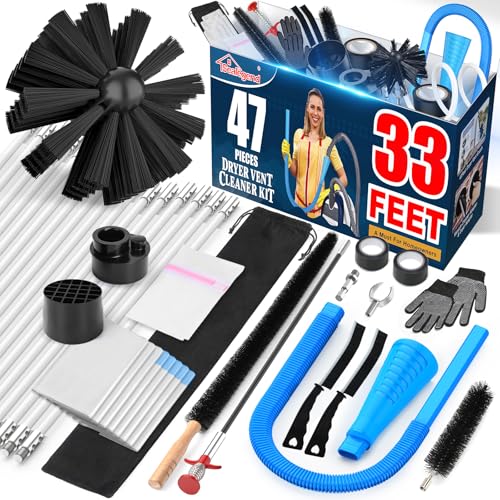
To effectively reduce lint in a dryer, use a dryer vent cleaning brush kit or stiff nylon dryer vent brush to scrub the vent and duct, connect a dryer vent cleaning kit with flexible rods to reach tight corners, and vacuum loose lint with a vacuum hose attachment for dryer lint removal. Regular maintenance every 6–12 months helps prevent buildup and improve airflow.
What You’ll Need
- dryer vent cleaning brush kit or stiff nylon dryer vent brush
- dryer vent cleaning kit with flexible rods
- vacuum hose attachment for dryer lint removal
- dryer duct cleaning kit with lint brush


Before You Start
Before beginning, unplug the dryer and shut off the gas supply if applicable. Move the appliance away from the wall to access the vent. Clear the area of any flammable materials and ensure good lighting. Expect a 30–60 minute task for a standard vent that’s moderately clogged. Wear protective gloves and a dust mask to minimize fiber exposure. If you notice excessive heat, burning smells, or the vent remains blocked after cleaning, stop and seek professional help.
Step-By-Step: How To Clean Lint From A Dryer and Duct
- Disconnect power and detach the dryer exhaust vent from the back of the unit.
- Inspect the external vent hood for obstructions; remove any lint, bird nests, or debris with a gloved hand.
- Insert the dryer vent cleaning brush kit into the duct and twist to dislodge lint, pulling back slowly to collect debris.
- Use the stiff nylon dryer vent brush to scrub the interior walls of the duct. Work in sections, moving toward the exterior vent.
- Attach the dryer vent cleaning kit with flexible rods to reach deeper corners. Push and rotate to loosen buildup behind bends or elbows.
- Vacuum the interior with the vacuum hose attachment for dryer lint removal, starting near the dryer and moving toward the exterior vent to capture debris.
- Reassemble the vent assembly and run the dryer on a no-load cycle to confirm airflow improves and there are no unusual noises.
- Inspect the exterior vent during the cycle to ensure lint is visibly exiting. If airflow remains weak, repeat cleaning or extend the rod length.
- Clean the lint screen tray and replace the lint screen with a thorough wipe-down to remove residual fibers.
- Schedule routine maintenance every 6–12 months, depending on usage and vent length.
- Document any issues such as repeated overheating; persistent problems may indicate duct replacement is needed.
- Dispose of collected lint safely and promptly; lint can be a fire hazard if left unattended.
Troubleshooting
| Symptom | Likely Cause | Fix | Prevention |
|---|---|---|---|
| Dryer takes longer than usual to dry | Restricted airflow | Clean vent and lint screen; check exterior vent | Regular cleaning every 6–12 months |
| Lint appears on clothes | Lint trap not functioning or clogged | Replace/clean lint screen and inspect housing | Always clean lint screen before every load |
| Excessive heat or burning smell | Lint buildup or damaged duct | Pause use; inspect vent; remove lint; call pro if persists | Prevent with routine inspection and replacement of damaged sections |
| Exterior vent not expelling air | Blocked exterior vent | Remove exterior cap and clear any debris | Keep vent cover unobstructed |
Common Mistakes
- Using a metal brush on plastic ducts, risking damage
- Forgetting to unplug the dryer or turn off gas before work
- Neglecting to clean the lint trap and interior path regularly
- Overtightening connections, causing leaks or kinks in the duct
Tips For Best Results
- Work in dry conditions; lint can be messy when wet.
- Always clean both the interior duct and the exterior vent hood for maximum airflow gains.
- Use the flexible-rod kit to reach bends; lint tends to accumulate behind elbows.
- Combine mechanical cleaning with a vacuum to minimize airborne dust.
- Mark a cleaning schedule on a calendar to maintain consistent performance.
Call A Professional
Consider professional help if there is persistent lint buildup, signs of moisture inside the duct, complex duct layouts, or if there is excessive heat after cleaning. Pro technicians can perform a duct pressure test, inspect for leaks, and replace worn sections safely. Stop DIY work and contact a pro if you encounter damaged ducts, gaskets, or if you cannot access the full length of the run.
FAQ
How often should I clean my dryer vent?
Aim for every 6–12 months, depending on usage, vent length, and whether you have pets or nearby debris.
Can I use any brush with my dryer vent?
Choose brushes rated for dryer vents; avoid metal bristles that can damage duct walls.
Is it safe to clean from both ends?
Yes, but ensure the dryer is unplugged and power is off; cleaning from the dryer end and exterior end improves access.
What tools work best for tight bends?
Flexible rod kits and stiff nylon brushes are ideal for navigating elbows without causing damage.
What else should I check besides the vent?
Inspect the lint screen housing, ensure the exhaust hood is clear, and confirm the exterior vent cap opens freely.
Buying Guide
Choosing the right lint-cleaning tools depends on vent length, duct type, and access. Key buying factors include size and compatibility with your vent system, noise level during use, energy efficiency considerations if using battery-powered devices, control simplicity, and placement flexibility for hard-to-reach spots.
Size and compatibility: Look for sets that include dryer vent cleaning kit with flexible rods long enough to reach your duct run, plus compatible adapters for different vent diameters. For shorter runs, a stiff nylon dryer vent brush may suffice, but longer or more complex ducts benefit from flexible segment options.
Performance and ease of use: A kit should offer robust bristles that resist bending and hold debris, and a rod system that locks securely without kinking. A vacuum hose attachment for dryer lint removal helps capture fibers as you work. Choose tools designed to minimize dust, with clear storage and straightforward cleaning steps.
Durability and safety: Stainless or coated brushes resist corrosion from humid duct environments. Ensure brushes are gentle enough not to scratch metal or plastic duct walls. Safety features such as gloves, masks, and non-slip handles improve comfort during use.
Placement and storage: Consider where you’ll store tools and how often you’ll use them. Compact kits with nested components fit tight laundry rooms, while larger kits cover more scenarios. If you plan frequent maintenance, select a kit that stays organized and readily accessible.
Brand and warranty: Opt for reputable brands offering clear instructions and robust customer support. A reasonable warranty indicates confidence in tool durability and performance.