Sticky residue on glass, metal, plastic, or painted surfaces can be stubborn. With the right approach and the proper tools, most residues lift off without damaging the surface. This guide explains practical methods, step-by-step actions, and common pitfalls to avoid for a clean, residue-free result.
Quick Answer
Choose the appropriate remover based on your surface: solvent-based for hard surfaces, gel or spray for convenient application, and a scraper for stubborn patches. Begin with a gentle option and test a small area first to prevent damage.
What You’ll Need
Gather the following tools and products to tackle various sticky residues. Start with the basics and add specialty tools if needed.
- adhesive remover gel for sticky residue 4 oz bottle
- sticker residue scraper tool stainless steel blade
- sticky adhesive remover spray 16 oz
- glue and sticker remover solvent for glass metal 8 oz
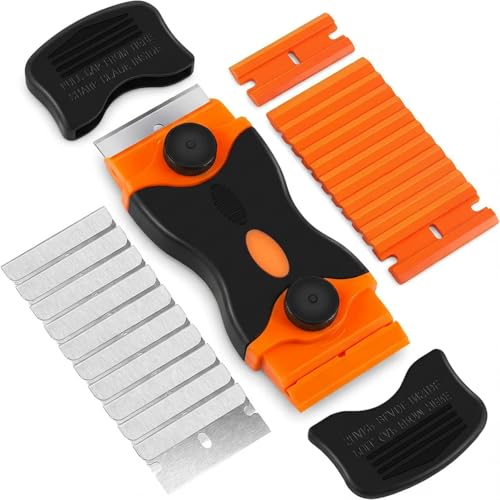
- craft scraper with replaceable blades for adhesive residue


Before You Start
Clear the workspace and protect nearby surfaces with a drop cloth or newspaper. Ventilate the area if you’re using solvent-based products. Test removers on an inconspicuous spot to check for discoloration or surface damage. Time estimates vary: light residue may take minutes, while stubborn patches can require several passes with a gentle approach. Avoid letting solvents sit too long on delicate finishes.
Step-By-Step: How To Remove Sticky Residue
- Identify the residue type and surface to choose the correct remover (gel for vertical surfaces, spray for larger areas).
- Apply a thin layer of the chosen remover to cover the sticky area completely.
- Let it sit for 1–5 minutes to soften the adhesive; avoid letting it dry hard.
- Gently rub with a microfiber cloth or paper towel to lift the residue in a circular motion.
- If patches remain, use the craft scraper with replaceable blades or the stainless steel scraper tool at a shallow angle to avoid scratching.
- Wipe away loosened residue and reapply remover if needed, repeating steps 2–5 until clean.
- Wipe the surface with a clean, damp cloth to remove any remover residue, then dry completely.
- For glass or metal that shows slight stickiness, finish with a mild soap solution and rinse thoroughly.
- Inspect for any remaining spots; repeat the process on stubborn areas, applying light pressure only.
- Disposal: seal and dispose of used wipes and rags according to local guidelines.
- Store removers in a cool, well-ventilated area away from children and pets.
- Record any surface sensitivities and avoid harsher methods on delicate finishes in the future.
Troubleshooting
| Symptom | Likely Cause | Fix | Prevention |
|---|---|---|---|
| Residue resists after one pass | Very strong adhesive | Reapply remover and extend dwell time to 2–5 minutes | Test small area first; consider multiple gentle treatments |
| Surface dulling or discoloration | Overexposure to solvent | Switch to a gentler gel or water-based cleaner and sanitize | Always test spot and use minimal time |
| Scratches on glossy paint | Abrasion from scraper | Switch to softer cloth and non-scratching methods | Use light pressure and a fresh blade if needed |
| Residue reappears after washing | Adhesive residue remained under the surface | Repeat removal process and wipe with alcohol-free cleaner | Clean thoroughly and finish with a protective coating if appropriate |
Common Mistakes To Avoid
- Using aggressive scrapers on delicate finishes or clear coatings
- Applying removers in high heat or direct sunlight
- Letting solvent sit on the surface for too long without monitoring
- Mixing cleaners that may react negatively with each other
Sticking to manufacturer instructions and performing small-area tests reduces the risk of damage and improves results.
Tips For Best Results
- Work from the outside edge of the residue toward the center to avoid spreading
- Use microfiber cloths for lint-free cleanup and easier residue lifting
- Warm the area slightly with a hairdryer to speed up softening on stubborn patches
- Keep a dedicated scraper blade on hand to minimize surface scratching
- Follow with a light soap wipe or glass cleaner for a pristine finish
Call A Professional
Consider professional help if the residue covers a large area, involves aged adhesives (especially on antique finishes), or if the surface is highly valuable or delicate. Stop and seek expert advice if you notice bubbling, color change, or clear coat damage. Professionals can assess material compatibility and employ safe removal strategies.
FAQ
What should I do first when faced with sticky residue?
Test a small hidden area with a gentle remover and choose a method based on surface durability and residue stubbornness.
Can I use standard household cleaners instead of specialized removers?
Some household cleaners work on light residue, but for tough adhesives, dedicated remover gels or sprays are more effective and safer for surfaces.
Is it safe to use a blade on glass or metal surfaces?
Yes, but use a plastic scraper when possible and keep the blade at a shallow angle to prevent scratches.
How long should a remover sit before scrubbing?
Typically 1–5 minutes; adjust based on residue strength and surface type, never letting it dry completely.
What if the residue returns after cleaning?
Reapply remover and repeat the steps, ensuring complete removal and proper cleaning afterward.
Is it necessary to wear protective gear?
Gloves and good ventilation are recommended, particularly with solvent-based products.
Buying Guide
When choosing products for removing sticky residue, consider factors such as the type of surface, strength of adhesive, and how large the area is. Key buying factors include:
- Surface compatibility: Opt for gels or sprays labeled safe for glass, metal, plastic, or painted finishes.
- Residue strength: Strong adhesives may require longer dwell times or a dual-action approach with a scraper.
- Form factor: Gel works well on vertical surfaces; spray covers larger areas; solvents handle stubborn residues.
- Controls and safety: Look for low-odor formulas and clear directions. Consider products with child-safe packaging.
- Noise and mess: Some tools are designed to minimize splash and noise, improving usability in home spaces.
- Surface placement: For windows or screens, ensure the product won’t damage coatings or allow streaks.
Think about whether you will tackle small touch-ups or large-scale cleanup, and choose a kit that offers a mix of removable options. If you’re unsure about a surface’s reaction to a solvent, start with a milder remover and test first. A well-chosen combination of gel, spray, and a scraper can handle most sticky residue challenges without compromise.