Cleaning single hung windows that don’t tilt can be challenging because you can’t drop the sash inward to reach both sides. This guide provides a practical, DIY approach using common sash window tools to safely refresh glass, frames, and tracks from the exterior or interior without tilting the sash.
By following careful steps and using the right tools, you can remove dirt, grime, and mineral deposits while minimizing the risk of damage to seals or hardware. The methods below focus on effectiveness, safety, and compatibility with American homes that feature non-tilting sash windows.
Quick Answer
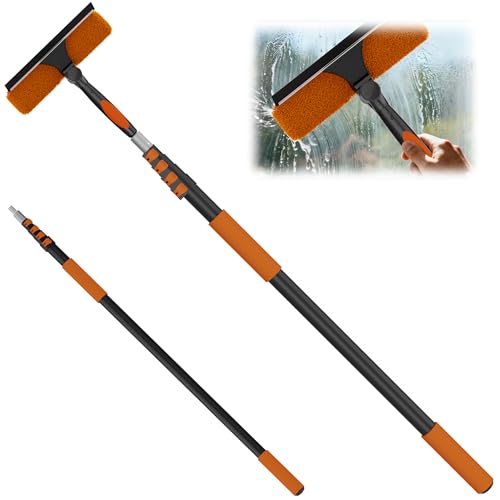
Use a telescoping pole kit and a long-handle brush to scrub the glass and frame from the exterior or interior, followed by a multi-angle or telescoping squeegee to remove standing water. Clean the window tracks with a dedicated track brush to prevent buildup, and finish with a dry microfiber wipe for a streak-free surface.
What You’ll Need
- Extension pole window cleaning kit for sash windows
- Sash window cleaning brush with long handle
- Telescoping window squeegee for single-hung sash windows
- Window track cleaning brush for sash windows
- Multi-angle squeegee tool for non-tilting sash windows


Before You Start
Inspect the window for any loose seals or damaged glazing. Wear gloves and eye protection if you’re scrubbing with cleaners. Protect nearby surfaces with a drop cloth or old towels. If exterior cleaning is needed, avoid cleaning on windy days or when glass is unusually hot from sun. Time estimate: 30–60 minutes depending on dirt level and window height. Crucial cautions: do not force the sash or hardware; avoid aggressive scrubbing that could scratch glass or dislodge seals.
Step-By-Step: How To Clean Non-Tilting Single Hung Windows
- Prepare cleaning solution suitable for glass and metal frames (mild dish soap with water or a commercially formulated window cleaner). Pour into a spray bottle or bucket.
- Attach the sash window cleaning brush with a long handle to the extension pole for reach. If needed, extend the pole to comfortable height from the interior or exterior.
- Spray the glass and frame generously, focusing on spots near corners and along the sash edge where grime accumulates.
- Scrub the glass with the brush in gentle, circular motions to lift dirt without scratching the surface. Soak stubborn deposits as needed and re-spray.
- Rinse the glass with the telescoping window squeegee by pulling from top to bottom in smooth strokes. Use the multi-angle squeegee tool for hard-to-reach corners or tight gaps.
- Wipe down the sash tracks with the window track cleaning brush to remove dust, hair, or mineral buildup. Move the brush along the track from ends to center for full coverage.
- Switch to a dry microfiber cloth or chamois to finish the glass, removing any remaining streaks. Work in a consistent pattern to prevent water spotting.
- If mineral deposits remain, apply a small amount of white vinegar or a dedicated mineral remover to the affected areas, allow a brief dwell, then rinse again with the squeegee.
- Inspect from both interior and exterior angles to ensure even cleanliness. Repeat any steps that required extra attention, especially on heavily soiled windows.
- Dry and recheck hinges, seals, and hardware for smooth operation. Lubricate moving parts only if manufacturer guidance supports it.
- Dispose of used towels and wash cleaning tools after use to prevent re-depositing grime on other tasks.
Troubleshooting
| Symptom | Likely Cause | Fix | Prevention |
|---|---|---|---|
| Streaks after drying | Water spots or soap residue | Switch to a microfiber wipe; dry in a single direction | Rinse thoroughly; use distilled water if possible |
| Stubborn grime in tracks | Build-up or debris | Use track cleaning brush; vacuum dust first | Regular maintenance every 4–6 weeks |
| Glass scratches after scrubbing | Using abrasive tools | Switch to soft brushes; avoid hard scrubbing | Use dedicated window brushes designed for sash windows |
| Difficulty extending squeegee fully | Stiff or jammed extension | Lubricate joints with manufacturer-approved lubricant | Clean joints to prevent grit buildup |
Common Mistakes
- Using harsh chemicals that can corrode metal components or seals
- Forcing the sash or hardware while cleaning from the exterior
- Neglecting window tracks, leading to repeated buildup
- Cleaning in direct sunlight when cleaner dries quickly and streaks
Tips For Best Results
- Choose tools with non-scratch pads and extendable handles to minimize indoor clutter.
- Work from top to bottom to prevent dirty water from dripping onto cleaned areas.
- Test cleaners on a small inconspicuous area first to ensure no discoloration.
- Keep a dedicated set of tools for sash windows to avoid cross-contamination with other surfaces.
Call A Professional
Consider a pro if windows are severely stained, the sash is difficult to operate, or hardware shows signs of damage or wear. Stop and consult a professional if you notice cracked glass, persistent leaks, or loose frames that affect energy efficiency and security.
FAQ
Can I clean non-tilting sash windows from the inside?
Yes, using long-handled tools and careful reach techniques allows interior cleaning without tilting the sash.
What cleaners are safe for sash windows?
Mild dish soap with water or glass cleaners labeled safe for metal and painted surfaces work well; avoid ammonia-based products on wood-grain finishes.
How do I prevent streaks on glass?
Rinse thoroughly, dry with a microfiber cloth, and avoid cleaning in direct sun to reduce rapid drying that causes streaks.
How often should I clean sash window tracks?
Clean tracks every 4–6 weeks during high-use seasons to prevent buildup and ensure smooth operation.
Is lubrication necessary for non-tilting sash hardware?
Only if the manufacturer approves; otherwise, avoid oil-based products that can attract dirt.
What if the sash doesn’t tilt due to hardware stiffness?
Do not force movement. Consult a professional to inspect the balance and hardware alignment.
Buying Guide
When selecting tools for cleaning non-tilting single hung windows, consider size, reach, and compatibility with sash hardware. A lightweight extension pole kit compatible with sash window brushes and telescoping squeegees makes interior or exterior cleaning easier. Look for:
- Size and reach: A telescoping pole that extends to the upper sash without overreaching.
- Quiet, non-scratch brushes: Soft bristles that won’t mar glass or frames.
- Multi-angle squeegee: Helps clean corners and narrow gaps commonly found on non-tilting windows.
- Track cleaning tools: A dedicated brush that fits along window tracks to remove debris.
- Durable construction: Stainless steel or reinforced plastic that resists corrosion from cleaners.
For most homes, a kit combining an extension pole window cleaning kit for sash windows, a sash window cleaning brush with long handle, a telescoping window squeegee, and a window track cleaning brush offers comprehensive coverage. Compare how each tool integrates with your existing cleaning routine and how easy it is to store after use. If window heights vary, a modular kit may provide greater flexibility and value.