Clogged or corroded faucet interiors can affect water flow and cleanliness. This guide explains practical steps to safely clean the inside of a faucet using common tools and specialized cleaning kits. By following a structured approach, homeowners can restore efficiency and extend faucet life without professional help.
Quick Answer
Turn off the water supply, disassemble the aerator or accessible interior components, soak with a descaler if mineral buildup is present, scrub gently with appropriate brushes, rinse, and reassemble. Use a dedicated faucet interior cleaning kit to simplify the process and reduce risk of damage.
What You’ll Need
- Faucet interior cleaning brush
- Faucet cleaning brush set
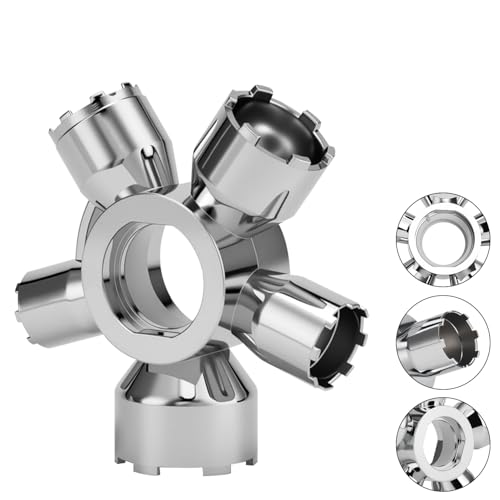
- Faucet aerator removal tool
- Faucet aerator cleaning tool kit
- Faucet descaler cleaning kit


Before You Start
Ensure the water supply is fully shut off at the valves under the sink and at the wall. Place a towel or tray to catch drips, especially if the faucet is in a dry kitchen or bathroom area. If the faucet has a removable aerator, prepare a small container for soaking parts. Wear eye protection if loosened mineral deposits may spray.
Estimate time: 30–60 minutes for a full interior clean, longer if multiple fixtures are involved. Check the manufacturer’s care guidelines to avoid damaging seals or coatings.
Step-By-Step: How To Clean Inside A Faucet
- Turn off the water supply at both the shutoff valves and the faucet handle, then open the faucet to relieve pressure.
- Remove the aerator using the faucet aerator removal tool. If the aerator is stuck, apply a small amount of penetrating oil and wait a few minutes before retrying.
- Disassemble accessible interior parts as per the faucet model’s guidance. Keep track of screws and small components for reassembly.
- Soak removable parts in a bowl of warm water mixed with faucet descaler cleaning kit solution for 15–30 minutes to dissolve mineral buildup.
- Gently scrub interior surfaces with the faucet interior cleaning brush or faucet cleaning brush set, focusing on hard-to-reach corners and screen openings.
- Rinse all parts thoroughly with clean water. Use a soft brush to remove any remaining deposits, then dry before reassembly.
- Reassemble the faucet components in the reverse order. Reinstall the aerator using the faucet aerator removal tool, then turn the water back on slowly to check for leaks.
- Run cold and hot water for several minutes to ensure smooth flow. If flow remains restricted, repeat the soaking and brushing steps on stubborn deposits.
- Inspect for leaks around seals and the aerator. If leaks persist, replace worn gaskets or seals as needed.
- Clean the exterior faucet surfaces with a mild cleaner to prevent future buildup and maintain appearance.
- Consider performing this interior cleaning every 6–12 months, depending on water hardness and usage.
Troubleshooting
| Symptom | Likely Cause | Fix | Prevention |
|---|---|---|---|
| Low water flow after cleaning | Residual debris or mineral buildup | Reopen and soak parts again; scrub more thoroughly | Regular maintenance with a brushing kit |
| Leaking around aerator | Damaged gasket or improper reassembly | Replace gasket; reassemble tightly | Keep track of seals during disassembly |
| Parts won’t fit back together | Mixed up small components | Lay out parts in order during disassembly | Follow manufacturer instructions |
| Mineral deposits reappear quickly | Hard water environment | Regular descaling and preventive cleaning | Use a descaler kit periodically |
Common Mistakes
- Over-tightening components during reassembly, causing leaks.
- Using abrasive tools on chrome or stainless finishes, leading to scratches.
- Skipping the safety steps and not shutting off water supply properly.
- Forgetting to reinstall seals or washers after cleaning.
Sticking to the recommended tools helps prevent these issues and prolongs faucet life. The included brushing sets and removal tools are designed to minimize damage while cleaning interiors.
Tips For Best Results
- Use warm water for soaking deposits; hot water can warp some seals.
- Apply descaler solutions only to metal parts that are designed to tolerate them.
- Label screws and small parts by size to simplify reassembly.
- Inspect aerator screens for wear; replace with a matching new screen if needed.
- Consider installing a filter or using softer water to slow mineral buildup.
Call A Professional
Contact a plumber if any of the following occur: persistent leaks after reassembly, corrosion that appears to compromise the faucet body, or if the faucet interior has extensive mineral buildup that cannot be safely scrubbed. Do not attempt to disassemble sealed or modern high-end faucets without model-specific instructions.
FAQ
How often should I clean the inside of a faucet?
Typically every 6–12 months, or sooner in areas with very hard water.
Can I use vinegar for descaling a faucet interior?
Vinegar is common for mineral deposits but may damage certain finishes. Use a dedicated faucet descaler kit when possible and follow product directions.
What tools are essential for interior faucet cleaning?
A faucet interior cleaning brush, a set of cleaning brushes, a faucet aerator removal tool, and a descaler cleaning kit are highly recommended.
Is it safe to disassemble all faucet models?
No. Some models have sealed cartridges or proprietary parts. Consult the manufacturer’s guide before disassembly.
What if the aerator won’t come out?
Apply gentle penetrating oil and wait, then use the aerator removal tool with steady pressure. If stubborn, seek professional help.
Buying Guide
When selecting tools for cleaning inside a faucet, consider the following factors to ensure effective performance and long-term durability.
- Size and compatibility: Choose a faucet aerator removal tool and cleaning brushes that fit common aerator sizes and interior fittings.
- Descaling capability: A descaler cleaning kit should handle mineral buildup typical of local water hardness levels.
- Tool quality: Stainless steel brushes and durable plastic handles reduce wear and provide reliable cleaning power.
- All-in-one kits: A faucet aerator cleaning tool kit may simplify maintenance by combining several tools in one package.
- Ease of use: Ergonomic handles and straightforward instructions help maintain safety and efficiency.
- Compatibility with finishes: Select tools that are safe for chrome, brushed nickel, and other common faucet finishes.
- Replacement parts: Look for kits that offer replacement brushes and seals to extend the kit’s lifespan.
How to choose between options? If mineral buildup is frequent, a descaler kit paired with a cleaning brush set often provides the best results. For simple maintenance, a compact aerator removal tool alongside a dedicated interior brush can be sufficient. Consider your faucet type, whether it’s a kitchen, bathroom, or utility faucet, and your local water hardness when deciding.