Headlights can lose brightness over time due to oxidation, dirt, and UV exposure. Cleaning and restoring them not only improves appearance but also enhances nighttime visibility and driving safety. This guide outlines practical, step‑by‑step methods you can use at home to restore clarity to plastic headlight lenses.
Whether you’re dealing with yellowed lenses or cloudiness, these techniques use common tools and purpose‑built products to deliver noticeable results without professional help.
Quick Answer
Best quick method: Start with a simple cleaning and polish, then progress to sanding with progressively finer grits and finish with a UV sealant. For stubborn oxidation, a drill‑powered restoration kit accelerates the process and yields smoother results.
What You’ll Need
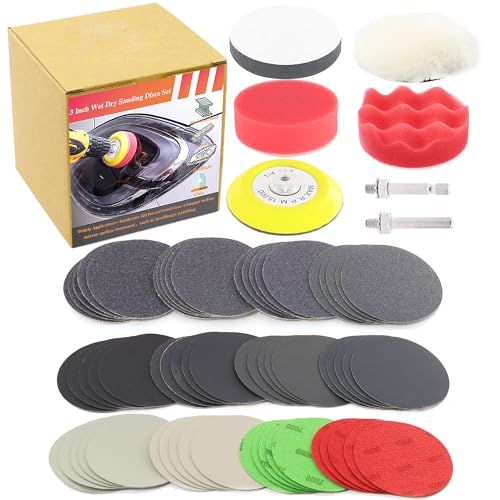
- Headlight restoration kit sanding pads polishing compound
- 4000 grit headlight sanding discs kit
- Headlight polishing compound kit for plastic lenses
- Drill powered headlight restoration kit
- Headlight sealant UV coating kit


Before You Start
Prepare a shaded work area to avoid rapid drying. Clean the headlights to remove surface dirt before starting. Protect surrounding paint with painter’s tape and cover nearby surfaces to prevent abrasives or solution splashes. Time estimate: 45–90 minutes depending on lens condition. Important cautions: do not use household abrasives, avoid scratching the edges of the lens, and follow all safety instructions on chemical products.
Step-By-Step: How To Clean Headlights For Clearer Vision
- Clean the headlights with mild soap and water to remove loose dirt; dry thoroughly.
- Mask the surrounding area with painter’s tape to protect the paint and trim.
- Apply a small amount of polishing compound to a clean microfiber pad and rub in a circular motion to remove the outer oxidation layer.
- For deeper cloudiness, attach a 4000 grit headlight sanding discs kit to a soft backing pad and sand the lens in light, even strokes. Wipe away residue often to assess progress.
- Continue with a finer grit polishing stage using the headlight polishing compound kit for plastic lenses to restore clarity and smoothness.
- If using a drill powered headlight restoration kit, set the drill to a low speed and maintain steady pressure; work in small sections until the entire lens is evenly treated.
- Rinse and dry the lens, then apply the headlight sealant UV coating kit as directed to protect against future UV damage and yellowing.
- Allow the sealant to cure as recommended, then remove tape and inspect the result. Repeat steps if needed for stubborn spots.
Troubleshooting
| Symptom | Likely Cause | Fix | Prevention |
|---|---|---|---|
| Hazy or cloudy lens after cleaning | Inadequate sanding or insufficient polishing | Repeat sanding with finer grits and re‑polish | Gradual progression through grits |
| Streaks or swirls remain | Residue left on surface | Thorough wipe with microfiber and a second light polish | Clean pad frequently during work |
| Sealant fails to cure | Surface not fully dry or contaminants present | Re‑dry the lens and reapply sealant | Ensure no moisture in the environment during cure |
| Lens chips or deep cracks | Physical damage beyond cosmetic restoration | Consider replacement or professional repair | Handle lenses gently during work |
Common Mistakes
- Skipping the masking step and risking scratches on adjacent surfaces
- Using overly aggressive abrasives or too much pressure
- Rushing the process and skipping curing times for sealants
- Neglecting to clean and dry between steps, which can smear residues
Taking time to prepare and following each step carefully yields the best long‑lasting results.
Tips For Best Results
- Work in a well‑lit, shaded area to monitor progress accurately.
- Use fresh polishing pads and replace worn ones to avoid scratches.
- Test a small area first to check compatibility with the lens material.
- Apply sealant in a thin, even layer for uniform protection.
- Consider a UV‑blocking sealant for longer‑lasting clarity, especially if headlights face strong sun exposure.
Call A Professional
Seek professional help if headlights show deep cracks, extensive pitting, or if restoration does not achieve desired clarity after repeated attempts. Stop any work if you notice heat buildup from the drill or chemical skin irritation. If headlights are severely yellowed and the inner housing shows moisture damage, a professional repair or lens replacement may be required.
FAQ
Can I use household polish to clean headlights?
Household polishes may be too harsh or not designed for plastic lenses; use products formulated for headlight restoration.
How often should I seal headlights after restoration?
Sealants typically need reapplication every 1–2 years, depending on exposure and climate.
Will this restore headlights on all car models?
Results vary with lens material and damage; most polycarbonate lenses respond well to restoration steps.
Is a drill necessary for best results?
No, but a drill‑powered kit can speed up the process and provide consistent pressure and speed.
Are there environmental concerns with the chemicals?
Follow product directions and use in a ventilated area; dispose of waste per local regulations.
Buying Guide
Choosing the right headlight cleaning kit depends on lens condition, equipment preference, and desired longevity. Consider the following factors to find the best option.
Size and Coverage
Look for kits that include sanding pads or discs in multiple grits and enough area coverage to handle both headlights at once. Larger pads can speed up the process but require steadier technique.
Noise Level and Ease Of Use
Manual polishing is quiet and simple, while drill‑powered kits offer faster results with more vibration. Choose based on comfort with power tools and patience.
Effectiveness And Materials
For aging or severely oxidized lenses, a kit with multiple grits (including 4000 grit) and a dedicated polishing compound designed for plastic lenses yields better clarity and smoothness.
UV Protection And Longevity
Opt for a headlight sealant UV coating kit to shield against sun damage and re‑yellowing. Proper curing is essential for lasting protection.
Ease Of Replacement Parts
Some kits offer replacement pads, discs, and polishing compounds. Access to refills helps maintain performance without buying a new kit.
Fit For Your Vehicle
Ensure the kit’s components are compatible with your headlights and housing type. Some kits are designed for universal use, others are tailored to specific lens shapes.
Maintenance And Aftercare
Consider whether the kit includes guidance or tools for reapplication and how often to reapply sealant for optimal results.