Preparing tile surfaces before grouting is essential for a professional, long-lasting finish. This guide explains practical steps to safely remove tile adhesive from ceramic tiles, ensuring a clean, smooth base for grout.
Readers will find a clear, step-by-step process, recommended tools, common issues, and important safety notes to help American homeowners complete the task with confidence.
Quick Answer
Remove excess adhesive first with a scraper or utility knife, then soften and dissolve residue using a tile adhesive remover solvent. Finish with a stiff nylon scrub brush and a grout haze remover kit to ensure a spotless surface before grouting.
A Quick List Of Tools And Materials
The following tools and materials cover the essentials for cleaning tile adhesive before grouting. Use the product keywords where applicable to ensure you have the right gear for ceramic tiles.
- Tile adhesive remover solvent 1 gallon for ceramic tile
- Tile scraper with replaceable blades 4 inch
- Grout haze remover kit for ceramic tile cleaning
- Stiff nylon scrub brush tile cleaning adhesive removal
- Utility knife with snap-off blades for tile adhesive removal


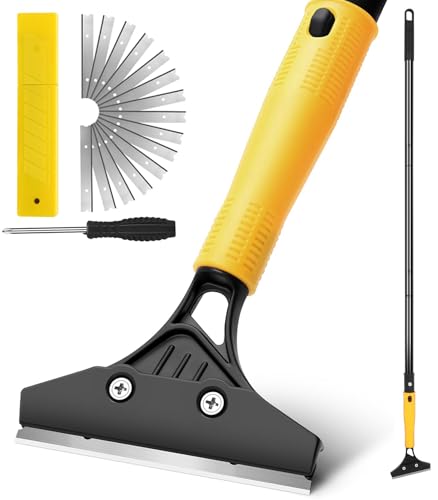
Before You Start
Before beginning, ensure you work in a well-ventilated area and wear protective gloves and eye protection. Test the solvent on a small, inconspicuous tile area to confirm it won’t affect the finish. Plan for a time range: most sessions take 1–3 hours depending on adhesive amount and tile size. Take note of any grout lines that may be exposed during adhesive removal, and protect surrounding surfaces with painter’s tape if needed.
Step-By-Step: How To Remove Tile Adhesive From Tiles Before Grouting
- Clear the work area and remove loose adhesive with a tile scraper with replaceable blades to lift chunky residues without scratching the tile surface.
- Apply a tile adhesive remover solvent to a clean rag or sponge and dab it onto remaining adhesive. Allow the solvent to sit for 5–10 minutes to soften the residue.
- Gently scrape again with the scraper on softened areas, taking care near edges and grout lines to avoid gouging the tile.
- For stubborn spots, reapply solvent, then use a stiff nylon scrub brush to lift remaining film without damaging the glaze.
- Wipe away loosened adhesive and solvent with a damp cloth. Repeat as needed until the surface is free of residue.
- Inspect the tiles for haze or film. If present, apply a grout haze remover kit for ceramic tile cleaning according to package directions to ensure a pristine surface.
- Rinse the area with clean water and dry with a lint-free cloth to prevent water spots or streaks before grouting.
- Double-check the entire surface, especially around corners and edges, to ensure there are no remaining sticky spots that could affect grout adhesion.
- Optionally, test a small area with your chosen grout to confirm adhesion and finish before proceeding with full grouting.
- Once satisfied, move on to grout preparation and sealing as part of the overall tiling workflow.
- Dispose of used rags and disposable tools according to local waste guidelines to minimize environmental impact.
- Keep the workspace dry and well-ventilated throughout the grouting process to achieve best results.
Troubleshooting
| Symptom | Likely Cause | Fix | Prevention |
|---|---|---|---|
| Adhesive film remains after cleaning | Insufficient solvent exposure | Reapply solvent and extend dwell time | Test small areas, follow manufacturer instructions |
| Scratching on tile surface | Using a too-aggressive blade | Switch to a gentler blade and lighter pressure | Use protective tape near edges |
| Residual haze after cleaning | Inadequate haze remover use | Apply haze remover kit per directions and re-clean | Rinse thoroughly after each step |
| Tiles feel tacky after cleaning | Excess solvent or incomplete drying | Wipe dry completely and allow air to dry | Ventilate and avoid over-wetting |
Common Mistakes To Avoid
- Using metal scrapers that gouge the tile glaze; opt for plastic or replaceable-blade tools with care.
- Over-wetting tiles, which can spread adhesive and create more film to remove later.
- Skipping a test area to check solvent compatibility with tile glaze.
- Rushing steps; sufficient dwell time for adhesive softening saves effort later.
Tips For Best Results
- Work in manageable sections to keep the surface consistent and prevent drying of the adhesive.
- Use a dedicated grout haze remover kit to prevent streaks and ensure uniform tile appearance.
- Keep tools clean during the process to avoid re-depositing adhesive onto tiles.
- Always dry the surface completely before applying grout for optimal bonding.
Call A Professional
Consider contacting a professional if the tile surface shows deep glazing, significant unevenness, or large areas of adhesive that resist removal. Seek help if you encounter cracked tiles, warped sheets, or uncertain adhesive types that require specialized solvents or safe handling.
FAQ
Can I use any solvent to remove tile adhesive?
Best results come from a solvent designed for ceramic tile adhesive and used according to the manufacturer’s instructions.
How long should adhesive remover sit on the tiles?
Most products require 5–10 minutes of dwell time before scrubbing, but always follow label directions.
Is it okay to grout soon after cleaning?
Yes, once the tile surface is completely dry and free of residue, proceed with grouting.
What if I cannot remove all adhesive before grouting?
Any residual adhesive can compromise grout adhesion; re-clean thoroughly or consult a professional if stubborn areas persist.
Buying Guide
Choosing the right tools for removing tile adhesive before grouting depends on tile type, adhesive density, and project scope. Consider the following factors to ensure a smooth workflow and durable results.
Size and Handling
Choose tools that fit comfortably in your hand. A 4-inch tile scraper is ideal for tight corners, while larger scrapers cover more area efficiently.
Material Compatibility
Verify that the adhesive remover is labeled for ceramic tile and glaze-safe. Some solvents may affect sensitive finishes; always test on a small area first.
Effectiveness Against Residue
Hybrid solutions or grouting haze remover kits are designed to tackle both adhesive residue and film haze, reducing the number of passes needed.
Noise, Vibration, And Comfort
Manual scrapers and brushes offer quiet operation and good control, while powered tools may speed up larger jobs. Consider your comfort level and the project duration.
Placement And Workspace
Plan for proper ventilation and a stable workspace. Keep rags and solvents away from heat sources and ensure clean, dry storage for tools after use.
Budget And Availability
Match your budget with tool durability and supply volume. A gallon of adhesive remover typically covers multiple sessions when used properly, and replacement blades extend tool life.