Preparing a ceiling for paint is a crucial step that affects coverage, adhesion, and the final finish. Dust, cobwebs, and grease can ruin a neat paint job, so a thorough cleaning using the right tools makes the process smoother and faster. This guide walks American homeowners through a straightforward ceiling-cleaning routine, with supplier-ready tool recommendations.
Quick Answer
Begin with a dry dusting to remove loose debris, then wash the surface with a damp sponge or microfiber cloth. For sticky spots or grease, use a mild detergent solution. Rinse with a clean damp cloth and let the ceiling dry completely before painting. Use a telescoping pole or long-handle brush to reach high areas safely.
What You’ll Need
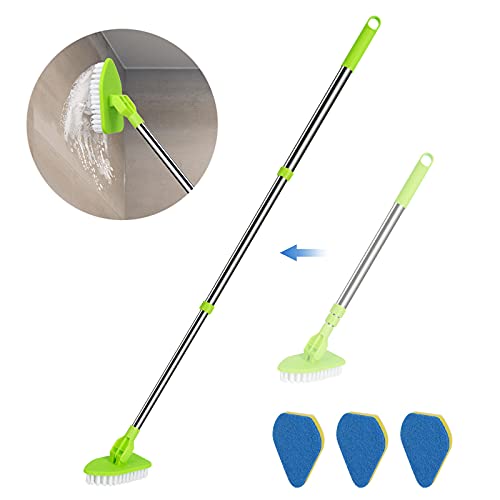
- Telescoping ceiling cleaning pole with brush head
- Microfiber ceiling scrub brush long handle
- Angulated sponge mop head for ceiling cleaning
- Long-handle wall and ceiling scrub brush with extension
- Ceiling cleaning sponge pad set for paint prep


Before You Start
Clear the room of furniture or move it to the center and cover with drop cloths. Protect floors with plastic sheeting. Test a small, inconspicuous area of the ceiling if you are unsure about the paint prep. Wear safety goggles and a dust mask to minimize inhalation of dust particles. Expect a time range of 45–90 minutes depending on ceiling size and dirt level.
Step-By-Step: How To Clean A Ceiling Before Painting
- Remove cobwebs and loose dust with a dry microfiber cloth or the dry head of a ceiling brush.
- Attach the appropriate cleaning tool to the telescoping pole for reach and stability.
- Gently wipe the ceiling in long, overlapping strokes to avoid re-depositing dirt.
- For textured ceilings, use a soft brush to prevent damage while cleaning crevices.
- Spot-treat any grease or soot with a mild solution: warm water and a few drops of dish soap.
- Rinse treated areas with a clean damp cloth to remove soap residue and prevent streaks.
- Allow the ceiling to air-dry completely; use fans to speed up drying if needed.
- Inspect for remaining stains or dust; re-clean as necessary before painting.
- Take care to avoid wetting adjacent walls or fixtures; wipe from edge to center where needed.
- Prepare painting surfaces by filling small cracks or chips with appropriate filler if required.
- Proceed to prime and paint once the ceiling is dry and clean.
Troubleshooting
| Symptom | Likely Cause | Fix | Prevention |
|---|---|---|---|
| Streaks after washing | Soap residue or uneven drying | Wipe with a clean damp cloth, dry thoroughly | Rinse thoroughly, keep surfaces evenly damp |
| Grease spots persist | Oil-based stains | Use a mild degreasing solution or a touch of tri-sodium phosphate (TSP) if safe for the ceiling | Test on small area first; use proper PPE |
| Water marks show through paint | Moisture intrusion or poor drying | Ensure complete drying; address moisture sources before painting | Improve ventilation during drying |
| Ceiling fibers shed during cleaning | Delicate texture or damaged surface | Switch to a softer brush; avoid aggressive scrubbing | Use gentle, dry cleaning first |
| New stains appear after painting | Dust or oils trapped in paint film | Thorough surface cleaning; consider a primer with stain-blocking properties | Clean more aggressively on suspect areas |
Common Mistakes
- Over-wetting textures or popcorn ceilings, which can damage the finish
- Skipping to rinse after soapy cleaning, leaving residue that affects adhesion
- Neglecting to dry the ceiling completely before painting
- Using abrasive tools on delicate textures or paint types
- Failing to protect walls, fixtures, and floors from cleaners and dust
Tips For Best Results
- Use a telescoping ceiling cleaning pole to minimize ladder use and reduce risk of falls.
- Opt for a microfiber ceiling scrub brush long handle to trap dust effectively without scratching surfaces.
- For textured ceilings, work in small sections to ensure even cleaning and drying.
- Choose a ceiling cleaning sponge pad set for paint prep for consistent contact and gentle cleaning.
- Ventilate the room well during cleaning and drying to speed up the process.
Call A Professional
Consider contacting a pro if the ceiling has extensive water damage, mold, or structural issues, or if the texture is brittle and at risk of flaking. Seek immediate help for persistent moisture problems, severe staining, or ceiling panels that sag. A licensed contractor can assess safety and advise on whether repair, replacement, or specialized cleaning is required.
FAQ
How soon should I start painting after cleaning the ceiling?
Wait until the ceiling is completely dry—typically 4–24 hours, depending on temperature and airflow.
Can I paint a ceiling with a brush instead of a roller or pole?
Yes, but using a long-handled tool reduces ladder use and helps reach high areas safely.
What cleaning solutions are best for grease on ceilings?
A mild dish soap solution works for most grease spots; for tougher stains, a mild degreaser or TSP can be effective, following manufacturer directions.
Should I prime a ceiling before painting after cleaning?
Priming is recommended for stained or heavily soiled ceilings or when switching paint types for better adhesion and coverage.
What if I notice mold after cleaning?
Do not paint over mold. Treat with a mold-specific cleaner and address moisture sources before repainting.
Is it safe to use a wet sponge on popcorn ceilings?
Generally not; dampening delicate textures can cause sagging. Use a dry microfiber brush or a very light dampening only if the texture permits.
Can I reuse the same tools for walls after ceiling cleaning?
Yes, but rinse and dry them thoroughly to avoid transferring dirt to walls.
Buying Guide
When choosing tools for ceiling cleaning before painting, consider size, reach, and surface compatibility. A telescoping ceiling cleaning pole with a brush head or a long-handle scrub brush allows safer access to high ceilings and reduces ladder use. Look for microfiber materials that trap dust without scratching. For textured ceilings, angulated sponge mop heads can reach awkward angles while minimizing surface contact that could cause damage. Pair tools with a dedicated ceiling cleaning sponge pad set for consistent prep.
Buying Guide: Key Buying Factors
- Size and reach: Choose adjustable poles that extend to tall ceilings without a ladder.
- Surface compatibility: Soft bristles and microfiber pads prevent damage on delicate surfaces.
- Cleaning performance: Tools with evenly distributed bristles or pads ensure thorough debris removal.
- Durability and grip: Ergonomic handles and sturdy construction improve control and reduce fatigue.
- Maintenance: Look for machine-washable or easily cleanable sleeves and pads.
- Noise and mess: Some tools generate less vibration and dust containment is beneficial for indoor use.
- Compatibility with paints: Primers and paints require clean surfaces; ensure tools do not leave lint or residue.
- Placement considerations: Plan tool storage for quick access and safe drying zones away from paint areas.