Removing paint from floors can be a messy, time-consuming task, but with the right tools and steps, it becomes manageable. This guide outlines a clear, safety-conscious approach to stripping paint from commonly finished floors, whether you’re refinishing hardwood, concrete, or linoleum. The goal is to expose a clean, ready-to-finish surface without gouging or wasteful overscraping.
Quick Answer
Best starting approach: use a combination of mechanical scraping, heat softening, and light sanding. Begin with a floor scraper to lift thick layers, switch to an electric heat gun to soften stubborn paint, and finish with an orbital sander for a smooth base. For delicate edges or tight corners, employ a plastic floor scraper to avoid scratching.
What You’ll Need
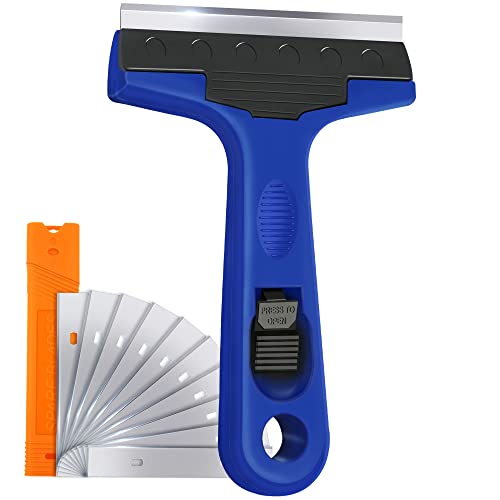
- 5-inch floor scraper with sturdy blade
- paint remover scraper tool with replaceable blades
- electric heat gun for removing floor paint
- orbital sander for removing floor paint
- plastic floor scraper for peeling paint


Before You Start
Assess the floor type and paint composition before starting. Oil-based paints may take longer to soften and remove than water-based coats. Work in a well-ventilated space to minimize fumes, and lay down drop cloths to protect surrounding areas. Wear safety gear including eye protection, gloves, and a respirator if fumes are present. Plan for time: a typical project may take several hours spread across multiple sessions depending on paint thickness and floor size.
Step-By-Step: How To Clean Paint Off Floor
- Clear the room and seal off adjacent areas to prevent dust intrusion.
- Inspect the floor finish and identify paint layers. Use the 5-inch floor scraper with sturdy blade to lift loose paint and create an initial relief trench.
- Switch to the paint remover scraper tool with replaceable blades for deeper grooves and stubborn patches. Replace blades as they dull.
- Use the electric heat gun for removing floor paint on small sections. Hold the gun a few inches from the surface and move steadily to soften paint without scorching.
- Begin light sanding with the orbital sander for removing floor paint, starting with a coarse grit and progessively moving to finer grits for a smooth base.
- Target edges and tight corners with the plastic floor scraper for peeling paint, which minimizes gouging near moldings and transitions.
- Dust and deburr the surface after sanding. Vacuum thoroughly and wipe with a damp cloth to remove residue.
- Inspect the surface. If any areas still show paint remnants, repeat the appropriate steps in small patches until the surface is clean and uniform.
- Apply a compatible finish or primer once the floor is clean and completely dry, following manufacturer guidelines for your floor type.
- Clean tools immediately after use and store properly to extend blade life and performance for future projects.
- Document any uneven spots or damage so repairs can be planned before final finishing.
Troubleshooting
| Symptom | Likely Cause | Fix | Prevention |
|---|---|---|---|
| Paint resistant patches remain | Thick, old coats or hard-to-adhere finishes | Reapply heat gun briefly and re-scrape with blades | Test a small area first; use longer heat exposure if needed |
| Gouges or scratches appear | Aggressive scraping or improper blade angle | Switch to plastic scraper for edges; adjust angle to 15–20 degrees | Maintain gentle, consistent pressure |
| Excess dust after sanding | Inadequate dust collection | Use a vacuum attachment with the sander; wipe down | Seal off room and use damp wipe-downs during progress |
| Paint fumes linger | Insufficient ventilation | Increase airflow with fans or an exhaust, pause work if fumes are strong | Ventilate consistently during the job |
Common Mistakes
- Rushing the heating step and scorching the floor
- Over-reliance on one tool, ignoring the need for edge work
- Using dull blades that smear paint rather than lift it
- Forgetting to protect adjacent surfaces and drafts
- Not cleaning between steps, leading to residue buildup
Awareness of these pitfalls helps maintain the integrity of the floor and reduces rework time. A methodical approach, with tool changes as needed, yields the best results.
Tips For Best Results
- Work in stages: begin with aggressive removal, then finish with a finish-smoothing pass.
- Keep blades sharp and clean for effective cutting and reduced surface damage.
- Ventilate thoroughly; fumes can be hazardous even for short exposures.
- Test changes on a small area before applying them system-wide.
- Choose the right grit for sanding based on the paint type and floor substrate.
Call A Professional
Seek professional help if any of the following occur: significant structural damage, water exposure that warps the floor, or finishes that require chemical strippers beyond consumer-grade tools. Electrical safety concerns or unhealthy levels of dust and fumes also warrant expert assessment. If you’re unsure about substrate compatibility with heat, or if the project involves asbestos-containing materials, contact a licensed contractor.
FAQ
Is heat safe for all floor types?
Heat can be effective on many painted floors, but it may damage soft woods or delicate finishes. Use controlled heat and follow manufacturer guidance for your floor type.
Can I reuse blades after scraping paint?
Blades dull quickly with paint buildup. Inspect for nicks or reduced cutting efficiency and replace as needed for best results.
What grit should I start sanding with?
Start with a coarse grit (around 40–60) for heavy paint and move to finer grits (120–180) for a smooth finish.
How long does this process typically take?
Time varies by room size, paint thickness, and floor type. Plan for several hours across multiple sessions to maintain safety and accuracy.
Can I skip the sanding step and finish directly?
Skipping sanding can leave paint residues and unevenness. Sanding helps ensure a uniform, well-adhered finish.
Do I need ventilation for sanding?
Yes. Sanding generates fine dust and should be performed with proper ventilation or a dust extraction system.
Buying Guide
When selecting tools to remove floor paint, consider factors that influence ease, safety, and outcome. Here are key buying considerations to guide a careful purchase.
- Size and weight: Choose manageable instrument dimensions for your space; lighter tools reduce fatigue for extended sessions.
- Power source: Corded models offer consistent performance; cordless options improve mobility at the expense of runtime.
- Blade quality and replacement availability: Durable blades with easy replacement help maintain efficiency throughout the project.
- Heat gun temperature range: Versatile heat guns with adjustable temps prevent surface damage on delicate floors.
- Dust control: Tools compatible with dust bags or vacuum attachments minimize cleanup and improve air quality.
- Floor type compatibility: Ensure tools work effectively with your floor substrate (wood, concrete, vinyl, etc.).
- Noise level: For multiroom or apartment projects, quieter models reduce disruption.
- Ergonomics: Grips and balance affect comfort during long tasks and can reduce strain injuries.
To compare options, assess how the included tools cover your typical paint removal tasks. For example, a kit featuring a 5-inch floor scraper with sturdy blade, a paint remover scraper tool with replaceable blades, and a plastic floor scraper is well-suited for mixed scenarios. Consider whether a dedicated electric heat gun and an orbital sander will accelerate progress on your floor type. Finally, examine warranty terms and blade availability to ensure long-term value.