Grease stains on kitchen walls can be stubborn, especially in highly used spaces. With the right approach and common cleaning tools, most grease marks can be lifted without damaging paint or finishes. This guide provides practical steps, the best products to reach for, and tips to prevent future buildup.
Whether you’re preparing for guests, tackling a post-cooking spill, or refreshing a powder room, a systematic method makes the job faster and results more durable. The following sections outline a clear process using safe, effective supplies suitable for American homes.
Quick Answer
Start with a gentle microfiber cloth dampened with warm water. If stains persist, apply a dedicated degreaser spray, wipe with a microfiber cloth again, then finish with a damp clean cloth. For stubborn marks, use a stiff nylon scrubbing brush or a long-handle wall scrub brush, followed by a final wipe with a microfiber cloth. Dry the area to prevent streaks.
What You’ll Need
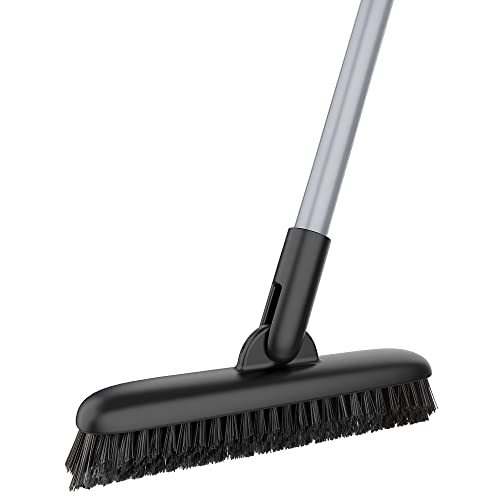
- Long-handle wall scrub brush for grease removal
- Microfiber wall cleaning cloths set for grease
- Grease remover degreaser spray for walls
- Eraser sponge for kitchen wall grease stains
- Stiff nylon scrubbing brush for wall grease removal


Before You Start
Prepare the area by removing nearby items and laying down a drop cloth to catch drips. Test cleaners on a small, inconspicuous area first to ensure no discoloration or damage. Work from top to bottom to prevent re-cleaning already handled surfaces. Allow proper ventilation when using chemical degreasers, and wear gloves if you have sensitive skin. Typical cleanup time ranges from 15 to 45 minutes, depending on stain severity and surface type.
Note: Avoid harsh abrasive pads on delicate wallpaper or freshly painted walls, as they can remove color or gloss. For textured finishes, use lighter strokes to avoid pushing grease deeper into the surface.
Step-By-Step: How To Clean Grease Off Walls
- Begin with a microfiber cloth lightly dampened with warm water. Wipe the wall in gentle, circular motions to lift surface grease without saturating the paint.
- If water alone doesn’t remove the stain, spray a grease remover degreaser spray for walls onto a clean microfiber cloth or directly onto the stain, following the product’s instructions.
- Wipe the area with the treated cloth, again moving from top to bottom. For plastic or enamel surfaces, use light pressure to avoid dulling the finish.
- For stubborn marks, use a stiff nylon scrubbing brush for wall grease removal on a small section, applying only enough pressure to lift the stain. Rinse with a clean damp cloth as you work.
- Switch to a long-handle wall scrub brush for grease removal if the stain is high on the wall or difficult to reach. Work in vertical strokes and keep strokes steady.
- Refresh the surface with another pass of a clean microfiber cloth, removing any remaining residue or cleaner after the stain is lifted.
- Use an eraser sponge for kitchen wall grease stains on particularly stubborn edges or corners, working gently to avoid tearing the paint surface.
- Wipe one final time with a damp cloth to remove cleaner traces. Dry with a soft towel to prevent streaking.
- Inspect the area from a distance and up close. If any shine or mark remains, repeat the appropriate step, starting with a gentle wipe.
- Dispose of used cloths and rinse sponges thoroughly. Store cleaners and tools out of reach of children and pets.
- Re-paint or re-seal if grease has penetrated porous walls or if stains persist after multiple cleanings.
Troubleshooting
| Symptom | Likely Cause | Fix | Prevention |
|---|---|---|---|
| Streaks after cleaning | Residual cleaner or moisture | Wipe with a dry microfiber cloth and re-dampen slightly to remove streaks | Wipe in consistent top-to-bottom strokes |
| Color change or dull spot | Overly abrasive scrubbing | Switch to gentler cloths, avoid harsh pads | Test cleaners on a hidden area first |
| Grease returns after cleaning | Ongoing cooking residue or improper cleaning product | Apply degreaser directly to stain and re-clean; seal surfaces if needed | Clean regularly to prevent buildup |
| Paint peeling when scrubbing | Old paint or damaged surface | Stop scrubbing that area; consider repainting or resealing | Use softer methods and test patches first |
Common Mistakes
- Over-wetting walls, which can cause paint to bubble or run
- Using harsh abrasives on delicate finishes or wallpaper
- Skipping a spot test before applying cleaners
- Neglecting to dry the wall after cleaning, leading to streaks
Tips For Best Results
- Work from the ceiling down to avoid drips on clean areas
- Use microfiber cloths for their lint-free, gentle-cleaning properties
- For high ceilings, a long-handle wall scrub brush reduces ladder time and keeps you safe
- Schedule regular light cleanings to prevent heavy grease buildup
- Choose a degreaser that’s appropriate for your wall finish and paint type
Call A Professional
Stop and contact a professional if you notice peeling paint, extensive staining, or if the wall is made from delicate materials like wallpaper that cannot tolerate cleaning products. Seek help immediately if chemical fumes or unusual reactions occur during cleaning. If you’re unsure about the wall finish or the stain’s depth, a professional can assess and provide safe, long-lasting solutions.
FAQ
Can I use dish soap to clean grease on walls?
Yes, a mild dish soap mixed with warm water can remove light grease, but may require repeated passes for stubborn stains.
Is a degreaser spray safe on painted walls?
Look for products labeled safe for walls or painted surfaces and follow the label directions to avoid damage.
How do I treat grease near outlets or switches?
Turn off power and use a damp cloth to avoid water entering electrical components.
How often should I clean kitchen walls?
Light cleaning every few weeks helps prevent heavy buildup; deep cleaning may be needed monthly in busy kitchens.
Buying Guide
Choosing the right tools for cleaning grease off walls depends on surface type, access, and stain severity. Consider the following factors to optimize results and ease of use:
- Size and reach: A long-handle wall scrub brush helps access high areas without ladders, while a compact eraser sponge handles corners.
- Cleaning power: A dedicated grease remover degreaser spray often performs better on stubborn stains than water alone, especially on enamel and gloss finishes.
- Material compatibility: Microfiber cloths are versatile and safe for most walls; avoid abrasive pads on delicate surfaces.
- Noise and ease of use: Manual brushes are quiet and straightforward; consider ergonomics if cleaning large areas.
- Durability and maintenance: Reusable cloths and brushes save money over time; rinse and air-dry after use to prevent odor.
- Placement and storage: Store cleaning products in a cool, ventilated area away from children; keep brushes upright to dry thoroughly.
For diverse needs, a kit including a long-handle wall brush, microfiber cloths, a stiff nylon brush, and a reliable degreaser spray provides coverage for most American kitchens and bathrooms. If stains are persistent or surfaces are unusual, compare product labels for material compatibility and warranty considerations.